Chapterبەش 3 · Lectureوانە 3.4
Arduino Boards and the Arduino IDEبۆردەکانی Arduino و Arduino IDE
Meet the Arduino family — the UNO, Nano, Mega and the LoRa board MKR WAN 1310 — and today's UNO R4 and UNO Q. Learn why some boards work at 5 V and others at 3.3 V, then set up the Arduino IDE 2: choose the board and the port, verify, upload and watch your first sketch blink an LED and talk through the Serial Monitor. No board yet? Use a free simulator.
خێزانی بناسە — UNO، Nano، Mega و بۆردی LoRa واتە MKR WAN 1310 — لەگەڵ UNO R4 و UNO Qـی ئەمڕۆ. فێر ببە بۆچی هەندێک بۆرد بە 5 V و هەندێکی تر بە 3.3 V کار دەکەن، پاشان Arduino IDE 2 ئامادە بکە: بۆرد و پۆرت هەڵبژێرە، بیپشکنە، بینێرە و سەیر بکە یەکەم چۆن هەڵدەکات و دەیکوژێنێتەوە و لە ڕێی قسە دەکات. هێشتا بۆردت نییە؟ بێبەرانبەر بەکار بهێنە.
What you will learnچی فێر دەبیت
- Name the main parts of an Arduino UNO and say what each group of pins does.
- Compare the UNO, Nano, Mega and MKR WAN 1310 with today's UNO R4 and UNO Q, and choose a board for a job.
- Explain the difference between 5 V and 3.3 V boards and keep pins within their limits.
- Use the Arduino IDE 2: choose the board and the port, verify, upload and open the Serial Monitor.
- Explain setup() and loop() and run a first sketch on a board or in a simulator.
- بەشە سەرەکییەکانی Arduino UNO ناو ببە و بڵێ هەر کۆمەڵە پینێک چی دەکات.
- UNO، Nano، Mega و MKR WAN 1310 لەگەڵ UNO R4 و UNO Qـی ئەمڕۆ بەراورد بکە و بۆ کارێک بۆردێک هەڵبژێرە.
- جیاوازیی نێوان بۆردەکانی 5 V و 3.3 V ڕوون بکەرەوە و پینەکان لە سنووری خۆیاندا بهێڵەرەوە.
- Arduino IDE 2 بەکار بهێنە: بۆرد و پۆرت هەڵبژێرە، بیپشکنە، بینێرە و بکەرەوە.
- setup() و loop() ڕوون بکەرەوە و یەکەم لەسەر بۆردێک یان لە جێبەجێ بکە.
Arduino: a microcontroller you can plug inArduino: مایکرۆکۆنترۆڵەرێک کە دەتوانیت بیبەستیت
A microcontroller chip on its own is hard to use. It needs power at the right voltage, a clock, a way to receive its program and wires to its tiny legs. An Arduino board puts all of this on one small board: you plug in a USB cable, write a program on your computer and send it to the board in a few seconds.
بە تەنیا بەکارهێنانی ئاسان نییە. پێویستی بە کارەبا بە دروست، کاتژمێرێک، ڕێگایەک بۆ وەرگرتنی و وایەر بۆ قاچە بچووکەکانی هەیە. بۆردێکی هەموو ئەمانە لەسەر یەک بۆردی بچووک کۆ دەکاتەوە: کێبڵێکی دەبەستیت، لەسەر دەنووسیت و لە چەند چرکەیەکدا دەینێریت بۆ بۆردەکە.
Arduino is an open-source platform for learning and building projects. It has three parts: a family of boards, the free Arduino IDE for writing and uploading programs, and a simple C++ library for pins, timing and Serial messages. A program for an Arduino board is called a sketch. Why chips like these exist is explained in Microprocessor or Microcontroller?.
پلاتفۆرمێکی بۆ فێربوون و دروستکردنی پڕۆژە. سێ بەشی هەیە: خێزانێک لە بۆرد؛ Arduino IDE کە بێبەرانبەرە بۆ نووسین و ناردنی ؛ و سادەی C++ بۆ پین، کات و پەیامی Serial. کە بۆ بۆردی دەنووسرێت پێی دەگوترێت . بۆچی ئەم جۆرە هەن، لە مایکرۆپرۆسێسەر یان مایکرۆکۆنترۆڵەر؟ ڕوون کراوەتەوە.
A tour of the UNOگەشتێک بە ناو UNOـدا
The Arduino UNO is the classic board, and the first labs of this course use its layout. From the left: the USB socket brings power and carries your sketch and Serial messages; the power jack takes 7–12 V from an adapter when no computer is connected. Along the top edge are the digital pins 0–13: each one is either HIGH or LOW. Pins 0 and 1 also carry the board's serial link (the ), so the labs start from pin 2.
Arduino UNO بۆردە ناسراوەکەیە و یەکەم تاقیگەکانی ئەم کۆرسە شێوەی ئەو بەکار دەهێنن. لە چەپەوە: کارەبا دەهێنێت و و پەیامەکانی Serial دەگوازێتەوە؛ کارەبا کاتێک نەبەسترابێت 7–12 V لە ئەداپتەرێکەوە وەردەگرێت. بە درێژایی لێواری سەرەوە 0–13 هەن: هەریەکەیان یان HIGHـە یان LOW. پینەکانی 0 و 1 هێڵی زنجیرەیی بۆردەکەش () هەڵدەگرن، بۆیە تاقیگەکان لە پینی 2ـەوە دەست پێ دەکەن.
Along the bottom edge are the power pins (3.3V, 5V, GND, VIN) and the analog inputs A0–A5, which measure a voltage instead of just HIGH or LOW (Reading Analog Signals). The small L LED is wired to pin 13, so a sketch can blink it with nothing else connected; the ON LED shows that the board has power, and the TX and RX LEDs flicker while Serial data goes over USB.
بە درێژایی لێواری خوارەوە پینەکانی کارەبا (3.3V، 5V، GND، VIN) و A0–A5 هەن، کە دەپێون نەک تەنیا HIGH یان LOW (خوێندنەوەی سیگناڵەکانی ئەنالۆگ). بچووکی L بە پینی 13ـەوە بەستراوە، بۆیە دەتوانێت بێ هیچ پارچەیەکی تر هەڵی بکات و بیکوژێنێتەوە؛ ON پیشان دەدات کە بۆردەکە کارەبای هەیە و TX و RX لە کاتی ناردنی Serial بە دەترووکێن.
Four boards from one familyچوار بۆرد لە یەک خێزان
Arduino boards differ in size, in the number of pins and in memory, but you program all of them in the same way. These four appear in this course; the numbers come from Arduino's technical specifications.
بۆردەکانی لە قەبارە، ژمارەی پین و جیاوازن، بەڵام بۆ هەموویان بە هەمان شێوە دەنووسیت. ئەم چوارە لەم کۆرسەدا دێن؛ ژمارەکان لە تایبەتمەندییە تەکنیکییەکانی وەرگیراون.
| Boardبۆرد | Microcontroller | Clock | Digital I/O pins | Analog inputs | Memory | Pins work at |
|---|---|---|---|---|---|---|
| UNO R3 | ATmega328P (8-bit)ATmega328P (8 ) | 16 MHz | 14 (6 PWM) | 6 | 32 KB flash, 2 KB SRAM, 1 KB EEPROM32 KB ، 2 KB SRAM، 1 KB EEPROM | 5 V |
| Nano | ATmega328P (8-bit)ATmega328P (8 ) | 16 MHz | 14 (6 PWM) | 8 | 32 KB flash, 2 KB SRAM, 1 KB EEPROM32 KB ، 2 KB SRAM، 1 KB EEPROM | 5 V |
| Mega 2560 | ATmega2560 (8-bit)ATmega2560 (8 ) | 16 MHz | 54 (15 PWM) | 16 | 256 KB flash, 8 KB SRAM, 4 KB EEPROM256 KB ، 8 KB SRAM، 4 KB EEPROM | 5 V |
| MKR WAN 1310 | SAMD21, Arm Cortex-M0+ (32-bit)SAMD21، Arm Cortex-M0+ (32 ) | 48 MHz | 8 | 7 (ADC 8, 10 or 12-bit), plus 1 DAC (10-bit)7 (ADC 8، 10 یان 12 )، لەگەڵ 1 DAC (10 ) | 256 KB flash, 32 KB SRAM256 KB ، 32 KB SRAM | 3.3 V |
The Nano is an UNO squeezed onto a strip that plugs into a breadboard, with two extra analog inputs. The Mega 2560 is an UNO with many more pins for big projects. The MKR WAN 1310 is a small, low-power 32-bit board with a radio. How these chips compare with the ESP32 and the Raspberry Pi Pico 2 is in Microcontrollers you will meet.
Nano وەک UNOـێکە کە لەسەر پارچەیەکی باریک پەستێنراوە و دەچێتە سەر ، لەگەڵ دوو زیادە. Mega 2560 وەک UNOـێکە بە پینی زۆر زیاترەوە بۆ پڕۆژەی گەورە. MKR WAN 1310 بۆردێکی بچووکی 32 کەموزەیە بە ڕادیۆیەکەوە. بەراوردی ئەم لەگەڵ ESP32 و Raspberry Pi Pico 2 لە ئەو مایکرۆکۆنترۆڵەرانەی دەیانبینیتدایە.
Four boards from one familyچوار بۆرد لە یەک خێزان
The MKR WAN 1310: a board with a LoRa radioMKR WAN 1310: بۆردێک بە ڕادیۆی LoRaـەوە
Many IoT labs, including the LoRa lessons of this course, use the Arduino MKR WAN 1310. It is long and narrow and built for battery-powered devices. Its SAMD21 microcontroller is a 32-bit Arm Cortex-M0+ at 48 MHz. Next to it sits a LoRa radio module (Murata) that sends small messages kilometres away on 433, 868 or 915 MHz, depending on the region. It has a socket for a 3.7 V Li-Po battery and a crypto chip that keeps secret keys. LoRa itself is taught in LoRa: Long Range on Little Power.
زۆر تاقیگەی IoT، لەوانە وانەکانی LoRaـی ئەم کۆرسە، Arduino MKR WAN 1310 بەکار دەهێنن. درێژ و باریکە و بۆ ئامێرێک دروست کراوە کە بە کار دەکات. SAMD21ـەکەی Arm Cortex-M0+ـێکی 32 بە 48 MHz. لە تەنیشتییەوە مۆدیولێکی ڕادیۆی (Murata) هەیە کە پەیامی بچووک بۆ چەندین کیلۆمەتر دەنێرێت لەسەر 433، 868 یان 915 MHz، بەپێی ناوچەکە. بۆ Li-Poـی 3.7 V هەیە و کریپتۆ کە نهێنییەکان دەپارێزێت. خودی LoRa لە LoRa: پەیوەندیی دوور بە وزەی کەم فێر دەکرێت.
Its built-in LED is on pin 6, not 13. That is why sketches write LED_BUILTIN instead of a number: the board package sets the name to the right pin for each board.
ناوخۆییەکەی لەسەر پینی 6ـە، نەک 13. لەبەر ئەوەیە کە لەبری ژمارە LED_BUILTIN دەنووسن: بۆردەکە ئەم ناوە بۆ هەر بۆردێک دەخاتە سەر پینە دروستەکەی.
The UNO today: UNO R4 Minima and UNO R4 WiFiUNO ئەمڕۆ: UNO R4 Minima و UNO R4 WiFi
In June 2023 Arduino released the UNO R4, the first UNO with a 32-bit microcontroller: a Renesas RA4M1 (Arm Cortex-M4 at 48 MHz) with 256 KB of flash, 32 KB of SRAM and 8 KB of EEPROM, an ADC of up to 14 bits, a 12-bit DAC and a USB-C socket. It keeps the UNO's shape and its 5 V pins, so add-on boards made for the R3 (shields) still fit, and most R3 sketches run unchanged.
لە حوزەیرانی 2023دا UNO R4ـی بڵاو کردەوە، یەکەم UNO بە 32 : Renesas RA4M1 (Arm Cortex-M4 بە 48 MHz) لەگەڵ 256 KB ، 32 KB SRAM و 8 KB EEPROM، ADCـێک تا 14 ، DACـێکی 12 و USB-C. شێوەی UNO و پینەکانی 5 Vـی هێشتووەتەوە، بۆیە ئەو بۆردە زیادانەی بۆ R3 دروست کراون (shields) هێشتا جێیان دەبێتەوە و زۆربەی R3 بێ گۆڕین کار دەکەن.
It comes in two versions. The UNO R4 Minima is the plain board. The UNO R4 WiFi adds an ESP32-S3 module for Wi-Fi and Bluetooth LE, a 12 × 8 red LED matrix and a Qwiic connector for sensors. One difference matters in the labs: each R4 pin may give only 8 mA, against 20 mA on the R3, so choose the LED resistor with care (Choosing the LED's resistor).
دوو جۆری هەیە. UNO R4 Minima بۆردە سادەکەیە. UNO R4 WiFi مۆدیولێکی ESP32-S3 بۆ و ، ڕیزبەندییەکی 12 × 8ـی سوور و Qwiic بۆ زیاد دەکات. جیاوازییەک لە تاقیگەکاندا گرنگە: هەر پینێکی R4 تەنیا دەتوانێت 8 mA بدات، بەرامبەر 20 mA لە R3، بۆیە بە وریاییەوە هەڵبژێرە (هەڵبژاردنی بەرگرەکەی LED).
The UNO today: UNO R4 Minima and UNO R4 WiFiUNO ئەمڕۆ: UNO R4 Minima و UNO R4 WiFi
UNO Q: a Linux computer and a microcontroller on one boardUNO Q: کۆمپیوتەرێکی Linux و مایکرۆکۆنترۆڵەرێک لەسەر یەک بۆرد
In October 2025 a new kind of UNO appeared: the UNO Q. It has the UNO's size and pin headers but carries two computers. A Qualcomm Dragonwing QRB2210 processor (four Arm Cortex-A53 cores at 2.0 GHz, with 2 or 4 GB of RAM) runs Debian Linux, like a small single-board computer. Beside it, an STM32U585 microcontroller (Arm Cortex-M33 at 160 MHz) runs your sketch and drives the pins at 3.3 V. It is programmed with Arduino App Lab, which joins Python programs on Linux with a sketch on the microcontroller.
لە تشرینی یەکەمی 2025دا جۆرێکی نوێی UNO دەرکەوت: UNO Q. قەبارە و ڕیزە پینەکانی UNOـی هەیە، بەڵام دوو هەڵدەگرێت. پرۆسێسەرێکی Qualcomm Dragonwing QRB2210 (چوار Arm Cortex-A53 بە 2.0 GHz، لەگەڵ 2 یان 4 GB RAM) Debian Linux جێبەجێ دەکات، وەک بچووک. لە تەنیشتییەوە STM32U585 (Arm Cortex-M33 بە 160 MHz) جێبەجێ دەکات و پینەکان بە 3.3 V دەجووڵێنێت. بە Arduino App Lab دەنووسرێن، کە Python لەسەر Linux لەگەڵ لەسەر پێکەوە دەبەستێت.
For the first labs a plain UNO is simpler. The UNO Q is for projects that also need a camera, AI or a web page on the board. Why a Linux computer and a microcontroller are different machines is explained in Raspberry Pi 5: a computer, not a microcontroller.
بۆ یەکەم تاقیگەکان UNOـی سادە ئاسانترە. UNO Q بۆ ئەو پڕۆژانەیە کە کامێرا، یان پەڕەیەکی وێبیان لەسەر بۆردەکە پێویستە. بۆچی Linux و دوو ئامێری جیاوازن، لە Raspberry Pi 5: کۆمپیوتەرە، نەک مایکرۆکۆنترۆڵەر ڕوون کراوەتەوە.
Boards for IoT: Wi-Fi and LoRa on the boardبۆرد بۆ IoT: وایفای و LoRa لەسەر بۆردەکە
An IoT device must send its data somewhere, so boards with a radio are popular. The UNO R4 WiFi keeps the familiar UNO and adds Wi-Fi. The Nano ESP32 (2023) puts an ESP32-S3 with Wi-Fi 4 and Bluetooth 5 (LE) on a Nano-sized board with 3.3 V pins. The MKR WAN 1310 uses LoRa instead of Wi-Fi when a device is far from any router and must run on a battery.
ئامێرێکی IoT دەبێت بۆ شوێنێک بنێرێت، بۆیە بۆردی خاوەن ڕادیۆ بەناوبانگن. UNO R4 WiFi هەمان UNOـی ناسراو دەهێڵێتەوە و زیاد دەکات. Nano ESP32 (2023) ESP32-S3ـێک بە 4 و Bluetooth 5 (LE) لەسەر بۆردێکی قەبارە Nano بە پینی 3.3 V دادەنێت. MKR WAN 1310 لەبری ، LoRa بەکار دەهێنێت کاتێک ئامێرەکە لە هەر ڕاوتەرێک دوورە و دەبێت بە کار بکات.
This course uses an UNO for the first labs, a Wi-Fi board for the cloud lessons and the final project, and the MKR WAN 1310 for LoRa. The picture helps you choose.
ئەم کۆرسە بۆ یەکەم تاقیگەکان UNO، بۆ وانەکانی هەور و پڕۆژەی کۆتایی بۆردێکی خاوەن و بۆ LoRa بۆردی MKR WAN 1310 بەکار دەهێنێت. وێنەکە یارمەتیت دەدات هەڵبژێریت.
5 V boards and 3.3 V boardsبۆردەکانی 5 V و بۆردەکانی 3.3 V
On an UNO, a HIGH pin is at about 5 V. On the MKR WAN 1310, the Nano ESP32 and most newer IoT chips, HIGH is about 3.3 V: smaller, newer chips use less power at a lower voltage. Both are logic levels, bands of voltage that mean 1 or 0 (Logic levels: HIGH and LOW).
لە UNOـدا پینێکی HIGH نزیکەی 5 Vـە. لە MKR WAN 1310، Nano ESP32 و زۆربەی نوێی IoTـدا HIGH نزیکەی 3.3 Vـە: بچووکتر و نوێترەکان بە نزمتر وزەی کەمتر بەکار دەبەن. هەردووکیان ، واتە کۆمەڵێک کە مانای 1 یان 0 دەدەن (ئاستە لۆجیکییەکان: HIGH و LOW).
The Arduino IDE 2ئامرازی Arduino IDE 2
The Arduino IDE is where you write, check and upload sketches. It is free and open source, for Windows, macOS and Linux; as of November 2026 the latest version is 2.3.10, released in June 2026. At the top left, Verify (✓) compiles your sketch and Upload (→) compiles it and sends it to the board; next to them a menu chooses the board and port. At the top right are the Serial Plotter and the Serial Monitor.
Arduino IDE ئەو شوێنەیە کە تێیدا دەنووسیت، دەپشکنیت و دەینێریت. بێبەرانبەر و و بۆ Windows، macOS و Linux هەیە؛ تا تشرینی دووەمی 2026 دوایین 2.3.10ـە، کە لە حوزەیرانی 2026دا بڵاو کرایەوە. لە سەرەوەی لای چەپ، Verify (✓) کۆمپایل دەکات و Upload (نیشانەی تیر) کۆمپایلی دەکات و دەینێرێت بۆ بۆردەکە؛ لە تەنیشتیانەوە بۆرد و پۆرت هەڵدەبژێرێت. لە سەرەوەی لای ڕاست Serial Plotter و هەن.
On the left, the Sketchbook holds your sketches, the Boards Manager installs support for a family of boards and the Library Manager installs extra code, for example for a display. Messages from the compiler and the uploader appear in the Output panel at the bottom.
لە لای چەپ، Sketchbook هەڵدەگرێت، Boards Manager پشتگیریی خێزانێک لە بۆرد دادەمەزرێنێت و Library Manager کۆدی زیادە دادەمەزرێنێت، بۆ نموونە بۆ شاشەیەک. پەیامەکانی و ناردن لە بەشی Outputـی خوارەوەدا دەردەکەون.
The Arduino IDE 2ئامرازی Arduino IDE 2
Choose the board and the portبۆرد و پۆرت هەڵبژێرە
Before the first upload, tell the IDE two things: which board (the compiler builds code for that chip and its pin names) and which port (the name the computer gives the USB connection, a ).
پێش یەکەم ناردن، دوو شت بە IDEـەکە بڵێ: کام بۆرد ( کۆد بۆ ئەو و ناوی پینەکانی دروست دەکات) و کام پۆرت (ئەو ناوەی لە پەیوەندیی دەنێت، ).
- Connectبیبەستە
Plug the board in with a USB cable that carries data, not one that only charges.
بۆردەکە بە کێبڵێکی ببەستە کە دەگوازێتەوە، نەک کێبڵێک کە تەنیا شەحن دەکات.
- Boardبۆرد
Choose Tools → Board (or the menu next to Upload). Missing? Install its package in the Boards Manager: Arduino AVR Boards for the UNO R3, Nano and Mega; Arduino UNO R4 Boards for the R4; Arduino SAMD Boards for the MKR family.
Tools → Board هەڵبژێرە (یان ئەو لە تەنیشت Upload). نییە؟ لە Boards Manager دابمەزرێنە: Arduino AVR Boards بۆ UNO R3، Nano و Mega؛ Arduino UNO R4 Boards بۆ R4؛ Arduino SAMD Boards بۆ خێزانی MKR.
- Portپۆرت
Choose Tools → Port: COM5 on Windows, /dev/cu.usbmodem… on macOS, /dev/ttyACM0 on Linux.
Tools → Port هەڵبژێرە: COM5 لە Windows، /dev/cu.usbmodem… لە macOS، /dev/ttyACM0 لە Linux.
- Verify, then UploadVerify، پاشان Upload
The same Tools menu opens the Serial Monitor (Ctrl+Shift+M).
هەر لە Toolsـەوە دەکرێتەوە (Ctrl+Shift+M).
setup() and loop()setup() و loop()
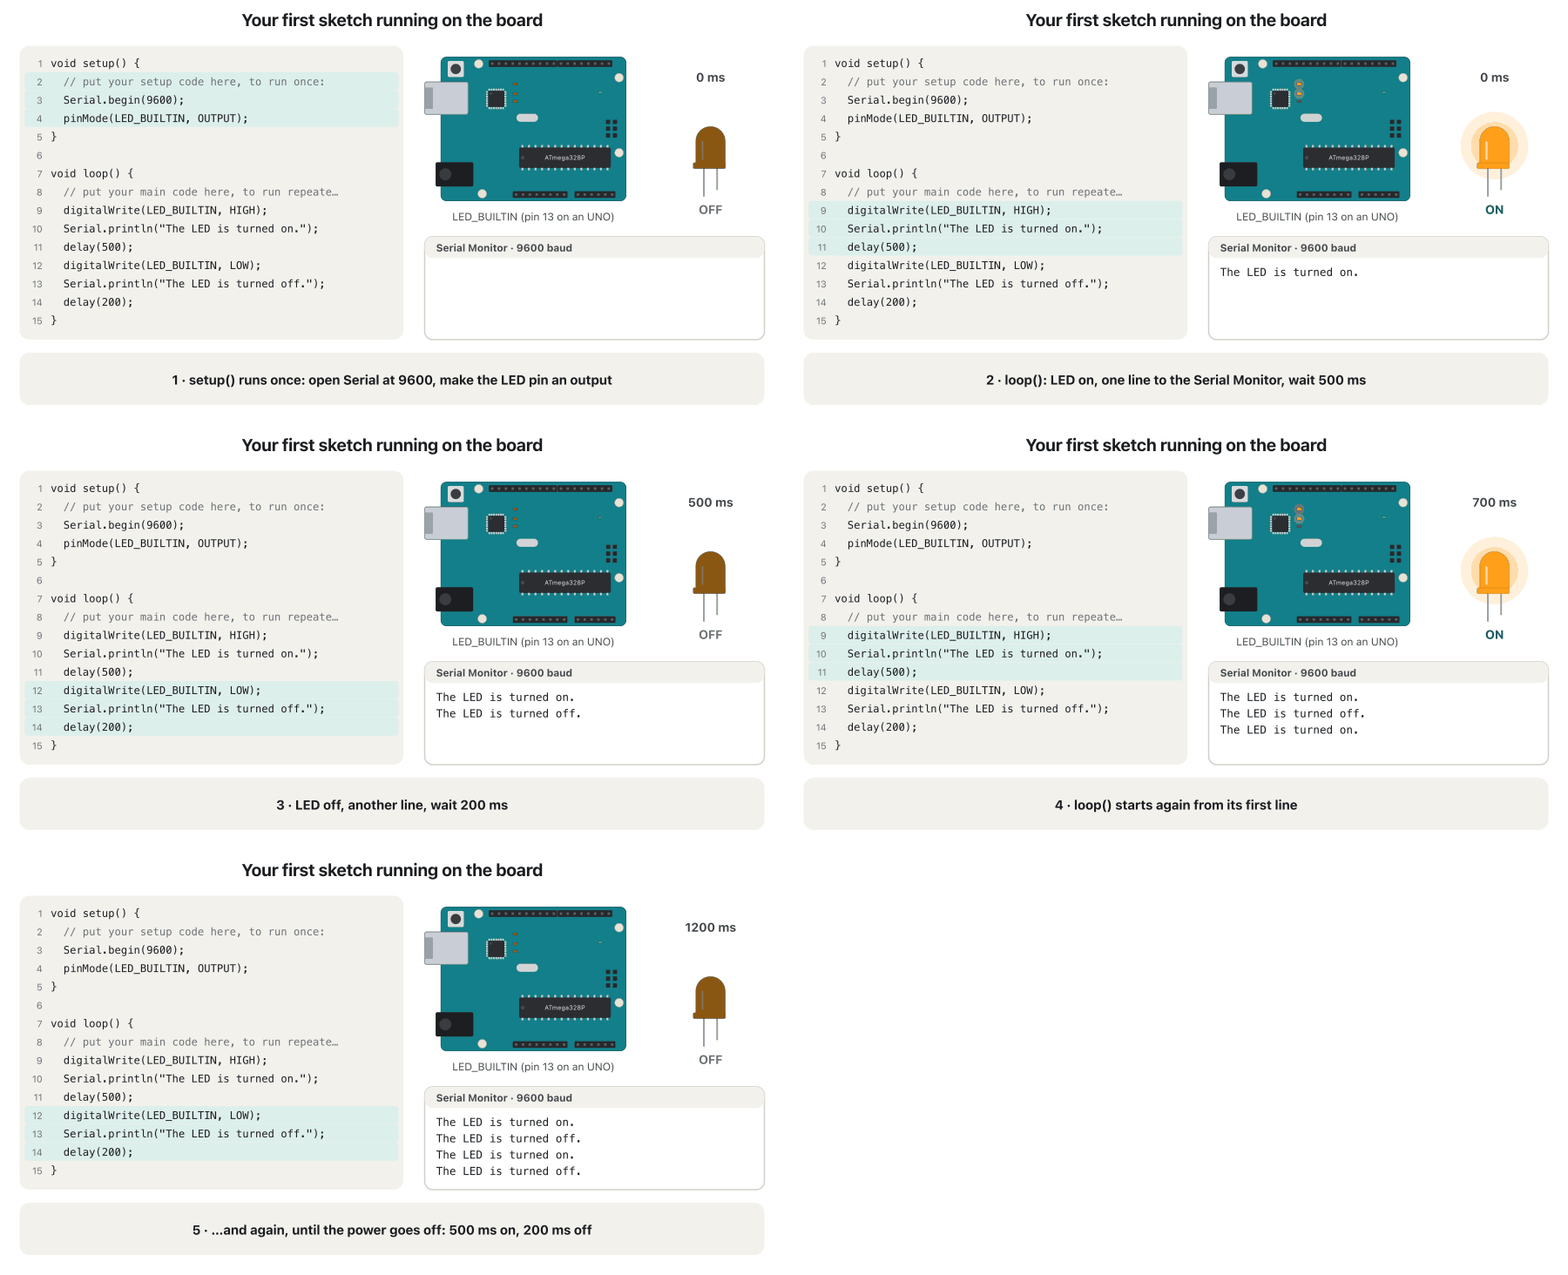
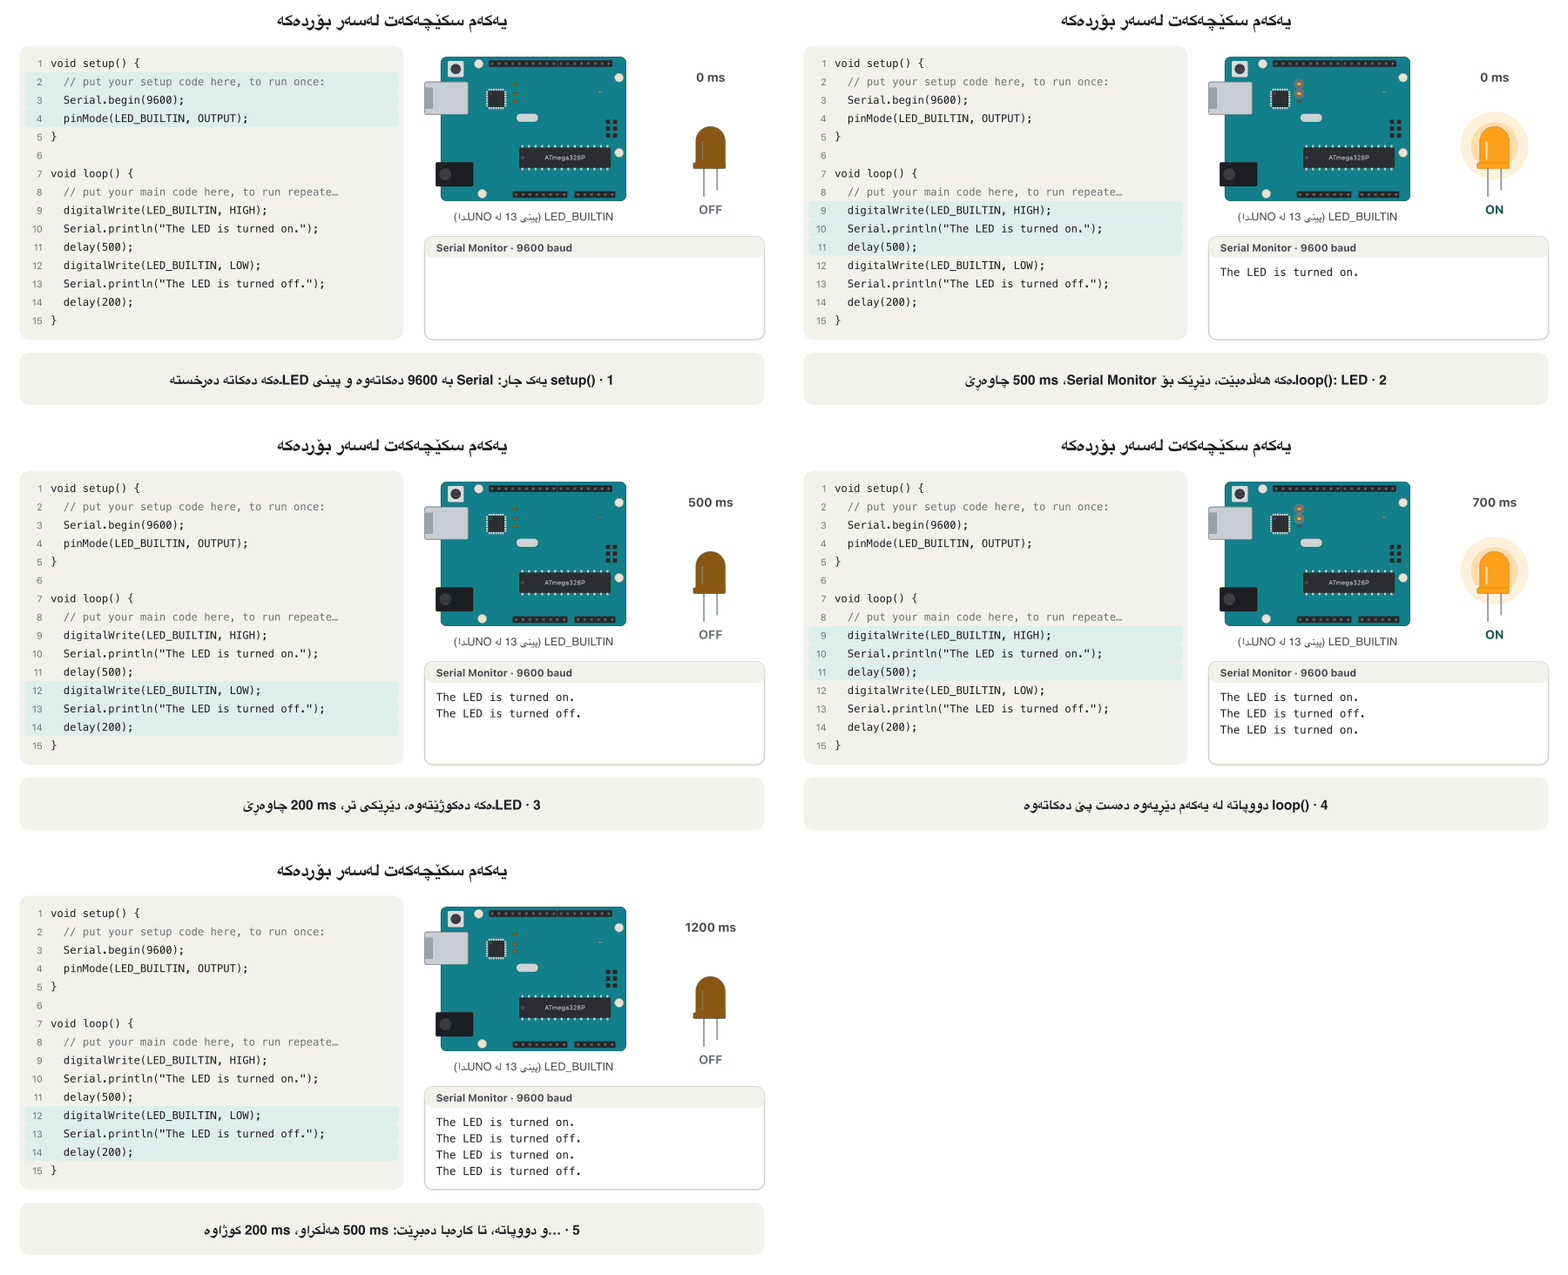
A sketch is saved as an .ino file inside a folder with the same name. Every new sketch starts from the template in the picture, with two functions. setup() runs once, when the board is powered on or reset: there you start Serial and set the pins' modes. loop() runs again and again: when its last line is done, it starts from its first line. There is no end — a board runs one program until the power goes off.
وەک فایلێکی .ino لە ناو بوخچەیەک بە هەمان ناو هەڵدەگیرێت. هەموو نوێ لەو شێوەیەوە دەست پێ دەکات کە لە وێنەکەدایە، بە دوو . setup() یەک جار جێبەجێ دەبێت، کاتێک بۆردەکە هەڵدەکرێت یان Reset دەکرێت: لەوێ Serial دەست پێ دەکەیت و جۆری کاری پینەکان دیاری دەکەیت. loop() دووپاتە و دووپاتە جێبەجێ دەبێت: کاتێک دوایین دێڕی تەواو بوو، لە یەکەم دێڕیەوە دەست پێ دەکاتەوە. کۆتایی نییە — بۆرد یەک جێبەجێ دەکات تا کارەبا دەبڕێت.
This is the usual shape of firmware (No operating system: a main loop). A sketch is C++: before compiling, the IDE adds #include <Arduino.h> and the function declarations for you.
ئەمە شێوەی ئاسایی (بێ سیستەمی وەگەڕخەر: خولی سەرەکی). C++ـە: پێش کۆمپایلکردن، IDEـەکە #include <Arduino.h> و ناساندنی بۆت زیاد دەکات.
Verify and uploadVerify و Upload
When you press Upload, five things happen. The IDE turns the sketch into a full C++ program and compiles it into machine code for the chosen board. If there is a mistake, the Output panel shows the line and the error, and nothing is sent. Otherwise the code goes through the USB cable to the board's bootloader, a small program that waits for new code after a reset and writes it into flash memory. Then the board restarts and runs setup() and loop().
کاتێک Upload دادەگریت، پێنج شت ڕوو دەدەن. IDEـەکە دەکات بە تەواوی C++ و بۆ بۆردە هەڵبژێردراوەکە کۆمپایلی دەکات بۆ . ئەگەر هەڵەیەک هەبێت، بەشی Output دێڕەکە و هەڵەکە پیشان دەدات و هیچ نانێردرێت. ئەگینا کۆدەکە بە کێبڵی دەچێت بۆ ـی بۆردەکە، بچووک کە دوای Reset چاوەڕێی کۆدی نوێ دەکات و دەینووسێتە ناو . پاشان بۆردەکە دەست پێ دەکاتەوە و setup() و loop() جێبەجێ دەکات.
The sketch stays in flash: unplug the board, power it from an adapter or a battery, and it runs by itself. If a sketch ever makes an UNO R4 or an MKR board unreachable, double-tap its reset button: the bootloader then waits for a new upload.
لە فلاشدا دەمێنێتەوە: بۆردەکە دەربهێنە، بە ئەداپتەر یان کارەبای پێ بدە و خۆی کار دەکات. ئەگەر UNO R4 یان بۆردێکی MKR بگەیەنێتە ئەوەی نەگەیشترێت، دوو جار بە خێرایی دوگمەی Resetـەکەی دابگرە: ئینجا چاوەڕێی ناردنێکی نوێ دەکات.
Your first sketch: the LED and messagesیەکەم سکێچەکەت: LEDـەکە و پەیامەکان
This first sketch uses both the LED and the Serial Monitor. It switches the built-in LED on for 500 ms and off for 200 ms, and sends a line of text each time. Upload it, open the Serial Monitor (Ctrl+Shift+M) and set it to 9600 baud, the speed given in Serial.begin(9600).
ئەم یەکەم هەم و هەم بەکار دەهێنێت. ناوخۆییەکە 500 ms هەڵدەکات و 200 ms دەیکوژێنێتەوە و هەر جارێک دێڕێک دەق دەنێرێت. بینێرە بۆ بۆردەکە، بکەرەوە (Ctrl+Shift+M) و لەسەر 9600 baud دایبنێ، ئەو خێراییەی لە Serial.begin(9600)ـدا دیاری کراوە.
void setup() {
  // put your setup code here, to run once:
  Serial.begin(9600);
  pinMode(LED_BUILTIN, OUTPUT);
}

void loop() {
  // put your main code here, to run repeatedly:
  digitalWrite(LED_BUILTIN, HIGH);
  Serial.println("The LED is turned on.");
  delay(500);
  digitalWrite(LED_BUILTIN, LOW);
  Serial.println("The LED is turned off.");
  delay(200);
}The LED is turned on. The LED is turned off. The LED is turned on. The LED is turned off. The LED is turned on. The LED is turned off.
Run with the CêIT Arduino checker. The LED (pin 13 on an UNO, pin 6 on an MKR WAN 1310) is on at 0, 700 and 1400 ms and off at 500, 1200 and 1900 ms.
بە پشکنەری Arduinoـی CêIT جێبەجێ کراوە. (پینی 13 لە UNO، پینی 6 لە MKR WAN 1310) لە 0، 700 و 1400 ms هەڵدەبێت و لە 500، 1200 و 1900 ms دەکوژێتەوە.
Explain the codeڕوونکردنەوەی کۆدەکە
- Lineدێڕی 3-4
setup(): open Serial at 9600 baud and make the LED's pin an output.
setup(): Serial بە 9600 baud دەکاتەوە و پینی دەکاتە .
- Lineدێڕی 9-11
LED on, a message, then wait 500 ms.
هەڵدەبێت، پەیامێک، پاشان 500 ms چاوەڕێ.
- Lineدێڕی 12-14
LED off, a message, wait 200 ms; then loop() starts again.
دەکوژێتەوە، پەیامێک، 200 ms چاوەڕێ؛ پاشان loop() دووپاتە دەست پێ دەکاتەوە.
LED_BUILTIN is set by the board package to the right pin. Serial.println() sends text and ends the line; the Serial Monitor and its menus are the subject of Lab: Talking to the Board with the Serial Monitor.
LED_BUILTIN لەلایەن بۆردەکەوە دەخرێتە سەر پینە دروستەکە. Serial.println() دەق دەنێرێت و دێڕەکە کۆتایی پێ دەهێنێت؛ و بابەتی تاقیگە: قسەکردن لەگەڵ بۆرد بە Serial Monitorن.
No board? Simulate itبۆردت نییە؟ هاوشێوەی بکە
You can start before you own a board. The Arduino Cloud Editor is the IDE in a web browser: with a free Arduino account and the small Cloud Agent program, it uploads to a real board over USB (the free plan allows 25 compilations a day, as of November 2026). A simulator needs no board at all. Wokwi runs UNO, Nano, Mega, ESP32 and Raspberry Pi Pico projects in the browser and is free for public projects. Tinkercad Circuits lets you build a circuit with an Arduino Uno R3, a breadboard, LEDs and resistors, then program it with blocks or with text and watch its Serial Monitor; it is free with an Autodesk account.
دەتوانیت پێش ئەوەی بۆردت هەبێت دەست پێ بکەیت. Arduino Cloud Editor هەمان IDEـە لە : بە بێبەرانبەری و بچووکی Cloud Agent، بە دەنێرێت بۆ بۆردێکی ڕاستەقینە (پلانی بێبەرانبەر ڕۆژانە 25 کۆمپایل ڕێگە پێ دەدات، تا تشرینی دووەمی 2026). هیچ بۆردێکی پێویست نییە. Wokwi پڕۆژەی UNO، Nano، Mega، ESP32 و Raspberry Pi Pico لە جێبەجێ دەکات و بۆ پڕۆژەی گشتی بێبەرانبەرە. Tinkercad Circuits ڕێگەت پێ دەدات بە Arduino Uno R3، ، و دروست بکەیت، پاشان بە بلۆک یان بە دەق بۆ بنووسیت و سەیری بکەیت؛ بە Autodesk بێبەرانبەرە.
Common mistakesهەڵە باوەکان
| Mistakeهەڵە | Betterباشتر |
|---|---|
| No port appears in Tools → Port.هیچ پۆرتێک لە Tools → Port دەرناکەوێت. | Use a data USB cable, not a charge-only one; try another USB socket.کێبڵێکی بەکار بهێنە کە دەگوازێتەوە، نەک کێبڵی تەنیا شەحن؛ تری تاقی بکەرەوە. |
| The upload fails with the wrong board selected.ناردن سەرناکەوێت چونکە بۆردی هەڵە هەڵبژێردراوە. | Choose the exact board (an UNO R4 Minima is not an UNO R3) and install its package.بۆردە ڕاستەکە هەڵبژێرە (UNO R4 Minima هەمان UNO R3 نییە) و دابمەزرێنە. |
| The Serial Monitor shows strange symbols. هێمای سەیر پیشان دەدات. | Set the Serial Monitor to the same baud rate as Serial.begin(). لەسەر هەمان Serial.begin() دابنێ. |
| A 5 V module connected straight to a 3.3 V board.مۆدیولێکی 5 V ڕاستەوخۆ بە بۆردێکی 3.3 Vـەوە بەستراوە. | Use a level shifter or a divider: the MKR WAN 1310 is not 5 V tolerant. یان بەکار بهێنە: MKR WAN 1310 بەرگەی 5 V ناگرێت. |
| A motor driven straight from a pin. ڕاستەوخۆ لە پینێکەوە کار پێ دەکرێت. | A pin gives 7–20 mA; use a transistor or a motor driver (Actuators).پینێک 7–20 mA دەدات؛ یان بەکار بهێنە (جووڵێنەرەکان). |
| LEDs or buttons on pins 0 and 1 of an UNO. یان لەسەر پینەکانی 0 و 1ـی UNO. | Those pins carry Serial (RX, TX); start from pin 2.ئەو پینانە Serial هەڵدەگرن (RX، TX)؛ لە پینی 2ـەوە دەست پێ بکە. |
| Thinking the sketch is lost when the USB cable is unplugged.وا بیر بکەیتەوە کە بە دەرهێنانی کێبڵی نامێنێت. | It stays in flash memory and starts again at power-on.لە دەمێنێتەوە و لە کاتی هەڵکردندا دووپاتە دەست پێ دەکاتەوە. |
Exercisesڕاهێنانەکان
Choose a board for each project and give one reason: (a) a classroom kit with LEDs and buttons; (b) a garden weather station that sends readings to a website over home Wi-Fi; (c) a pressure sensor on a water pipe 8 km from town, on a battery; (d) a robot with 40 sensors and motors.
بۆ هەر پڕۆژەیەک بۆردێک هەڵبژێرە و هۆیەک بنووسە: (أ) کیتی پۆل بە و ؛ (ب) وێستگەیەکی کەشوهەوای باخچە کە خوێندنەوەکان بە ماڵەوە دەنێرێت بۆ ماڵپەڕێک؛ (ج) پەستان لەسەر بۆرییەکی ئاو 8 km دوور لە شار، بە ؛ (د) بە 40 و .
Show answerوەڵامەکە پیشان بدە
- (a) UNO R3 or UNO R4 Minima — 5 V, simple, every tutorial uses it;
- (b) UNO R4 WiFi or Nano ESP32 — they have Wi-Fi;
- (c) MKR WAN 1310 — LoRa reaches kilometres on little battery power;
- (d) Mega 2560 — 54 digital and 16 analog pins (motors need drivers, not bare pins).
- (أ) UNO R3 یان UNO R4 Minima — 5 V، سادە، هەموو فێرکارییەک بەکاری دەهێنێت؛
- (ب) UNO R4 WiFi یان Nano ESP32 — هەیە؛
- (ج) MKR WAN 1310 — LoRa بە وزەی کەمی چەندین کیلۆمەتر دەڕوات؛
- (د) Mega 2560 — 54 و 16 ( پێویستە، نەک تەنیا پین).
You upload the first sketch and the IDE says "Done uploading.", but the Serial Monitor shows strange symbols instead of "The LED is turned on.". The LED blinks normally. What is wrong, and how do you fix it?
یەکەم دەنێریت و IDEـەکە دەڵێت "Done uploading."، بەڵام لەبری "The LED is turned on." هێمای سەیر پیشان دەدات. بە ئاسایی هەڵدەبێت و دەکوژێتەوە. چی هەڵەیە و چۆن چاکی دەکەیتەوە؟
Show answerوەڵامەکە پیشان بدە
The Serial Monitor's baud menu does not match Serial.begin(9600). Set the menu to 9600 baud. Both ends must use the same speed, or the bits are read with the wrong timing.
baudـی لەگەڵ Serial.begin(9600) یەک ناگرێتەوە. لەسەر 9600 baud دابنێ. هەردوو لا دەبێت هەمان خێرایی بەکار بهێنن، ئەگینا بە کاتی هەڵە دەخوێنرێنەوە.
Change the first sketch so the LED is on for 1 second and off for 1 second. How many lines does the Serial Monitor show in the first 10 seconds?
یەکەم بگۆڕە بۆ ئەوەی 1 چرکە هەڵکراو و 1 چرکە کوژاوە بێت. لە یەکەم 10 چرکەدا چەند دێڕ پیشان دەدات؟
Show answerوەڵامەکە پیشان بدە
Change delay(500) and delay(200) to delay(1000). One cycle now takes 2 seconds and prints two lines, so 10 seconds give 5 cycles: 10 lines, "on" and "off" taking turns.
delay(500) و delay(200) بگۆڕە بۆ delay(1000). ئێستا یەک خول 2 چرکە دەخایەنێت و دوو دێڕ چاپ دەکات، بۆیە 10 چرکە دەکاتە 5 خول: 10 دێڕ، «on» و «off» یەک لە دوای یەک.
An LED circuit draws 10 mA from a pin. On which of these boards is that within the rating of one pin: UNO R3, UNO R4 Minima, MKR WAN 1310? What can you do on the others?
10 mA لە پینێک دەکێشێت. لەسەر کام لەم بۆردانە ئەمە لە سنووری یەک پیندایە: UNO R3، UNO R4 Minima، MKR WAN 1310؟ لەسەر ئەوانی تر چی دەکەیت؟
Show answerوەڵامەکە پیشان بدە
Only the UNO R3 (20 mA per pin). The UNO R4 allows 8 mA and the MKR WAN 1310 7 mA: use a bigger resistor so the LED takes about 5–6 mA (it is still clearly visible), or switch a bigger load with a transistor.
تەنیا UNO R3 (20 mA بۆ هەر پینێک). UNO R4 تەنیا 8 mA و MKR WAN 1310 تەنیا 7 mA ڕێگە پێ دەدەن: گەورەتر بەکار بهێنە بۆ ئەوەی نزیکەی 5–6 mA وەربگرێت (هێشتا بە ڕوونی دەبینرێت)، یان بارێکی گەورەتر بە هەڵبکە و بکوژێنەرەوە.
Summaryپوختە
- An Arduino board puts a microcontroller with USB, power, a reset button and pin headers on one board; its programs are called sketches.
- UNO R3, Nano and Mega 2560 use 8-bit AVR chips at 16 MHz and 5 V; the MKR WAN 1310 is a 32-bit, 3.3 V board with a LoRa radio and its LED on pin 6.
- The UNO R4 (2023) is 32-bit but still 5 V, with only 8 mA per pin; the R4 WiFi adds Wi-Fi; the UNO Q (2025) adds a Linux computer beside the microcontroller.
- Never put 5 V into a 3.3 V pin that is not 5 V tolerant; never drive a motor from a pin.
- In the Arduino IDE 2 choose the board and the port, Verify, then Upload; the bootloader writes the sketch into flash, where it stays.
- setup() runs once; loop() runs again and again until the power goes off.
- No board yet? Use the Cloud Editor with a board, or Wokwi or Tinkercad Circuits with none.
- بۆردێکی لەگەڵ ، کارەبا، دوگمەی Reset و ڕیزە پین لەسەر یەک بۆرد دادەنێت؛ پێیان دەگوترێت .
- UNO R3، Nano و Mega 2560 AVRـی 8 بە 16 MHz و 5 V بەکار دەهێنن؛ MKR WAN 1310 بۆردێکی 32 و 3.3 Vـە بە ڕادیۆی LoRa و لەسەر پینی 6ـە.
- UNO R4 (ساڵی 2023) 32 هەیە بەڵام هێشتا 5 Vـە، تەنیا بە 8 mA بۆ هەر پینێک؛ R4 WiFi زیاد دەکات؛ UNO Q (2025) Linux لە تەنیشت زیاد دەکات.
- هەرگیز 5 V مەخەرە ناو پینێکی 3.3 V کە بەرگەی 5 V ناگرێت؛ هەرگیز ڕاستەوخۆ بە پین کار پێ مەکە.
- لە Arduino IDE 2ـدا بۆرد و پۆرت هەڵبژێرە، Verify، پاشان Upload؛ دەنووسێتە ناو فلاش و لەوێ دەمێنێتەوە.
- setup() یەک جار جێبەجێ دەبێت؛ loop() دووپاتە و دووپاتە تا کارەبا دەبڕێت.
- هێشتا بۆردت نییە؟ Cloud Editor لەگەڵ بۆردێک بەکار بهێنە، یان Wokwi یان Tinkercad Circuits بێ بۆرد.
Why do sketches write LED_BUILTIN instead of 13?بۆچی سکێچەکان لەبری 13 دەنووسن LED_BUILTIN؟
Because the built-in LED is on different pins on different boards (13 on the UNO, 6 on the MKR WAN 1310); the board package sets the name.
چونکە ناوخۆییەکە لە بۆردە جیاوازەکاندا لەسەر پینی جیاوازە (13 لە UNO، 6 لە MKR WAN 1310)؛ بۆردەکە ناوەکە دیاری دەکات.
What two things must you choose before uploading?پێش ناردن دەبێت چ دوو شتێک هەڵبژێریت؟
The board (Tools → Board) and the port (Tools → Port).
بۆردەکە (Tools → Board) و پۆرتەکە (Tools → Port).
What does the bootloader do?بارکەری بووت چی دەکات؟
It runs for a moment after a reset, receives a new sketch over USB and writes it into flash memory.
دوای Reset بۆ ساتێک کار دەکات، نوێ بە وەردەگرێت و دەینووسێتە ناو .
Lesson complete!وانەکە تەواو بوو!
Well done. Review the key terms, then go on to the next lesson.دەستخۆش. سەیرێکی زاراوە سەرەکییەکان بکەرەوە، پاشان بڕۆ بۆ وانەی داهاتوو.
Key termsزاراوە سەرەکییەکان
Lab: Blink an LED and Build a Traffic Lightتاقیگە: LEDـێک بترووکێنە و گڵۆپێکی هاتوچۆ دروست بکە
Related lecturesوانە پەیوەندیدارەکان
- What Is an Embedded System?سیستەمی چەسپێنراو چییە؟
- Lab: Blink an LED and Build a Traffic Lightتاقیگە: LEDـێک بترووکێنە و گڵۆپێکی هاتوچۆ دروست بکە
- Lab: Talking to the Board with the Serial Monitorتاقیگە: قسەکردن لەگەڵ بۆرد بە Serial Monitor
- LoRa: Long Range on Little PowerLoRa: دووریی زۆر بە وزەی کەم
- Storing IoT Readings in the Cloudهەڵگرتنی خوێندنەوەکانی IoT لە هەوردا
- Reading Analog Signals: the ADC and analogRead()خوێندنەوەی سیگناڵەکانی ئەنالۆگ: ADC و analogRead()
- Analog and Digital Signalsسیگناڵەکانی ئەنالۆگ و دیجیتاڵ
- The CPU: Control Unit, ALU and CoresCPU: یەکەی جڵەوکردن، ALU و ناوکەکانی پرۆسێسەر
- How Code Becomes a Running Program: Compilers and Interpretersچۆن کۆد دەبێت بە بەرنامەیەک کە کار دەکات: کۆمپایلەرەکان و ئینتەرپرێتەرەکان
References and further readingسەرچاوەکان و خوێندنەوەی زیاتر
- Arduino docs: UNO R3 tech specs (A000066: ATmega328P, built-in LED pin 13, 14 digital I/O, 6 analog in, 5 V, 20 mA per pin, 68.6 × 53.4 mm)
- Arduino docs: Nano tech specs (ATmega328, 14 digital, 8 analog, 5 V, Mini-B USB, 45 × 18 mm)
- Arduino docs: Mega 2560 Rev3 tech specs (ATmega2560, 54 digital, 16 analog, 256 KB flash, 8 KB SRAM, 4 KB EEPROM)
- Arduino docs: MKR WAN 1310 (SAMD21 Cortex-M0+, Murata CMWX1ZZABZ LoRa 433/868/915 MHz, 3.3 V I/O not 5 V tolerant, 7 mA per pin, LED pin 6)
- Arduino UNO R4 Minima datasheet ABX00080 (first release June 2023; RA4M1 48 MHz; 256 kB flash, 32 kB SRAM, 8 kB EEPROM; 5 V; GPIO up to 8 mA; built-in bootloader)
- Arduino docs: UNO R4 WiFi (ESP32-S3 radio module, 12×8 LED matrix, Qwiic, 8 mA per pin)
- Arduino docs: UNO Q tech specs (Qualcomm Dragonwing QRB2210 with Debian Linux + STM32U585 MCU on Zephyr; released October 2025)
- Arduino docs: Nano ESP32 tech specs (u-blox NORA-W106 ESP32-S3, Wi-Fi 4, Bluetooth 5 LE, 3.3 V)
- Arduino IDE releases on GitHub (2.3.10, 9 June 2026)
- Arduino docs: How to upload a sketch with the Arduino IDE 2 (Verify vs Upload, board and port)
- Arduino docs: Installing a board package in the IDE 2 (Boards Manager, AVR and SAMD packages)
- Arduino CLI docs: Sketch build process (pre-processing, compiling, linking, upload through the bootloader)
- Arduino docs: Cloud Editor (free Arduino account and the Cloud Agent)
- Arduino Cloud plans (Free: 25 compilations per day, checked November 2026)
- Arduino built-in examples: Blink (LED_BUILTIN is pin 13 on the UNO, pin 6 on MKR boards)
- Wokwi: pricing (Community plan free, unlimited public projects) and supported hardware
- Wikipedia: Tinkercad (free browser-based circuit simulator with Arduino Uno, CodeBlocks and text code)
This lecture is a first edition. The Kurdish text and terminology are waiting for review by Kurdish IT teachers.ئەم وانەیە چاپی یەکەمە. دەقە کوردییەکە و زاراوەکانی چاوەڕێی پێداچوونەوەی مامۆستایانی کوردی بواری IT ن.