Chapterبەش 4 · Lectureوانە 4.3
Lab: Buttons, INPUT_PULLUP and Debouncingتاقیگە: دوگمەکانی پەستان، INPUT_PULLUP و لابردنی هەڵبەزینەوە
Read push buttons on an Arduino: floating inputs, pull-up and pull-down resistors, INPUT_PULLUP (pressed = LOW), edge detection, contact bounce and a 50 ms debounce with millis(), and a three-button code lock.
خوێندنەوەی لەسەر : ، و ، INPUT_PULLUP (پەستێنراو = LOW)، ، و 50 ms بە millis() و قفڵێکی کۆددار بە سێ دوگمە.
What you will learnچی فێر دەبیت
- Explain why an unconnected input floats and how pull-up and pull-down resistors fix it.
- Wire a button with INPUT_PULLUP and read it correctly (pressed = LOW).
- Use edge detection so that one press causes one action.
- Debounce a button with millis() and a 50 ms wait.
- Build a three-button code lock and judge how safe it is.
- ڕوون بکەیتەوە بۆچی نەبەستراو هەڵدەواسرێت و و چۆن چارەسەری دەکەن.
- دوگمەیەک بە INPUT_PULLUP ببەستیت و بە دروستی بیخوێنیتەوە (پەستێنراو = LOW).
- بەکار بهێنیت بۆ ئەوەی یەک پەستان یەک کردەوە دروست بکات.
- بە millis() و چاوەڕێی 50 ms بۆ دوگمەیەک بکەیت.
- قفڵێکی کۆددار بە سێ دوگمە دروست بکەیت و هەڵیبسەنگێنیت چەند سەلامەتە.
Buttons: the board starts to listenدوگمە: بۆردەکە دەست بە گوێگرتن دەکات
So far the board has only talked: it switched LEDs on and off and printed text. Now it listens. A push button is the simplest input: a person presses, a pin reads it and the sketch decides what to do. It is the same sense, decide, act loop that robots and AI agents follow (Sensors).
تا ئێستا بۆردەکە تەنیا قسەی کردووە: هەڵکردووە و کوژاندووەتەوە و دەقی نووسیوە. ئێستا گوێ دەگرێت. سادەترین : کەسێک دەیپەستێنێت، پینێک دەیخوێنێتەوە و بڕیار دەدات چی بکات. ئەمە هەمان خولی هەستکردن، بڕیاردان و کردەوەیە کە ڕۆبۆت و پەیڕەوی دەکەن (هەستەوەرەکان).
You wire a button to pin 2 and an LED to pin 3 of an Arduino UNO (R3 or R4) and build three sketches: the LED follows the button, one press flips the LED, and a three-button code lock. On the way you meet floating pins, pull-up resistors, edges and the bouncing contacts that every real button has. Everything runs on the 5 V of the USB cable.
دوگمەیەک بە پینی 2 و بە پینی 3ـی Arduino UNO (R3 یان R4)ـەوە دەبەستیت و سێ دروست دەکەیت: بەدوای دوگمەکەدا دەڕوات، یەک پەستان دەگۆڕێت و قفڵێکی کۆددار بە سێ دوگمە. لە ڕێگادا ، ، لێوارەکان و ئەو خاڵە هەڵبەزیوانەی پەیوەندی دەناسیت کە هەموو دوگمەیەکی ڕاستەقینە هەیەتی. هەمووی بە 5 Vـی کێبڵی کار دەکات.
What you needچیت پێویستە
- an Arduino UNO R3 or UNO R4 and a USB data cable (an MKR WAN 1310 works too: the buttons go to GND, which is safe on a 3.3 V board);
- three 4-leg push buttons (6 mm or 12 mm);
- two or three LEDs, each with its resistor: 330 Ω on an UNO R3, 470 Ω on an UNO R4, as in the LED lab;
- a breadboard and jumper wires; for one exercise, a 10 kΩ resistor.
- Arduino UNO R3 یان UNO R4 و کێبڵێکی کە دەگوازێتەوە (MKR WAN 1310ـیش کار دەکات: دوگمەکان بۆ GND دەچن، کە لەسەر بۆردێکی 3.3 V سەلامەتە)؛
- سێ چوار قاچ (6 mm یان 12 mm)؛
- دوو یان سێ ، هەریەکە بە خۆیەوە: 330 Ω لەسەر UNO R3، 470 Ω لەسەر UNO R4، وەک تاقیگەی ؛
- و وایەری پەیوەندی؛ بۆ ڕاهێنانێک، 10 kΩ.
Why those resistor values is explained in Choosing the LED's resistor with Ohm's law. No board yet? Tinkercad Circuits and Wokwi simulate buttons too (No board? Simulate it).
بۆچی ئەو بەهایانەی لە هەڵبژاردنی بەرگری LED بە یاسای ئۆمدا ڕوون کراوەتەوە. هێشتا بۆردت نییە؟ Tinkercad Circuits و Wokwiـش دوگمە هاوشێوە دەکەن (بۆردت نییە؟ هاوشێوەی بکە).
The push button: two pairs of legsدوگمەی پەستان: دوو جووت قاچ
A push button joins two metal contacts only while you press it; a spring pushes it back when you let go. The common 4-leg button has its legs in two pairs. The two legs of a pair are always joined inside, and pressing joins the two pairs. Not sure which legs pair? Use two legs at opposite corners: they always belong to different pairs.
تەنیا تا کاتێک دەیپەستێنیت دوو خاڵی کانزایی پەیوەندی بەیەکەوە دەبەستێت؛ کە بەری دەدەیت سپرینگێک دەیگەڕێنێتەوە. دوگمەی چوار قاچی باو قاچەکانی دوو جووتن. دوو قاچی هەر جووتێک لە ناوەوە هەمیشە بەستراون و پەستان دوو جووتەکە بەیەکەوە دەبەستێت. نازانیت کام قاچانە جووتن؟ دوو قاچی دوو گۆشەی بەرامبەر بەکار بهێنە: هەمیشە سەر بە دوو جووتی جیاوازن.
On the breadboard, put the two pairs in different columns. If one column holds both pairs, they are joined all the time and the button seems pressed for ever (The breadboard).
لەسەر دوو جووتەکە لە دوو ستوونی جیاوازدا دابنێ. ئەگەر یەک ستوون هەردوو جووتەکەی تێدا بێت، هەمیشە بەیەکەوە بەستراون و دوگمەکە وا دەردەکەوێت کە بۆ هەمیشە پەستێنراوە (بریدبۆرد).
A pin connected to nothing floatsپینێک کە بە هیچەوە نەبەسترابێت هەڵدەواسرێت
An input pin is like an open ear: it only listens and takes almost no current. Arduino's documentation compares it to a 100 MΩ resistor in front of the pin. With nothing connected, nothing decides its level: the pin floats. It picks up noise from the air and from nearby wires like an antenna, so digitalRead() returns HIGH and LOW at random and the sketch sees presses that never happened. Analog pins float in the same way: A pin with nothing on it reads noise.
پینێکی وەک گوێیەکی کراوەیە: تەنیا گوێ دەگرێت و زۆر کەم وەردەگرێت. بەڵگەنامەکانی بە 100 MΩ لەبەردەم پینەکەدا دەیشوبهێنن. کاتێک هیچی پێوە نەبەسترابێت، هیچ شتێک ئاستەکەی دیاری ناکات: پینەکە هەڵدەواسرێت (). وەک لە هەواوە و لە وایەرە نزیکەکانەوە وەردەگرێت، بۆیە digitalRead() بە هەڕەمەکی HIGH و LOW دەگەڕێنێتەوە و پەستانێک دەبینێت کە هەرگیز نەبووە. پینە بە هەمان شێوە هەڵدەواسرێن: پینێک کە هیچی پێوە نییە ژاوەژاو دەخوێنێتەوە.
An untied balloon floats wherever the air pushes it: that is a floating pin. Tie its string to the ceiling and it stays up until someone pulls it down: that is a pull-up resistor holding the pin HIGH until a press pulls it to GND.
پاڵۆنێکی نەبەستراو بۆ هەر لایەک هەوا پاڵی پێوە بنێت دەڕوات: ئەوە پینێکی هەڵواسراوە. دەزووەکەی بە بنمیچەوە ببەستە، لە سەرەوە دەمێنێتەوە تا کەسێک بۆ خوارەوەی دەکێشێت: ئەوە کە پینەکە لە HIGHـدا ڕادەگرێت تا پەستانێک بۆ GNDـی دەکێشێت.
Where the analogy stops workingسنووری ئەم نموونەیە
A balloon drifts slowly; a floating pin can flip between HIGH and LOW thousands of times a second.
پاڵۆن هێواش دەڕوات؛ پینێکی هەڵواسراو دەتوانێت لە چرکەیەکدا هەزاران جار لە نێوان HIGH و LOWـدا بگۆڕێت.
A pin connected to nothing floatsپینێک کە بە هیچەوە نەبەسترابێت هەڵدەواسرێت
See it: a pin that presses itselfببینە: پینێک کە خۆی دەپەستێنێت
This sketch reads pin 2 with plain INPUT and no resistor. Nobody touches the button, yet some lines say "pressed?":
ئەم پینی 2 بە INPUTـی سادە و بەبێ دەخوێنێتەوە. کەس دەست لە دوگمەکە نادات، کەچی هەندێک دێڕ دەڵێن «pressed?»:
// Pin 2 with a loose wire and NO pull-up resistor: a floating input
const int btnPin = 2;

void setup() {
  Serial.begin(9600);
  pinMode(btnPin, INPUT);   // plain INPUT: nothing holds the pin
}

void loop() {
  if (digitalRead(btnPin) == LOW) {
    Serial.println("pressed?");
  } else {
    Serial.println("not pressed");
  }
  delay(500);
}not pressed not pressed pressed? pressed? pressed? not pressed pressed? not pressed
The checker cannot make real noise, so its scenario moves pin 2 by itself at random moments. On a real board the lines change from run to run.
پشکنەرەکە ناتوانێت ڕاستەقینە دروست بکات، بۆیە سیناریۆکەی پینی 2 لە ساتی هەڕەمەکیدا خۆی دەگۆڕێت. لەسەر بۆردی ڕاستەقینە دێڕەکان لە هەر جێبەجێکردنێکدا دەگۆڕێن.
Explain the codeڕوونکردنەوەی کۆدەکە
- Lineدێڕی 6
Plain INPUT: nothing holds the pin at HIGH or at LOW.
INPUTـی سادە: هیچ شتێک پینەکە لە HIGH یان LOWـدا ڕاناگرێت.
- Lineدێڕی 10
This test is sometimes true and sometimes false without any press.
ئەم تاقیکردنەوەیە هەندێک جار ڕاستە و هەندێک جار هەڵە، بەبێ هیچ پەستانێک.
Pull-up and pull-down resistorsبەرگری بەرزکەرەوە و بەرگری نزمکەرەوە
The cure is a resistor that gives the pin a resting level. A pull-up resistor joins the pin to the supply, so the pin reads HIGH until the button, wired to GND, pulls it LOW. A pull-down resistor joins the pin to GND, so it reads LOW until the button, wired to 5 V, lifts it HIGH. Arduino suggests 10 kΩ for either.
چارەسەر کە ئاستێکی ئاسایی بە پینەکە دەدات. پینەکە بە سەرچاوەی دەبەستێت، بۆیە پینەکە HIGH دەخوێنێتەوە تا دوگمەکە، کە بە GNDـەوە بەستراوە، بۆ LOWـی دەکێشێت. پینەکە بە GNDـەوە دەبەستێت، بۆیە LOW دەخوێنێتەوە تا دوگمەکە، کە بە 5 Vـەوە بەستراوە، بەرزی دەکاتەوە بۆ HIGH. بۆ هەردووکیان 10 kΩ پێشنیار دەکات.
Why a resistor and not a plain wire? With a wire from the pin to 5 V, pressing the button would join 5 V straight to GND: a short circuit. The resistor lets only a tiny current flow while the button is pressed (Ohm's law):
بۆچی و نەک وایەرێکی سادە؟ بە وایەرێک لە پینەکەوە بۆ 5 V، پەستانی دوگمەکە 5 V ڕاستەوخۆ بە GNDـەوە دەبەستێت: . تا دوگمەکە پەستێنراوە تەنیا زۆر کەم دەهێڵێت بڕوات (یاسای ئۆم):
A loose light switch in a windy house flips on and off by itself. Add a spring that holds it at one position until somebody presses it firmly, and it only moves when it should. The pull-up or pull-down resistor is that spring.
شلی گڵۆپ لە ماڵێکی باداردا خۆی هەڵدەبێت و دەکوژێتەوە. سپرینگێکی بۆ دابنێ کە لە یەک شوێندا ڕایبگرێت تا کەسێک بە توندی دەیپەستێنێت، ئەوسا تەنیا کاتی پێویست دەجووڵێت. یان ئەو سپرینگەیە.
Where the analogy stops workingسنووری ئەم نموونەیە
The resistor does not stop strong interference on long cables completely; it only gives the pin a firm default.
بەهێز لەسەر کێبڵی درێژ بە تەواوی ناوەستێنێت؛ تەنیا ئاستێکی بنەڕەتیی پتەو بە پینەکە دەدات.
INPUT_PULLUP: the pull-up inside the chipINPUT_PULLUP: بەرگری بەرزکەرەوە لەناو چیپەکەدا
You do not even need to buy the resistor. Every digital pin has a pull-up resistor inside the microcontroller, switched on by software with pinMode(2, INPUT_PULLUP);, the third mode of pinMode(): give each pin its job. Then wire the button from pin 2 to GND: released, the pin reads HIGH; pressed, it reads LOW.
پێویست ناکات بکڕیت. هەموو پینێکی لەناو هەیە کە بە و بە pinMode(2, INPUT_PULLUP); هەڵدەکرێت، سێیەم دۆخی pinMode(): کاری هەر پینێک دیاری بکە. پاشان دوگمەکە لە پینی 2ـەوە بۆ GND ببەستە: بەردراو، پینەکە HIGH دەخوێنێتەوە؛ پەستێنراو، LOW دەخوێنێتەوە.
INPUT_PULLUP: the pull-up inside the chipINPUT_PULLUP: بەرگری بەرزکەرەوە لەناو چیپەکەدا
How strong is the built-in pull-up?بەرگری بەرزکەرەوەی ناوخۆیی چەند بەهێزە؟
| Board (chip)بۆرد (چیپ) | Built-in pull-up ناوخۆیی |
|---|---|
| UNO R3 (ATmega328P) | 20–50 kΩ (Arduino documentation)20–50 kΩ (بەڵگەنامەکانی ) |
| MKR WAN 1310 (SAMD21) | about 40 kΩ, between 20 and 60 kΩ (chip datasheet)نزیکەی 40 kΩ، لە نێوان 20 و 60 kΩـدا ( چیپەکە) |
| UNO R4 (RA4M1) | built in as well; its datasheet gives it as a current, not in ohmsئەمیش ناوخۆییە؛ وەک دەیدات، نەک بە ئۆم |
These pull-ups are weak: tens of kilohms. For a button on a breadboard that is plenty. A long cable picks up more noise, so projects with long wires often add a stronger external pull-up, such as 10 kΩ.
ئەم لاوازن: دەیان کیلۆئۆم. بۆ دوگمەیەک لەسەر بەسە. کێبڵی درێژ زیاتر وەردەگرێت، بۆیە پڕۆژەکانی وایەری درێژ زۆرجار دەرەکیی بەهێزتر، وەک 10 kΩ، زیاد دەکەن.
INPUT_PULLUP is like the spring on a door: it keeps the door shut (HIGH). Push the door, that is press the button, and it opens (LOW); let go and the spring shuts it again.
INPUT_PULLUP وەک سپرینگی دەرگایە: دەرگاکە داخراو (HIGH) ڕادەگرێت. دەرگاکە پاڵ بنێ، واتە دوگمەکە بپەستێنە، دەکرێتەوە (LOW)؛ بەری بدە و سپرینگەکە دووپاتە دایدەخاتەوە.
Where the analogy stops workingسنووری ئەم نموونەیە
A door can stay half open; a digital pin is always read as one of two levels.
دەرگا دەتوانێت نیوەکراوە بمێنێتەوە؛ پینێکی هەمیشە وەک یەکێک لە دوو ئاست دەخوێنرێتەوە.
Words for this labوشەکانی ئەم تاقیگەیە
| Wordوشە | What it means hereلێرەدا واتای چییە |
|---|---|
| input | the pin listens; pinMode(pin, INPUT)پینەکە گوێ دەگرێت؛ pinMode(pin, INPUT) |
| pull-up | pulling the pin up to HIGH with a resistorکێشانی پینەکە بۆ HIGH بە |
| resistor | limits the current; for INPUT_PULLUP it is built into the chip; for the LED it protects LED and pin سنووردار دەکات؛ بۆ INPUT_PULLUP لەناو چیپەکەدایە؛ بۆ و پینەکە دەپارێزێت |
| internal | inside the chipلەناو چیپەکەدا |
| floating | connected to nothing, so the reading is randomبە هیچەوە نەبەستراوە، بۆیە خوێندنەوەکە هەڕەمەکییە |
| noise | unwanted signals from the air or nearby electronics نەخوازراو لە هەواوە یان لە ئامێرە ئەلیکترۆنییە نزیکەکانەوە |
| unreliable | not steady; you cannot trust itنەگۆڕ نییە؛ ناتوانیت متمانەی پێ بکەیت |
| HIGH / LOW | 1 = 5 V (3.3 V on 3.3 V boards) / 0 = 0 V1 = 5 V (لەسەر بۆردەکانی 3.3 V، 3.3 V) / 0 = 0 V |
| GND | ground, 0 V: the way back for every currentزەوی، 0 V: ڕێگای گەڕانەوەی هەموو |
digitalRead(pin) | reads HIGH or LOW from an input pinHIGH یان LOW لە پینێکی دەخوێنێتەوە |
digitalWrite(pin, v) | sets an output pin HIGH (on) or LOW (off)پینێکی دەکاتە HIGH (هەڵکراو) یان LOW (کوژاو) |
loop() | runs again and again, for everدووپاتە و دووپاتە کار دەکات، بۆ هەمیشە |
The lab circuit: a button on pin 2, an LED on pin 3سووڕی کارەبایی تاقیگەکە: دوگمەیەک لەسەر پینی 2، LED لەسەر پینی 3
- Buttonدوگمە
One leg of the button to pin 2; a leg of the other pair to GND.
یەکێک لە قاچەکانی دوگمەکە بۆ پینی 2؛ قاچێکی جووتەکەی تر بۆ GND.
- LEDLED
The LED's long leg (anode) to pin 3; its short leg (cathode) to a resistor, and the resistor to GND.
قاچی درێژی () بۆ پینی 3؛ قاچە کورتەکەی () بۆ و بۆ GND.
- GNDGND، زەوی
One wire from the board's GND to the breadboard's GND row.
وایەرێک لە GNDـی بۆردەکەوە بۆ ڕیزی GNDـی .
- No resistor for the buttonبەرگر بۆ دوگمەکە نییە
The button needs no resistor: INPUT_PULLUP switches on the internal one.
دوگمەکە پێویستی بە نییە: INPUT_PULLUP ناوخۆییەکە هەڵدەکات.
The LED follows the buttonLEDـەکە بەدوای دوگمەکەدا دەڕوات
The first sketch reads pin 2 on every pass of loop() and copies the answer to pin 3. Step by step: INPUT_PULLUP holds pin 2 HIGH; not pressed, it stays HIGH and the else switches the LED off; pressed, pin 2 is joined to GND and reads LOW, so the if is true and the LED goes on.
یەکەم لە هەموو جارێکی loop()ـدا پینی 2 دەخوێنێتەوە و وەڵامەکە بۆ پینی 3 دەگوازێتەوە. هەنگاو بە هەنگاو: INPUT_PULLUP پینی 2 لە HIGHـدا ڕادەگرێت؛ نەپەستێنراو، HIGH دەمێنێتەوە و else دەکوژێنێتەوە؛ پەستێنراو، پینی 2 بە GNDـەوە دەبەسترێت و LOW دەخوێنێتەوە، بۆیە if ڕاستە و هەڵدەبێت.
void setup() {
  pinMode(2, INPUT_PULLUP); // use internal pull-up resistor
  pinMode(3, OUTPUT);       // LED pin as output
}

void loop() {
  if (digitalRead(2) == LOW) { // button is pressed (connected to GND)
    digitalWrite(3, HIGH);     // turn LED on
  } else {
    digitalWrite(3, LOW);      // turn LED off
  }
}0 ms pin 3 = LOW LED off 1000 ms pin 3 = HIGH LED on 1500 ms pin 3 = LOW LED off
From the pin events of the CêIT Arduino checker; this sketch prints nothing to the Serial Monitor.
لە ڕووداوەکانی پینەکانی پشکنەری Arduinoـی CêITـەوە؛ ئەم هیچ لە چاپ ناکات.
Explain the codeڕوونکردنەوەی کۆدەکە
- Lineدێڕی 2
Pin 2 listens, with the internal pull-up.
پینی 2 گوێ دەگرێت، بە ناوخۆیی.
- Lineدێڕی 7
LOW = the button joins pin 2 to GND = pressed.
LOW = دوگمەکە پینی 2 بە GNDـەوە دەبەستێت = پەستێنراو.
Lab 1: a message for each press?تاقیگەی 1: نامەیەک بۆ هەر پەستانێک؟
Lab 1 prints a message while the button is down and then waits two seconds, so that one press does not fill the Serial Monitor.
تاقیگەی 1 تا دوگمەکە پەستێنراوە نامەیەک دەنووسێت و پاشان دوو چرکە چاوەڕێ دەکات، بۆ ئەوەی یەک پەستان پڕ نەکات.
// Lab 1: a message when the button on pin 2 is pressed
const int btnPin = 2;

void setup() {
  pinMode(btnPin, INPUT_PULLUP);
  Serial.begin(9600);
}

void loop() {
  if (digitalRead(btnPin) == LOW) {   // LOW = pressed
    Serial.println("Button pressed");
    delay(2000);                      // wait 2 s before looking again
  }
}Button pressed Button pressed
Run with the CêIT Arduino checker.
بە پشکنەری Arduinoـی CêIT جێبەجێ کراوە.
Explain the codeڕوونکردنەوەی کۆدەکە
- Lineدێڕی 11
One line per press, and at most one line every 2 seconds.
یەک دێڕ بۆ هەر پەستانێک؛ لە هەر 2 چرکەدا زیاتر لە یەک دێڕ نا.
- Lineدێڕی 12
While delay() waits, the sketch does not look at the button at all.
تا delay() چاوەڕێ دەکات، هەر سەیری دوگمەکە ناکات.
The long press prints twice (at 1 s and 3 s), and the two quick presses are lost: they come and go while delay(2000) waits. The sketch reacts to the level (is it down now?) instead of the moment of pressing.
پەستانە درێژەکە دوو جار دەنووسێت (لە 1 و 3 چرکەدا) و دوو پەستانە خێراکە لەدەست دەچن: دێن و دەڕۆن تا delay(2000) چاوەڕێ دەکات. کاردانەوەی بۆ ئاست هەیە (ئایا ئێستا پەستێنراوە؟) نەک بۆ ساتی پەستان.
Lab 2: the ternary operator and a flooded Serial Monitorتاقیگەی 2: کارپێکەری سێیانی و Serial Monitorـی پڕ
Lab 2 makes the LED follow the button in two lines. bool pressed = digitalRead(btnPin) == LOW; stores the answer as a boolean, true or false. pressed ? HIGH : LOW then chooses a value: HIGH if pressed is true, LOW if it is false. This ?: is the ternary operator (a choice in one line).
تاقیگەی 2 بە دوو دێڕ بەدوای دوگمەکەدا دەبات. bool pressed = digitalRead(btnPin) == LOW; وەڵامەکە وەک ، true یان false، هەڵدەگرێت. پاشان pressed ? HIGH : LOW بەهایەک هەڵدەبژێرێت: HIGH ئەگەر pressed ڕاست بێت، LOW ئەگەر هەڵە بێت. ئەم ?:ـە (هەڵبژاردن بە یەک دێڕ).
// Lab 2: the LED follows the button
const int btnPin = 2;
const int ledPin = 3;

void setup() {
  pinMode(btnPin, INPUT_PULLUP);
  pinMode(ledPin, OUTPUT);
  Serial.begin(9600);
}

void loop() {
  bool pressed = digitalRead(btnPin) == LOW;
  digitalWrite(ledPin, pressed ? HIGH : LOW);
  Serial.println(pressed ? "LED ON" : "LED OFF");
  delay(200);
}LED OFF LED OFF LED OFF LED ON LED ON LED OFF LED OFF LED OFF
A line every 200 ms, whether anything changed or not. The LED is on from 600 to 1000 ms, the first checks after the press and the release.
هەر 200 ms دێڕێک، جا شتێک گۆڕابێت یان نا. لە 600 تا 1000 ms هەڵکراوە، یەکەم پشکنینەکانی دوای پەستان و بەردان.
Explain the codeڕوونکردنەوەی کۆدەکە
- Lineدێڕی 12
A boolean: true while the button is pressed.
: تا دوگمەکە پەستێنراوە true.
- Lineدێڕی 13-14
Two ternary choices: one for the pin, one for the text.
دوو هەڵبژاردنی سێیانی: یەکێک بۆ پینەکە، یەکێک بۆ دەقەکە.
It works, but it floods the Serial Monitor with five lines a second for ever. Printing only when the state changes is better: that is an exercise below.
کار دەکات، بەڵام بە پێنج دێڕ لە چرکەیەکدا بۆ هەمیشە پڕ دەکات. باشتر وایە تەنیا کاتێک دۆخەکە دەگۆڕێت بنووسێت: ئەمە ڕاهێنانێکە لە خوارەوە.
Level or edge? React to the changeئاست یان لێوار؟ کاردانەوە بۆ گۆڕانەکە
A level is what the pin reads now: HIGH or LOW. An edge is the moment it changes. With INPUT_PULLUP the press is a falling edge, HIGH → LOW, and the release is a rising edge, LOW → HIGH. These are the same edges that clock signals have in Logic Design (Pulses, period and frequency).
ئاست ئەوەیە کە پینەکە ئێستا دەیخوێنێتەوە: HIGH یان LOW. لێوار ساتی گۆڕانەکەیە. بە INPUT_PULLUP پەستان (لە HIGHـەوە بۆ LOW) و بەردان (لە LOWـەوە بۆ HIGH). ئەمانە هەمان ئەو لێوارانەن کە لە دیزاینی هەیەتی (تڕپەکان، کاتی خولی و لەرەلەر).
To catch an edge, the sketch keeps the last reading in a variable and compares: if it was HIGH last time and is LOW now, the button has just been pressed. This is edge detection, also called state change detection. A light-sensor lab later meets the same difference between a level and a change: A night light, not a toggle.
بۆ گرتنی لێوارێک، کۆتا خوێندنەوە لە هەڵدەگرێت و بەراورد دەکات: ئەگەر جاری پێشوو HIGH بووبێت و ئێستا LOW بێت، دوگمەکە ئێستا پەستێنرا. ئەمە ، کە پێی دەوترێت دۆزینەوەی گۆڕانی دۆخیش. دواتر تاقیگەیەکی ڕووناکی هەمان جیاوازیی نێوان ئاست و گۆڕان دەبینێت: گڵۆپی شەو، نەک گۆڕین.
Lab 3: one press, one toggleتاقیگەی 3: یەک پەستان، یەک گۆڕان
Lab 3 flips the LED on each press. Two variables keep its memory: ledState (is the LED on?) and lastBtnState (what pin 2 read on the last pass). !ledState means "the opposite", as in the toggles of the Serial lab (Lab 5: toggles with switch and !).
تاقیگەی 3 لە هەر پەستانێکدا دەگۆڕێت. دوو یادەوەرییەکەی هەڵدەگرن: ledState (ئایا هەڵکراوە؟) و lastBtnState (پینی 2 لە جاری پێشوودا چی خوێندەوە). !ledState واتە «پێچەوانەکەی»، وەک گۆڕینەکانی تاقیگەی Serial (تاقیگەی 5: گۆڕین بە switch و !).
// Lab 3: toggle the LED on each press (edge detection)
const int btnPin = 2;
const int ledPin = 3;

bool ledState = false;      // is the LED on?
bool lastBtnState = HIGH;   // the reading from the last pass of loop()

void setup() {
  pinMode(btnPin, INPUT_PULLUP);
  pinMode(ledPin, OUTPUT);
  Serial.begin(9600);
}

void loop() {
  bool currentBtnState = digitalRead(btnPin);
  if (lastBtnState == HIGH && currentBtnState == LOW) {  // HIGH -> LOW: a press
    ledState = !ledState;
    digitalWrite(ledPin, ledState ? HIGH : LOW);
    Serial.println(ledState ? "LED ON" : "LED OFF");
    delay(200);
  }
  lastBtnState = currentBtnState;   // remember it for the next pass
}LED ON LED OFF
The LED goes on at 1000 ms and off at 3000 ms: one toggle per press. Run with the CêIT Arduino checker.
لە 1000 msـدا هەڵدەبێت و لە 3000 msـدا دەکوژێتەوە: بۆ هەر پەستانێک یەک گۆڕان. بە پشکنەری Arduinoـی CêIT جێبەجێ کراوە.
Explain the codeڕوونکردنەوەی کۆدەکە
- Lineدێڕی 16
HIGH last time and LOW now: a falling edge, so a press.
جاری پێشوو HIGH و ئێستا LOW: ، واتە پەستان.
- Lineدێڕی 22
Remember this reading for the next pass. Lab 3 first forgot this line.
ئەم خوێندنەوەیە بۆ جاری داهاتوو لەبیر بهێڵە. تاقیگەی 3 سەرەتا ئەم دێڕەی لەبیر کردبوو.
Lab 3: one press, one toggleتاقیگەی 3: یەک پەستان، یەک گۆڕان
Common mistake: the reading that is never savedهەڵەی باو: ئەو خوێندنەوەیەی هەرگیز هەڵناگیرێت
Real buttons bounceدوگمەی ڕاستەقینە هەڵدەبەزێتەوە
Inside a button, a springy metal part hits the contacts. Like a dropped ball it bounces: for a few milliseconds the contacts touch, part and touch again. This is contact bounce. Most switches settle within 1 to 20 ms, some take longer; measurements of many switches found about 1.5 ms on average.
لەناو دوگمەدا پارچەیەکی کانزایی سپرینگدار بەر خاڵەکانی پەیوەندی دەکەوێت. وەک تۆپێکی کەوتوو هەڵدەبەزێتەوە: بۆ چەند میلیچرکەیەک خاڵەکان بەیەک دەگەن، جیا دەبنەوە و دیسان بەیەک دەگەن. ئەمە . زۆربەی سویچەکان لە 1 تا 20 msـدا ئارام دەبنەوە، هەندێکیان زیاتر دەخایەنن؛ پێوانی زۆر سویچ نزیکەی 1.5 msـی وەک تێکڕا دۆزیوەتەوە.
A person sees one press. loop() runs thousands of times a second and sees every bounce as a new press.
مرۆڤ یەک پەستان دەبینێت. loop() لە چرکەیەکدا هەزاران جار کار دەکات و هەر هەڵبەزینەوەیەک وەک پەستانێکی نوێ دەبینێت.
Real buttons bounceدوگمەی ڕاستەقینە هەڵدەبەزێتەوە
See it in the checker: bounce fools Lab 3لە پشکنەردا ببینە: هەڵبەزینەوە تاقیگەی 3 فریو دەدات
Inside a tactile switch, a thin metal dome snaps down onto the contacts and shakes for a moment. Here the fixed Lab 3 meets two presses whose contacts bounce for 5 to 8 ms at the press and again at the release:
لەناو هەستپێکراودا، گومبەزێکی کانزایی تەنک بە توندی دەکەوێتە سەر خاڵەکانی پەیوەندی و بۆ ساتێک دەلەرزێت. لێرەدا تاقیگەی 3ـی چاککراو دوو پەستان دەبینێت کە خاڵەکانیان لە کاتی پەستان و دیسان لە کاتی بەرداندا 5 تا 8 ms هەڵدەبەزنەوە:
LED ON LED OFF LED ON LED OFF
Each press switches the LED on, and the bounce of the release switches it off again (at 1701 and 3401 ms). The checker runs loop() once per millisecond; a real UNO runs it far more often and sees even more bounces.
هەر پەستانێک هەڵدەکات و هەڵبەزینەوەی بەردانەکە دیسان دەیکوژێنێتەوە (لە 1701 و 3401 ms). پشکنەرەکە loop() لە هەر میلیچرکەیەکدا جارێک جێبەجێ دەکات؛ UNOـی ڕاستەقینە زۆر زیاتر جێبەجێی دەکات و هەڵبەزینەوەی زیاتریش دەبینێت.
Debouncing: wait until the button is stillلابردنی هەڵبەزینەوە: چاوەڕێ بکە تا دوگمەکە ئارام دەبێت
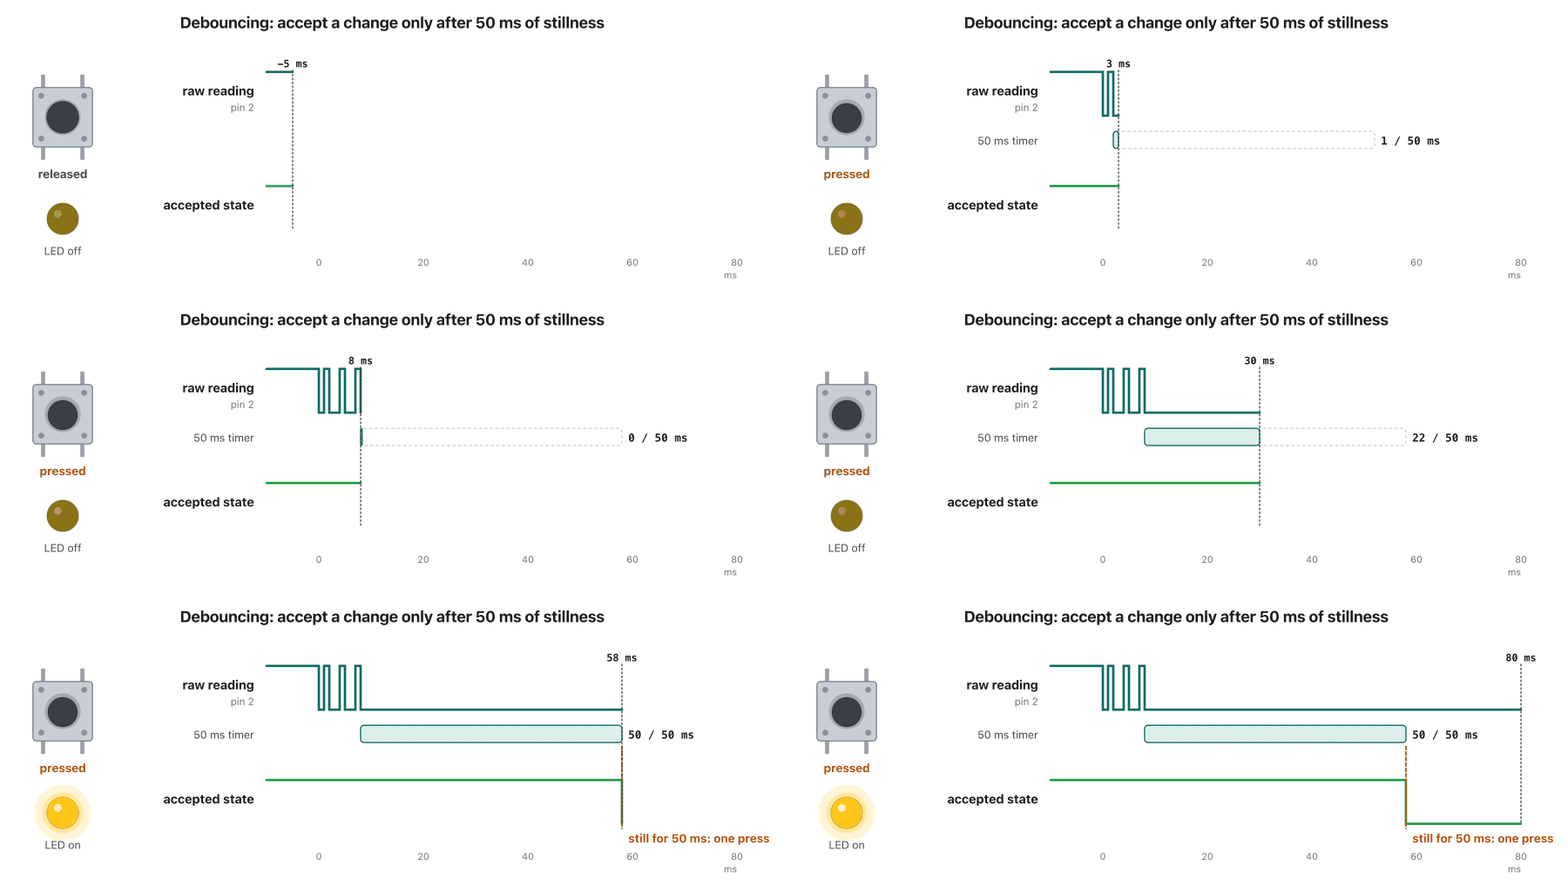
The cure is debouncing: believe a new reading only when it has stayed the same for a while. Arduino's official Debounce example waits 50 ms. Every change restarts a 50 ms timer; when the timer runs out with no new change, the reading becomes the accepted state, and only a change of that accepted state from HIGH to LOW counts as a press.
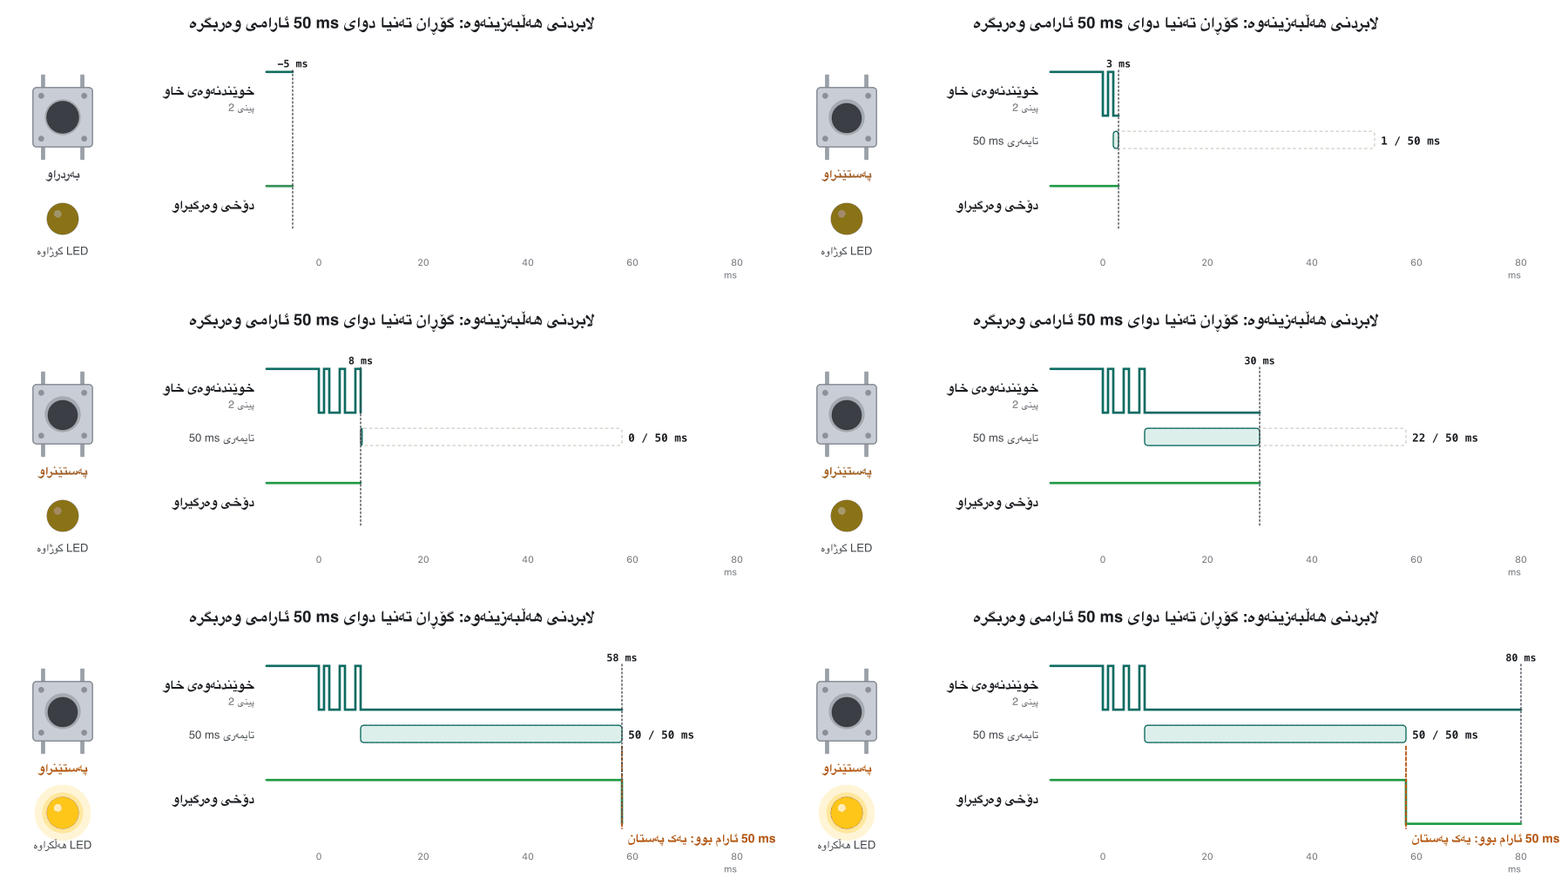
چارەسەر : تەنیا باوەڕ بە خوێندنەوەیەکی نوێ بکە کە بۆ ماوەیەک وەک خۆی مابێتەوە. نموونەی فەرمیی Debounceـی 50 ms چاوەڕێ دەکات. هەر گۆڕانێک 50 ms لە سەرەتاوە دەست پێدەکاتەوە؛ کاتێک بەبێ گۆڕانێکی نوێ تەواو دەبێت، خوێندنەوەکە دەبێتە دۆخی وەرگیراو و تەنیا گۆڕانی ئەو دۆخە وەرگیراوە لە HIGHـەوە بۆ LOW وەک پەستان دەژمێردرێت.
The timer is millis(), the clock from millis(): check the clock instead of waiting. Waiting with delay() would make the board deaf; millis() keeps loop() running, so it can watch other buttons and sensors at the same time.
millis()ـە، ئەو کاتژمێرەی لە millis(): لە جیاتی چاوەڕێکردن سەیری کاتژمێر بکەدا ناسیت. چاوەڕێکردن بە delay() بۆردەکە کەڕ دەکات؛ millis() loop() بە کارکردن دەهێڵێتەوە، بۆیە دەتوانێت لە هەمان کاتدا سەیری دوگمە و تریش بکات.
Debouncing: wait until the button is stillلابردنی هەڵبەزینەوە: چاوەڕێ بکە تا دوگمەکە ئارام دەبێت
Lab 3, debouncedتاقیگەی 3، بە لابردنی هەڵبەزینەوە
// Lab 3, debounced: one press = one toggle
const int btnPin = 2;
const int ledPin = 3;
const unsigned long debounceDelay = 50;  // ms the reading must stay still

bool ledState = false;
int lastReading = HIGH;          // the raw reading from the last pass
int stableState = HIGH;          // the accepted (debounced) state
unsigned long lastChange = 0;    // when the raw reading last moved

void setup() {
  pinMode(btnPin, INPUT_PULLUP);
  pinMode(ledPin, OUTPUT);
  Serial.begin(9600);
}

void loop() {
  int reading = digitalRead(btnPin);

  if (reading != lastReading) {     // it moved: a bounce or a real change
    lastChange = millis();          // start the 50 ms wait again
    lastReading = reading;
  }

  if (millis() - lastChange > debounceDelay && reading != stableState) {
    stableState = reading;          // still for 50 ms: accept it
    if (stableState == LOW) {       // the new state is LOW: a real press
      ledState = !ledState;
      digitalWrite(ledPin, ledState ? HIGH : LOW);
      Serial.print(millis());
      Serial.print(" ms: ");
      Serial.println(ledState ? "LED ON" : "LED OFF");
    }
  }
}1059 ms: LED ON 3057 ms: LED OFF
One toggle per press. Each line comes about 50 ms after the last bounce (1008 ms and 3006 ms). Run with the CêIT Arduino checker.
بۆ هەر پەستانێک یەک گۆڕان. هەر دێڕێک نزیکەی 50 ms دوای کۆتا هەڵبەزینەوە دێت (1008 ms و 3006 ms). بە پشکنەری Arduinoـی CêIT جێبەجێ کراوە.
Explain the codeڕوونکردنەوەی کۆدەکە
- Lineدێڕی 4
The debounce time; raise it if the LED still flickers.
کاتی ؛ ئەگەر هێشتا دەلەرزێت زیادی بکە.
- Lineدێڕی 20-23
Any movement, bounce or real, restarts the wait.
هەر جووڵەیەک، هەڵبەزینەوە بێت یان ڕاستەقینە، چاوەڕێکردنەکە لە سەرەتاوە دەست پێدەکاتەوە.
- Lineدێڕی 25-27
Still for more than 50 ms and different from the accepted state: accept it; LOW means a real press.
زیاتر لە 50 ms ئارام بووە و جیاوازە لە دۆخی وەرگیراو: وەریبگرە؛ LOW واتە پەستانێکی ڕاستەقینە.
Why 50 ms? It is longer than nearly every bounce and shorter than people notice: a 100 ms wait is noticeable, 50 ms feels instant. Debouncing is only for contacts that move: a password typed in the Serial Monitor needs none (A password over Serial).
بۆچی 50 ms؟ لە نزیکەی هەموو هەڵبەزینەوەیەک درێژترە و لەوە کورتترە کە خەڵک هەستی پێ بکەن: چاوەڕێی 100 ms هەستی پێ دەکرێت، 50 ms وەک ساتی دەردەکەوێت. تەنیا بۆ خاڵی پەیوەندیی جووڵاوە: کە لە دەنووسرێت پێویستی پێی نییە (تێپەڕەوشەیەک لە ڕێی Serialـەوە).
The idea: a three-button code lockبیرۆکەکە: قفڵێکی کۆددار بە سێ دوگمە
The last sketch turns three buttons into a lock. Each press adds a digit to a String; after three digits the sketch compares the String with the code "132": the green LED for two seconds if it is right, the red one if it is wrong, then it starts again.
کۆتا سێ دوگمە دەکاتە قفڵ. هەر پەستانێک ژمارەیەک بۆ زیاد دەکات؛ دوای سێ ژمارە لەگەڵ کۆدی «132» بەراورد دەکات: ئەگەر دروست بێت سەوزەکە بۆ دوو چرکە، ئەگەر هەڵە بێت سوورەکە، پاشان لە سەرەتاوە دەست پێدەکاتەوە.
// A three-button code lock: the code is 1, 3, 2
const int btn1 = 3;
const int btn2 = 2;
const int btn3 = 7;          // not pin 1: on an UNO R3, pin 1 is the Serial TX line

const int redLedPin = 5;
const int greenLedPin = 4;

String correctPass = "132";
String input = "";

void setup() {
  pinMode(btn1, INPUT_PULLUP);
  pinMode(btn2, INPUT_PULLUP);
  pinMode(btn3, INPUT_PULLUP);

  pinMode(redLedPin, OUTPUT);
  pinMode(greenLedPin, OUTPUT);

  Serial.begin(9600);
}

void loop() {
  if (digitalRead(btn1) == LOW) {
    input += "1";
    Serial.println("Pressed: 1");
    waitForRelease(btn1);
  }
  if (digitalRead(btn2) == LOW) {
    input += "2";
    Serial.println("Pressed: 2");
    waitForRelease(btn2);
  }
  if (digitalRead(btn3) == LOW) {
    input += "3";
    Serial.println("Pressed: 3");
    waitForRelease(btn3);
  }

  if (input.length() == 3) {
    if (input == correctPass) {
      digitalWrite(redLedPin, LOW);
      digitalWrite(greenLedPin, HIGH);
      Serial.println("Correct password");
    } else {
      digitalWrite(redLedPin, HIGH);
      digitalWrite(greenLedPin, LOW);
      Serial.println("Incorrect password");
    }

    delay(2000);
    input = "";
    digitalWrite(redLedPin, LOW);
    digitalWrite(greenLedPin, LOW);
  }
}

void waitForRelease(int pin) {
  while (digitalRead(pin) == LOW) {   // wait while the button is held
    delay(10);
  }
  delay(200);                         // let the contacts settle
}Pressed: 1 Pressed: 3 Pressed: 2 Correct password Pressed: 2 Pressed: 2 Pressed: 2 Incorrect password
The green LED (pin 4) is on from 2500 to 4500 ms after the right code; the red LED (pin 5) from 6500 to 8500 ms after the wrong one. Run with the CêIT Arduino checker.
سەوزەکە (پینی 4) دوای کۆدی دروست لە 2500 تا 4500 ms هەڵکراوە؛ سوورەکە (پینی 5) دوای کۆدی هەڵە لە 6500 تا 8500 ms. بە پشکنەری Arduinoـی CêIT جێبەجێ کراوە.
Explain the codeڕوونکردنەوەی کۆدەکە
- Lineدێڕی 4
Pin 7, not pin 1: see the common mistake below.
پینی 7، نەک پینی 1: هەڵە باوەکەی خوارەوە ببینە.
- Lineدێڕی 24-38
Each press adds a digit, then waits for the release.
هەر پەستانێک ژمارەیەک زیاد دەکات، پاشان چاوەڕێی بەردان دەکات.
- Lineدێڕی 40-55
Three digits: compare, light green or red for 2 s, start again.
سێ ژمارە: بەراوردکردن، 2 چرکە سەوز یان سوور، دەستپێکردنەوە.
- Lineدێڕی 58-63
Wait while held, then 200 ms more: a simple, blocking debounce.
تا گیراوە چاوەڕێ بکە، پاشان 200 msـی تر: سادە و ڕاگر.
The idea: a three-button code lockبیرۆکەکە: قفڵێکی کۆددار بە سێ دوگمە
Common mistake: a button on pin 1هەڵەی باو: دوگمەیەک لەسەر پینی 1
The idea: a three-button code lockبیرۆکەکە: قفڵێکی کۆددار بە سێ دوگمە
How safe is this lock?ئەم قفڵە چەند سەلامەتە؟
Three presses of three buttons give codes, by the multiplication principle (Counting passwords). A try takes about three and a half seconds (three presses and the 2-second answer), so trying every code, a brute-force attack (How passwords are broken), takes under two minutes.
سێ پەستانی سێ دوگمە کۆد دەدات، بەپێی بنەمای لێکدان (ژماردنی تێپەڕەوشەکان). هەر هەوڵێک نزیکەی سێ چرکە و نیو دەخایەنێت (سێ پەستان و وەڵامی 2 چرکەیی)، بۆیە تاقیکردنەوەی هەموو کۆدەکان، (تێپەڕەوشەکان چۆن دەشکێنرێن)، لە دوو خولەک کەمتر دەخایەنێت.
Three buttons, three presses; ten keys, six digits.
سێ دوگمە، سێ پەستان؛ دە دوگمە، شەش ژمارە.
Real locks use more keys and longer codes, slow down after wrong tries and never ship one default code for every device. IoT devices follow the same rules (Keeping IoT devices safe).
قفڵی ڕاستەقینە دوگمەی زیاتر و کۆدی درێژتر بەکار دەهێنن، دوای هەوڵی هەڵە خاو دەبنەوە و هەرگیز یەک کۆدی بنەڕەتی بۆ هەموو ئامێرێک نانێرن. ئامێرەکانی هەمان یاسا پەیڕەو دەکەن (پاراستنی ئامێرەکانی IoT).
Common mistakesهەڵە باوەکان
| Mistakeهەڵە | Betterباشتر |
|---|---|
| A button input with plain INPUT and no resistor: random presses. دوگمە بە INPUTـی سادە و بەبێ : پەستانی هەڕەمەکی. | Use INPUT_PULLUP, or an external 10 kΩ pull-up or pull-down.INPUT_PULLUP بەکار بهێنە، یان یان دەرەکیی 10 kΩ. |
Testing == HIGH for a press with INPUT_PULLUP.تاقیکردنەوەی == HIGH بۆ پەستان بە INPUT_PULLUP. | With a pull-up, pressed = LOW.بە ، پەستێنراو = LOW. |
| Two legs of the same pair: the button is always "pressed".دوو قاچی هەمان جووت: دوگمەکە هەمیشە «پەستێنراو»ـە. | Use two legs at opposite corners.دوو قاچی دوو گۆشەی بەرامبەر بەکار بهێنە. |
| A wire instead of a resistor from the pin to 5 V.وایەرێک لە جیاتی لە پینەکەوە بۆ 5 V. | Pressing would short 5 V to GND; use a resistor.پەستان 5 V بە GNDـەوە کورت دەبەستێت؛ بەکار بهێنە. |
| Reacting to the level when you want one action per press.کاردانەوە بۆ ئاست کاتێک بۆ هەر پەستانێک یەک کردەوەت دەوێت. | Detect the falling edge: compare with the last reading. بدۆزەوە: لەگەڵ کۆتا خوێندنەوەدا بەراوردی بکە. |
Forgetting lastBtnState = currentBtnState;.لەبیرکردنی lastBtnState = currentBtnState;. | Save the reading at the end of every loop().لە کۆتایی هەموو loop()ێکدا خوێندنەوەکە هەڵبگرە. |
| No debounce: one press counts two or three times.بەبێ : یەک پەستان دوو یان سێ جار دەژمێردرێت. | Accept a change only after 50 ms without a new change (millis()).گۆڕان تەنیا دوای 50 ms بەبێ گۆڕانی نوێ وەربگرە (millis()). |
| Long delay() calls to hide bounce.بانگکردنی delay()ـی درێژ بۆ شاردنەوەی هەڵبەزینەوە. | They miss quick presses and freeze the board; use millis().پەستانی خێرا لەدەست دەدەن و بۆردەکە ڕادەگرن؛ millis() بەکار بهێنە. |
| A button on pin 0 or 1 of an UNO R3 while Serial runs.دوگمەیەک لەسەر پینی 0 یان 1ـی UNO R3 تا Serial کار دەکات. | Use pins 2 to 7.پینەکانی 2 تا 7 بەکار بهێنە. |
| Printing on every pass of loop().نووسین لە هەموو جارێکی loop()ـدا. | Print only when the state changes.تەنیا کاتێک دۆخەکە دەگۆڕێت بنووسە. |
Exercisesڕاهێنانەکان
Change the debounced Lab 3 so that it counts presses and prints Presses: 1, Presses: 2, … instead of toggling an LED.
تاقیگەی 3ـی بە بگۆڕە بۆ ئەوەی پەستانەکان بژمێرێت و Presses: 1، Presses: 2، … بنووسێت لە جیاتی گۆڕینی .
Hintئاماژە
Keep the debounce part; replace the toggle with presses++.
بەشی بهێڵەوە؛ گۆڕینەکە بە presses++ بگۆڕە.
Show answerوەڵامەکە پیشان بدە
// Count the presses: one press = one count, with a 50 ms debounce
const int btnPin = 2;
const unsigned long debounceDelay = 50;

int presses = 0;
int lastReading = HIGH;
int stableState = HIGH;
unsigned long lastChange = 0;

void setup() {
  pinMode(btnPin, INPUT_PULLUP);
  Serial.begin(9600);
}

void loop() {
  int reading = digitalRead(btnPin);
  if (reading != lastReading) {
    lastChange = millis();
    lastReading = reading;
  }
  if (millis() - lastChange > debounceDelay && reading != stableState) {
    stableState = reading;
    if (stableState == LOW) {
      presses++;
      Serial.print("Presses: ");
      Serial.println(presses);
    }
  }
}Presses: 1 Presses: 2
Run with the CêIT Arduino checker.
بە پشکنەری Arduinoـی CêIT جێبەجێ کراوە.
Rewire Lab 2 with an external 10 kΩ pull-down: the resistor from pin 2 to GND and the button from pin 2 to 5 V. Change the sketch so the LED still follows the button.
تاقیگەی 2 بە دەرەکیی 10 kΩ دووپاتە ببەستەوە: لە پینی 2ـەوە بۆ GND و دوگمەکە لە پینی 2ـەوە بۆ 5 V. بگۆڕە بۆ ئەوەی هێشتا بەدوای دوگمەکەدا بڕوات.
Hintئاماژە
With a pull-down the logic is the natural one: pressed = HIGH.
بە لۆجیکەکە ئاساییە: پەستێنراو = HIGH.
Show answerوەڵامەکە پیشان بدە
// Lab 2 with an external 10 kOhm pull-down: the button goes to 5 V
const int btnPin = 2;
const int ledPin = 3;

void setup() {
  pinMode(btnPin, INPUT);        // the resistor on the breadboard holds it LOW
  pinMode(ledPin, OUTPUT);
  Serial.begin(9600);
}

void loop() {
  bool pressed = digitalRead(btnPin) == HIGH;   // pressed = HIGH now
  digitalWrite(ledPin, pressed ? HIGH : LOW);
  Serial.println(pressed ? "LED ON" : "LED OFF");
  delay(200);
}LED OFF LED OFF LED OFF LED ON LED ON LED OFF LED OFF LED OFF
Run with the CêIT Arduino checker.
بە پشکنەری Arduinoـی CêIT جێبەجێ کراوە.
The output is the same as Lab 2: only the wiring and the == HIGH test changed.
دەرچوونەکە وەک تاقیگەی 2یە: تەنیا بەستنەکە و تاقیکردنەوەی == HIGH گۆڕان.
Keep the LED following the button, but print LED ON or LED OFF only when the state changes.
با هەر بەدوای دوگمەکەدا بڕوات، بەڵام LED ON یان LED OFF تەنیا کاتێک دۆخەکە دەگۆڕێت بنووسە.
Hintئاماژە
Remember the last state in a variable and compare, as in edge detection.
کۆتا دۆخ لە لەبیر بهێڵە و بەراورد بکە، وەک .
Show answerوەڵامەکە پیشان بدە
// Lab 2 without the flood: print only when the button changes
const int btnPin = 2;
const int ledPin = 3;

bool lastPressed = false;

void setup() {
  pinMode(btnPin, INPUT_PULLUP);
  pinMode(ledPin, OUTPUT);
  Serial.begin(9600);
}

void loop() {
  bool pressed = digitalRead(btnPin) == LOW;
  digitalWrite(ledPin, pressed ? HIGH : LOW);
  if (pressed != lastPressed) {           // only on a change (an edge)
    Serial.println(pressed ? "LED ON" : "LED OFF");
    lastPressed = pressed;
  }
  delay(20);                              // a short pause also hides most bounce
}LED ON LED OFF
Run with the CêIT Arduino checker.
بە پشکنەری Arduinoـی CêIT جێبەجێ کراوە.
How many codes does the lock have with 3 buttons and 4 presses? With 4 buttons and 4 presses? Why is the second lock still weak against a brute-force attack?
قفڵەکە بە 3 دوگمە و 4 پەستان چەند کۆدی هەیە؟ بە 4 دوگمە و 4 پەستان؟ بۆچی قفڵی دووەم هێشتا بەرامبەر لاوازە؟
Show answerوەڵامەکە پیشان بدە
Even 256 codes take only about 15 minutes at 3.5 seconds a try. A real lock adds more keys, longer codes and a growing wait after wrong tries.
تەنانەت 256 کۆد بە 3.5 چرکە بۆ هەر هەوڵێک تەنیا نزیکەی 15 خولەک دەخایەنێت. قفڵی ڕاستەقینە دوگمەی زیاتر، کۆدی درێژتر و چاوەڕێیەکی زیادبوو دوای هەوڵی هەڵە زیاد دەکات.
Summaryپوختە
- An input pin with nothing connected floats and reads HIGH and LOW at random.
- A pull-up resistor holds it HIGH (button to GND, pressed = LOW); a pull-down holds it LOW (button to 5 V, pressed = HIGH).
pinMode(pin, INPUT_PULLUP)switches on the weak pull-up inside the chip (20–50 kΩ on the UNO R3).- React to the falling edge (HIGH → LOW) for one action per press: compare with the last reading and save it every pass.
- Contacts bounce for a few ms; accept a change only after 50 ms without a new change, timed with millis().
- Keep buttons off pins 0 and 1 of an UNO R3; a 27-code lock falls to a brute-force attack in minutes.
- پینێکی کە هیچی پێوە نەبەسترابێت هەڵدەواسرێت و بە هەڕەمەکی HIGH و LOW دەخوێنێتەوە.
- لە HIGHـدا ڕایدەگرێت (دوگمە بۆ GND، پەستێنراو = LOW)؛ لە LOWـدا ڕایدەگرێت (دوگمە بۆ 5 V، پەستێنراو = HIGH).
pinMode(pin, INPUT_PULLUP)لاوازی ناو چیپەکە هەڵدەکات (20–50 kΩ لەسەر UNO R3).- بۆ یەک کردەوە بۆ هەر پەستانێک کاردانەوەت بۆ (HIGH بۆ LOW) هەبێت: لەگەڵ کۆتا خوێندنەوەدا بەراوردی بکە و لە هەموو جارێکدا هەڵیبگرە.
- خاڵەکان چەند ms هەڵدەبەزنەوە؛ گۆڕان تەنیا دوای 50 ms بەبێ گۆڕانی نوێ وەربگرە، بە millis() کاتەکەی بپێوە.
- دوگمە لەسەر پینەکانی 0 و 1ـی UNO R3 دامەنێ؛ قفڵێکی 27 کۆدی بە لە چەند خولەکێکدا دەشکێت.
Why does a button with INPUT_PULLUP read LOW when pressed?بۆچی دوگمەیەک بە INPUT_PULLUP کاتی پەستان LOW دەخوێنێتەوە؟
The pull-up holds the pin at the supply; pressing joins it straight to GND, so the pin reads 0 V.
پینەکە لە سەرچاوەی ڕادەگرێت؛ پەستان ڕاستەوخۆ بە GNDـەوەی دەبەستێت، بۆیە پینەکە 0 V دەخوێنێتەوە.
What is the difference between a level and an edge?جیاوازیی نێوان ئاست و لێوار چییە؟
A level is the reading now (HIGH or LOW); an edge is the moment it changes. A held button is a level; pressing it is an edge.
ئاست خوێندنەوەی ئێستایە (HIGH یان LOW)؛ لێوار ساتی گۆڕانەکەیە. دوگمەیەکی گیراو ئاستە؛ پەستانی لێوارە.
Why 50 ms for debouncing?بۆچی 50 ms بۆ لابردنی هەڵبەزینەوە؟
It is longer than nearly all contact bounce and shorter than a delay people notice.
لە نزیکەی هەموو درێژترە و لە دواکەوتنێک کە خەڵک هەستی پێ بکەن کورتترە.
Lesson complete!وانەکە تەواو بوو!
Well done. Review the key terms, then go on to the next lesson.دەستخۆش. سەیرێکی زاراوە سەرەکییەکان بکەرەوە، پاشان بڕۆ بۆ وانەی داهاتوو.
Key termsزاراوە سەرەکییەکان
Lab: Dimming with PWM and Beeping with tone()تاقیگە: کزکردن بە PWM و بیپ بە tone()
Related lecturesوانە پەیوەندیدارەکان
- Lab: Dimming with PWM and Beeping with tone()تاقیگە: کزکردن بە PWM و بیپ بە tone()
- Arduino Boards and the Arduino IDEبۆردەکانی Arduino و Arduino IDE
- Components and Instruments on the Lab Benchپارچە و ئامێرەکانی سەر مێزی تاقیگە
- Simulating and Testing Logic Circuitsهاوشێوەکردن و تاقیکردنەوەی سووڕە لۆجیکییەکان
- Analog and Digital Signalsسیگناڵەکانی ئەنالۆگ و دیجیتاڵ
- Electricity Basics: Voltage, Current and Resistanceبنەماکانی کارەبا: ڤۆڵتیە، تەزوو و بەرگری
- Logical Operators, Nested and Multi-way ifکارپێکەرە لۆجیکییەکان، ڕستەکانی ifـی ناوەکی و ifـی فرە ڕێگا
- Counting and Permutationsژماردن و گۆڕینەکان
- Passwords, MFA and Access Controlتێپەڕەوشەکان، MFA و کۆنترۆڵی دەستڕاگەیشتن
- Keeping IoT Devices Safe and Privateئامێرەکانی IoT: ئاسایش و تایبەتێتی
- Agents, Sensors and Actuators; Rational Agentsئەیجێنتەکان، هەستەوەرەکان و جووڵێنەرەکان؛ ئەیجێنتە عەقڵانییەکان
- Sensors: How Things Feel the Worldهەستەوەرەکان: شتەکان چۆن هەست بە جیهان دەکەن
References and further readingسەرچاوەکان و خوێندنەوەی زیاتر
- Arduino: Digital Pins (INPUT, pull-up and pull-down resistors, INPUT_PULLUP 20–50 kΩ, pins as OUTPUT)
- Arduino reference: pinMode()
- Arduino reference: digitalRead()
- Arduino reference: millis()
- Arduino reference: Serial (pins 0 and 1 on the UNO R3; Serial1 on the UNO R4 and MKR boards)
- Arduino built-in example: Debounce (debounceDelay = 50 ms)
- Arduino built-in example: State Change Detection (edge detection)
- Makeability Lab (University of Washington): Debouncing — bounce duration and debounce windows
- Adafruit: What about breadboard switches? (how the four legs pair)
- TechOverflow: pull-up/pull-down resistor value of the SAMD21 (20–60 kΩ, typical 40 kΩ, from the Microchip datasheet)
This lecture is a first edition. The Kurdish text and terminology are waiting for review by Kurdish IT teachers.ئەم وانەیە چاپی یەکەمە. دەقە کوردییەکە و زاراوەکانی چاوەڕێی پێداچوونەوەی مامۆستایانی کوردی بواری IT ن.