Chapterبەش 2 · Lectureوانە 2.7
Lab: Building a Wireless LAN in Packet Tracerتاقیگە: دروستکردنی ڕایەڵەیەکی بێتەلی ناوچەیی لە Packet Tracer
Three wireless labs in Packet Tracer as written steps: a home wireless router (LAN address and DHCP, SSID, WPA2 Personal with AES, admin password), a laptop with a wireless card joining the SSID, an access point + switch + router office network, and a guest network on its own VLAN — plus what real networks need (WPA3, WPS off, firmware) and enterprise Wi-Fi with a controller and lightweight APs.
سێ تاقیکردنەوەی لە Packet Tracer وەک هەنگاوی نووسراو: ماڵەوە (ناونیشانی LAN و ، ، WPA2 Personal بە AES، بەڕێوەبەر)، بە کارتی کە بە دەبەسترێت، نووسینگە بە ، و و لەسەر خۆی — لەگەڵ ئەوەی ڕاستەقینە پێویستیانە (WPA3، WPSـی کوژاوە، ) و دامەزراوەکان بە و .
What you will learnچی فێر دەبیت
- Configure a home wireless router: LAN address, DHCP, SSID, WPA2 Personal with AES and an admin password.
- Fit a wireless card to a Packet Tracer laptop, join an SSID and verify with ipconfig and ping.
- Build an access point + switch + router network in which the router serves DHCP.
- Separate guests on their own SSID, VLAN and subnet with an unused native VLAN on the trunk.
- List the settings a real wireless network needs and explain what a WLC with lightweight APs does.
- ماڵەوە ڕێک بخەیت: ناونیشانی LAN، ، ، WPA2 Personal بە AES و بەڕێوەبەر.
- کارتی لە Packet Tracer دابنێیت، بە ببەستیت و بە ipconfig و بیپشکنیت.
- بە ، و دروست بکەیت کە تێیدا پێشکەش دەکات.
- میوانان لەسەر ، و خۆیان جیا بکەیتەوە بە بەکارنەهێنراو لەسەر .
- ئەو ڕێکخستنانە ناو ببەیت کە ڕاستەقینە پێویستیانە و ڕوون بکەیتەوە WLC بە چی دەکات.
Three wireless labsسێ تاقیکردنەوەی بێتەل
In Wireless LANs you met SSIDs, the 2.4/5/6 GHz bands and WPA2/WPA3. Now you build wireless networks yourself in Packet Tracer, in three labs: (1) a home wireless router, (2) an access point, a switch and a router, as in an office, and (3) a separate guest network. At the end come the settings a real network needs before it goes live, and how large sites manage hundreds of access points.
لە ڕایەڵە بێتەلەکانـدا ، 2.4/5/6 GHz و WPA2/WPA3ـت ناسی. ئێستا خۆت لە Packet Tracer دروست دەکەیت، لە سێ تاقیکردنەوەدا: (1) ماڵەوە، (2) ، و ، وەک نووسینگەیەک و (3) جیا. لە کۆتاییدا ئەو ڕێکخستنانە دێن کە ڕاستەقینە پێش کەوتنە کار پێویستی پێیانە و ئەوەی شوێنە گەورەکان چۆن سەدان بەڕێوە دەبەن.
Lab 1: the home wireless routerتاقیکردنەوەی 1: ڕێدۆزی بێتەلی ماڵەوە
Take a WRT300N from Packet Tracer's Wireless Devices, a Laptop-PT, a Smartphone-PT and a PC-PT. Cable the PC to one of the router's LAN ports with a straight-through cable; the laptop and the phone will join by radio. Like a real home box, the WRT300N is four devices in one: router, switch, access point and DHCP server. Its Internet port can stay empty in this lab.
لە Wireless Devicesـی Packet Tracer WRT300Nـێک، Laptop-PTـێک، Smartphone-PTـێک و PC-PTـێک هەڵبگرە. PCـەکە بە بە یەکێک لە دەرچەکانی LANـی ببەستە؛ و مۆبایلەکە بە ڕادیۆ دەبەسترێن. وەک سندووقێکی ڕاستەقینەی ماڵەوە، WRT300N چوار ئامێرە لە یەکدا: ، ، و . لەم تاقیکردنەوەیەدا دەرچەی Internetـی دەتوانێت بەتاڵ بمێنێتەوە.
Step 1: the LAN address and DHCPهەنگاوی 1: ناونیشانی LAN و DHCP
Click the router and open its GUI tab — the same pages a real router shows in a web browser. Under Setup → Basic Setup, Network Setup holds the router's LAN address (by default 192.168.0.1/24, the default gateway of every device at home) and the DHCP Server, which is Enabled and hands out addresses from 192.168.0.100 for up to 50 users. Keep these values. Click Save Settings before you leave any tab — otherwise the change is lost.
لەسەر بکە و تابی GUIـی بکەرەوە — هەمان ئەو لاپەڕانەی ڕاستەقینە لە پیشانیان دەدات. لە Setup → Basic Setupـدا، Network Setup ناونیشانی LANـی (بە بنەڕەت 192.168.0.1/24، هەموو ئامێرێکی ماڵەوە) و DHCP Server لەخۆ دەگرێت کە Enabledـە و لە 192.168.0.100ـەوە بۆ تا 50 بەکارهێنەر ناونیشان دابەش دەکات. ئەم بەهایانە بهێڵەوە. پێش جێهێشتنی هەر تابێک لە Save Settings بکە — ئەگینا گۆڕانکارییەکە لەدەست دەچێت.
Step 2: SSID and WPA2هەنگاوی 2: SSID و WPA2
Open Wireless → Basic Wireless Settings. Change Network Name (SSID) from the default to something neutral, such as CeIT-Home — never a family name or flat number, because everyone in range sees it. Save. Then Wireless → Wireless Security: choose WPA2 Personal, encryption AES and a passphrase of 8 to 63 characters; use at least 16 that are hard to guess. Save again.
Wireless → Basic Wireless Settings بکەرەوە. Network Name (SSID) لە بنەڕەتەوە بگۆڕە بۆ شتێکی بێلایەن، وەک CeIT-Home — هەرگیز ناوی خێزان یان ژمارەی شوقە نا، چونکە هەموو کەسێک لە دەیبینێت. پاشەکەوت بکە. پاشان Wireless → Wireless Security: WPA2 Personal، AES و passphraseـێک لە 8 تا 63 پیت هەڵبژێرە؛ لانیکەم 16 پیت بەکار بهێنە کە بە ئاسانی مەزەندە نەکرێن. دووپاتە پاشەکەوت بکە.
Step 3: lock the settings pageهەنگاوی 3: لاپەڕەی ڕێکخستنەکان قوفڵ بکە
Anyone who reaches the router's settings page can switch the security off. Under Administration → Management, give the router a new Router Password (Packet Tracer's default login is admin/admin, like many real routers' labels) and keep Remote Management Disabled, so the page cannot be opened from the Internet. The same tab group has Firmware Upgrade — on a real router, install updates or turn on automatic updates.
هەر کەسێک بگاتە لاپەڕەی ڕێکخستنەکانی دەتوانێت ئاسایشەکە بکوژێنێتەوە. لە Administration → Management، Router Passwordـێکی نوێ بدە بە ( بنەڕەتیی Packet Tracer admin/adminـە، وەک لەسەر لەیبڵی زۆر ڕاستەقینە) و Remote Management بە Disabled بهێڵەوە، بۆ ئەوەی لاپەڕەکە لە نەکرێتەوە. هەمان کۆمەڵە تاب Firmware Upgradeـی هەیە — لەسەر ڕاستەقینە نوێکارییەکانی دابمەزرێنە یان نوێکردنەوەی خۆکار چالاک بکە.
Step 4: give the laptop a wireless cardهەنگاوی 4: کارتی بێتەل بدە بە لاپتۆپەکە
A new Laptop-PT has only a wired network interface card (PT-LAPTOP-NM-1CFE). Open the laptop's Physical tab, switch the power off with the button on the picture, drag the wired card out to the module list and drag WPC300N — a 2.4 GHz wireless card — into the empty slot. Switch the power on again. Modules can only be changed while the device is off. A smartphone or tablet already has a wireless interface.
Laptop-PTـێکی نوێ تەنیا وایەرداری هەیە (PT-LAPTOP-NM-1CFE). تابی Physicalـی بکەرەوە، بە دوگمەکەی سەر وێنەکە کارەباکەی بکوژێنەوە، کارتە وایەردارەکە بۆ لیستی مۆدیوڵەکان ڕابکێشە و WPC300N — کارتێکی 2.4 GHz — ڕابکێشە بۆ شوێنە بەتاڵەکە. دووپاتە کارەباکەی هەڵبکە. مۆدیوڵەکان تەنیا کاتێک دەگۆڕدرێن کە ئامێرەکە کوژاوەیە. مۆبایل یان تابلێت پێشتر هەیە.
Step 5: join the networkهەنگاوی 5: پەیوەندی بە ڕایەڵەکەوە بکە
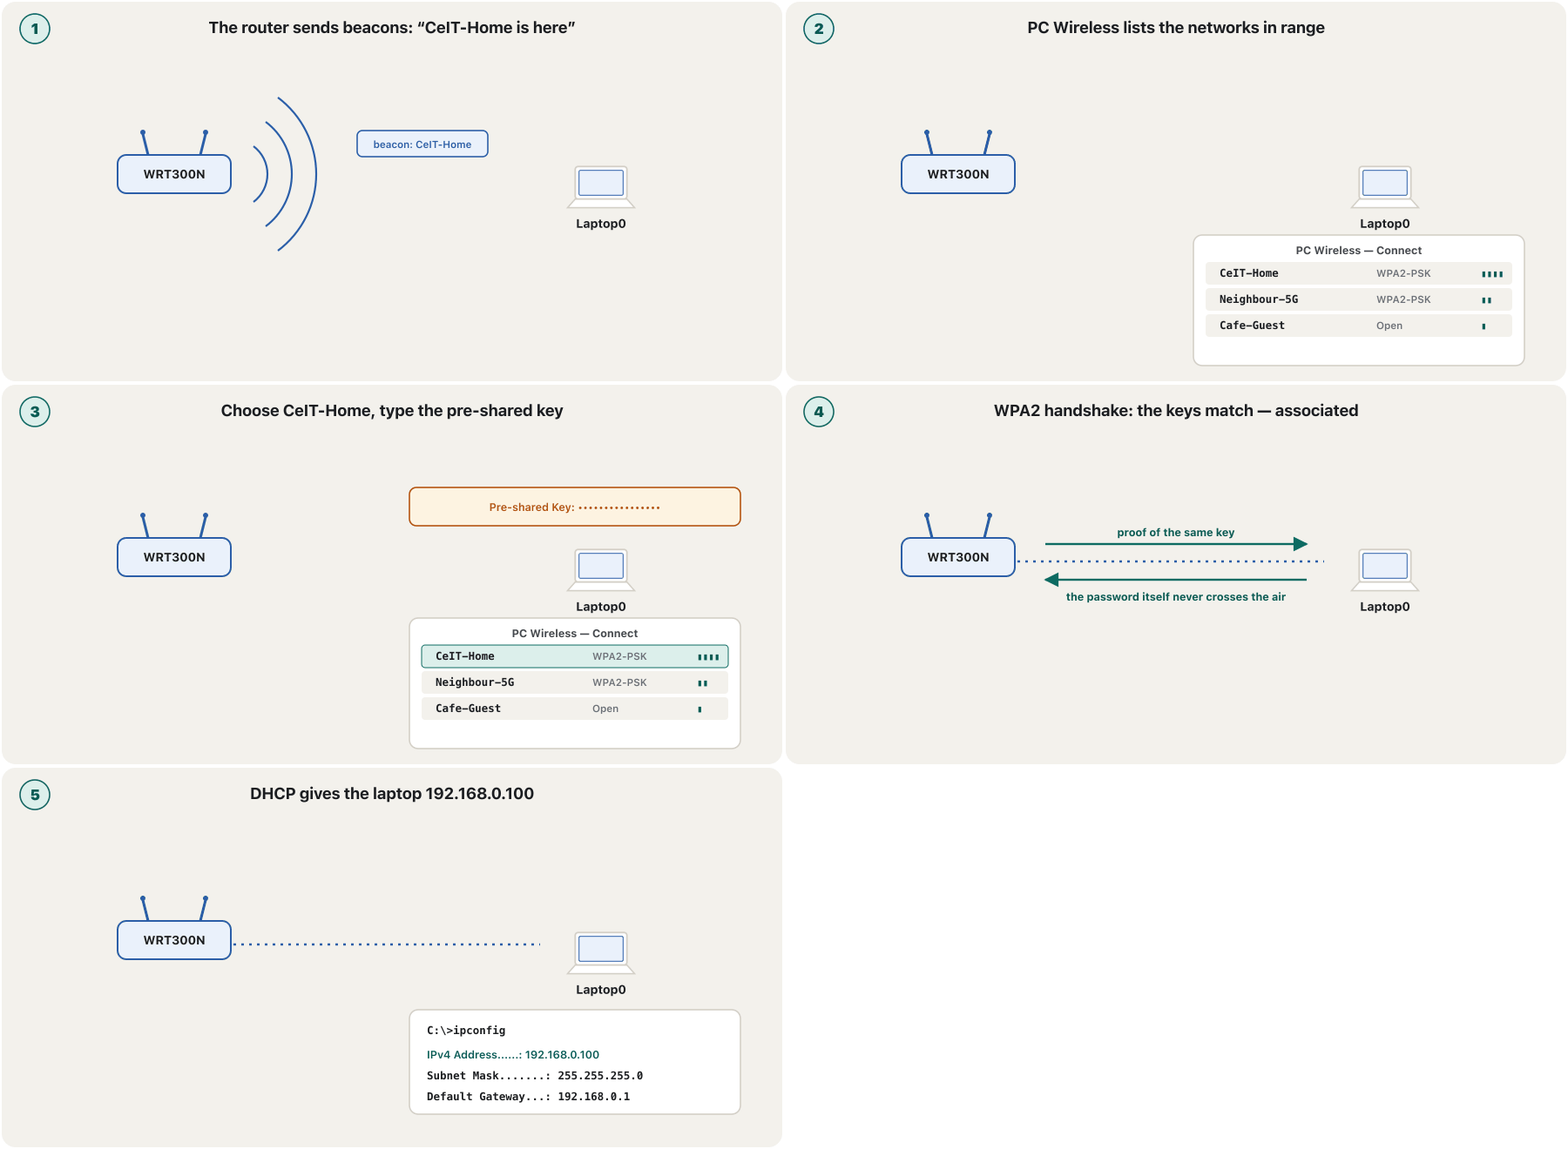
On the laptop open Desktop → PC Wireless (it appears once the WPC300N is in). The Connect tab lists the networks in range; choose CeIT-Home, click Connect, type the passphrase as the Pre-shared Key and connect. A dotted line now joins the laptop and the router. For the smartphone, use Config → Wireless0: SSID CeIT-Home, authentication WPA2-PSK, the same passphrase, encryption AES. If a device shows no address, set IP Configuration to DHCP.
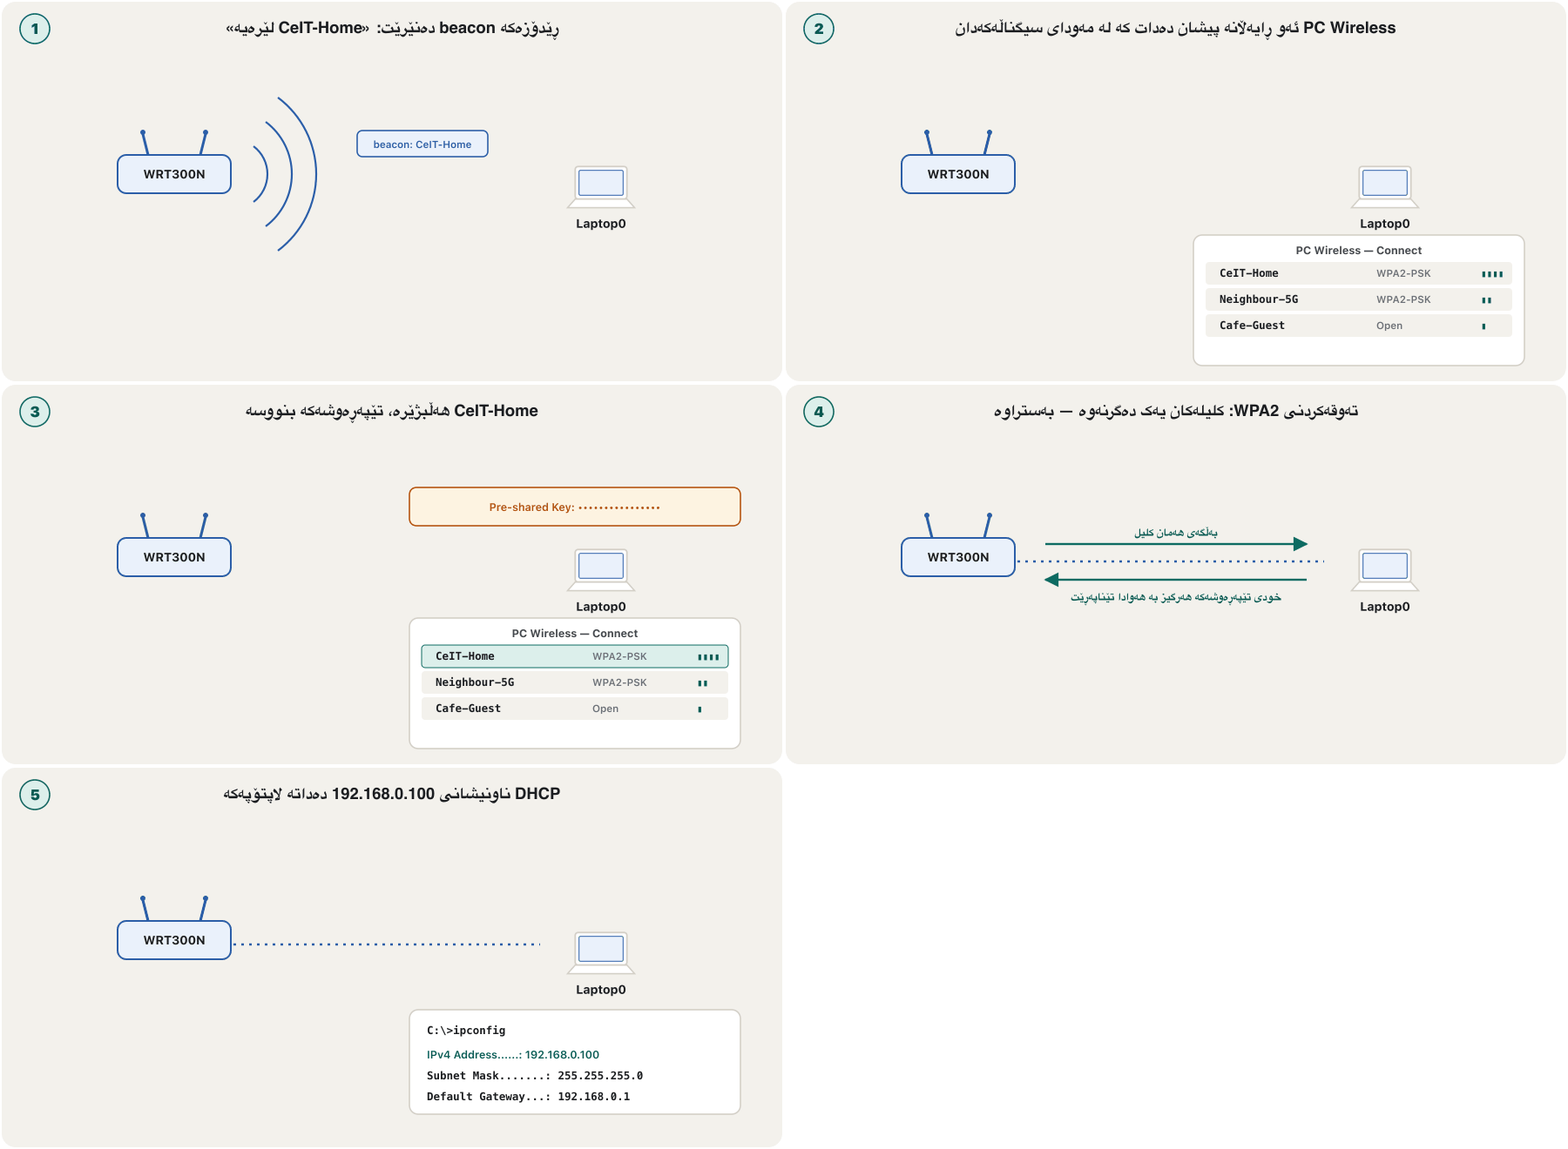
لەسەر Desktop → PC Wireless بکەرەوە (کاتێک WPC300N دانرا دەردەکەوێت). تابی Connect ئەو پیشان دەدات کە لە ؛ CeIT-Home هەڵبژێرە، لە Connect بکە، passphraseـەکە وەک Pre-shared Key بنووسە و پەیوەندی بکە. ئێستا هێڵێکی خاڵخاڵ بە دەبەستێت. بۆ مۆبایلەکە Config → Wireless0 بەکار بهێنە: CeIT-Home، WPA2-PSK، هەمان passphrase، AES. ئەگەر ئامێرێک هیچ ناونیشانێکی نەبوو، IP Configuration بکە بە DHCP.
Step 6: check the addresses and pingهەنگاوی 6: ناونیشانەکان بپشکنە و پینگ بکە
On the laptop open Desktop → Command Prompt. ipconfig shows the address the router's DHCP server handed out; then ping the wired PC. On the router, Status → Local Network shows the DHCP Client Table: every device and its address.
لەسەر Desktop → Command Prompt بکەرەوە. ipconfig ئەو ناونیشانە پیشان دەدات کە دایە؛ پاشان بۆ PCـە وایەردارەکە بکە. لەسەر ، Status → Local Network DHCP Client Table پیشان دەدات: هەموو ئامێرێک و ناونیشانەکەی.
C:\>ipconfig

Wireless0 Connection:(default port)

   ...
   IPv4 Address....................: 192.168.0.100
   Subnet Mask.....................: 255.255.255.0
   Default Gateway.................: ::
                                     192.168.0.1
Explain the codeڕوونکردنەوەی کۆدەکە
- Lineدێڕی 3
The wireless interface; the wired one is gone with the old card.
؛ وایەردارەکە لەگەڵ کارتە کۆنەکە ڕۆیشت.
- Lineدێڕی 8-9
::is the empty IPv6 gateway; the IPv4 gateway is the router.::بەتاڵی IPv6ـە؛ IPv4 .
C:\>ping 192.168.0.101

Pinging 192.168.0.101 with 32 bytes of data:

Reply from 192.168.0.101: bytes=32 time=21ms TTL=128
Reply from 192.168.0.101: bytes=32 time=11ms TTL=128
Reply from 192.168.0.101: bytes=32 time=12ms TTL=128
Reply from 192.168.0.101: bytes=32 time=9ms TTL=128

Ping statistics for 192.168.0.101:
    Packets: Sent = 4, Received = 4, Lost = 0 (0% loss),
Approximate round trip times in milli-seconds:
Minimum = 9ms, Maximum = 21ms, Average = 13msLab 2: access point, switch and routerتاقیکردنەوەی 2: خاڵی دەستڕاگەیشتن، سویچ و ڕێدۆز
Offices split the jobs over separate devices: a router (here an ISR 4331, R1) is the gateway and the DHCP server, a switch (2960, SW1) connects everything by cable, and an access point (AccessPoint-PT, AP1) only joins the radio side to the wired LAN — it does no routing and hands out no addresses (access point or wireless router?). Cable R1 G0/0/0 to SW1 G0/1, AP1 to Fa0/2 and PC1 to Fa0/3, then configure R1:
نووسینگەکان کارەکان بەسەر ئامێری جیادا دابەش دەکەن: (لێرە ISR 4331، R1) و ، (2960، SW1) هەموو شتێک بە کێبڵ دەبەستێت و (AccessPoint-PT، AP1) تەنیا لای ڕادیۆ بە وایەردارەوە دەبەستێت — نە دەکات نە ناونیشان دابەش دەکات (خاڵی دەستڕاگەیشتن یان ڕێدۆزی بێتەل؟). R1 G0/0/0 بە SW1 G0/1، AP1 بە Fa0/2 و PC1 بە Fa0/3ـەوە ببەستە، پاشان R1 ڕێک بخە:
R1(config)#interface gigabitEthernet 0/0/0
R1(config-if)#ip address 192.168.10.1 255.255.255.0
R1(config-if)#no shutdown
R1(config-if)#exit
R1(config)#ip dhcp excluded-address 192.168.10.1 192.168.10.9
R1(config)#ip dhcp pool OFFICE
R1(dhcp-config)#network 192.168.10.0 255.255.255.0
R1(dhcp-config)#default-router 192.168.10.1
R1(dhcp-config)#end
R1#copy running-config startup-config
Explain the codeڕوونکردنەوەی کۆدەکە
- Lineدێڕی 5
Keep .1–.9 for fixed devices (router, printers …).
.1–.9بۆ ئامێرە جێگیرەکان بهێڵەوە (، …).- Lineدێڕی 6-8
The pool and the gateway it gives out. Every line is explained in DHCP on Cisco routers; a real network also adds
dns-server.پووڵەکە و ئەو دەیدات. هەموو دێڕێک لە DHCP لەسەر ڕێدۆزەکانی Ciscoـدا ڕوون کراوەتەوە؛ ڕاستەقینە
dns-serverـیش زیاد دەکات.
Step 2: configure the access pointهەنگاوی 2: خاڵی دەستڕاگەیشتنەکە ڕێک بخە
Click AP1 and open Config → Port 1 (Port 1 is the radio; Port 0 is the Ethernet side towards SW1). Set the SSID to CeIT-Office, choose WPA2-PSK as authentication, type a PSK Pass Phrase and keep encryption AES. A channel of 1, 6 or 11 avoids overlap with neighbours on 2.4 GHz (channels). The AP needs no IP address for this lab.
لەسەر AP1 بکە و Config → Port 1 بکەرەوە (Port 1 ڕادیۆکەیە؛ Port 0 لای Ethernetـە بەرەو SW1). SSID بکە بە CeIT-Office، WPA2-PSK وەک هەڵبژێرە، PSK Pass Phraseـێک بنووسە و AES بهێڵەوە. 1، 6 یان 11 لەسەر 2.4 GHz لە تێکەڵبوون لەگەڵ دراوسێکان دوورت دەخاتەوە (کەناڵە ڕادیۆییەکان). لەم تاقیکردنەوەیەدا پێویستی بە نییە.
Join Laptop1 and Laptop2 as in Lab 1, with SSID CeIT-Office and the new passphrase. Their IP Configuration set to DHCP, they get 192.168.10.10 and up from R1 — the request crosses AP1 and SW1 unchanged. show ip dhcp binding on R1 lists who got which address; a ping from Laptop1 to PC1 and to 192.168.10.1 should succeed.
Laptop1 و Laptop2 وەک تاقیکردنەوەی 1 ببەستە، بە CeIT-Office و passphrase نوێیەکە. کاتێک IP Configurationـیان بێت، لە R1ـەوە 192.168.10.10 و بەرەو سەرەوە وەردەگرن — داواکارییەکە بێ گۆڕان بە AP1 و SW1دا تێدەپەڕێت. show ip dhcp binding لەسەر R1 دەنووسێت کێ کام ناونیشانی وەرگرتووە؛ لە Laptop1ـەوە بۆ PC1 و بۆ 192.168.10.1 دەبێت سەربکەوێت.
Lab 3: a guest network on its own VLANتاقیکردنەوەی 3: ڕایەڵەیەکی میوانان لەسەر VLANـی خۆی
Visitors should reach the Internet but not the office's computers. Give them a guest network: a second access point, AP2, with SSID CeIT-Guest, on a switch port in VLAN 30, while AP1 and PC1 move to VLAN 10. R1 routes both VLANs through one trunk as a router on a stick, each subinterface with its own gateway and DHCP pool. As in every lab of this course, the trunk's native VLAN is an unused VLAN, here 999 — not VLAN 1 and not a management VLAN.
میوانان دەبێت بگەنە بەڵام نەگەنە نووسینگەکە. ـیان بدەیە: دووەم، AP2، بە CeIT-Guest، لەسەر لە VLAN 30ـدا، لە کاتێکدا AP1 و PC1 دەگوازرێنەوە بۆ VLAN 10. R1 هەردوو بە یەک وەک ڕێدۆزی تاکقۆڵ دەکات، هەر بە و پووڵی خۆیەوە. وەک هەموو تاقیکردنەوەیەکی ئەم کۆرسە، بەکارنەهێنراوە، لێرە 999 — نە VLAN 1 و نە بەڕێوەبردن.
A separate Wi-Fi network (its own , password and ) for visitors: guests reach the Internet but not the home's or company's own computers, printers and servers.
جیا (، و خۆی) بۆ میوانان: میوانەکان دەگەنە بەڵام ناگەنە ، و خودی ماڵەکە یان کۆمپانیاکە.
Configuring the guest networkڕێکخستنی ڕایەڵەی میوانانەکە
On SW1 create the VLANs, put the APs and PC1 into them and make G0/1 a trunk with the unused native VLAN. On R1 move the address from the physical interface to subinterfaces and add a second DHCP pool. Set AP1's SSID to CeIT-Staff and AP2's to CeIT-Guest, each with its own passphrase.
لەسەر SW1 دروست بکە، و PC1 بخە ناویانەوە و G0/1 بکە بە بە بەکارنەهێنراوەوە. لەسەر R1 ناونیشانەکە لە فیزیکییەوە بگوازەوە بۆ و پووڵێکی دووەمی زیاد بکە. AP1 بکە بە CeIT-Staff و هی AP2 بە CeIT-Guest، هەریەکە بە passphraseـی خۆی.
SW1(config)#vlan 10
SW1(config-vlan)#name STAFF
SW1(config-vlan)#vlan 30
SW1(config-vlan)#name GUEST
SW1(config-vlan)#vlan 999
SW1(config-vlan)#name Native
SW1(config-vlan)#exit
SW1(config)#interface range fastEthernet 0/2, fastEthernet 0/4
SW1(config-if-range)#switchport mode access
SW1(config-if-range)#switchport access vlan 10
SW1(config-if-range)#interface fastEthernet 0/3
SW1(config-if)#switchport mode access
SW1(config-if)#switchport access vlan 30
SW1(config-if)#interface gigabitEthernet 0/1
SW1(config-if)#switchport mode trunk
SW1(config-if)#switchport trunk native vlan 999
SW1(config-if)#switchport trunk allowed vlan 10,30,999
SW1(config-if)#end
SW1#copy running-config startup-config
Explain the codeڕوونکردنەوەی کۆدەکە
- Lineدێڕی 5-6
VLAN 999 carries no user traffic; it is only the trunk's native VLAN (native VLAN).
VLAN 999 هیچ هاتوچۆیەکی بەکارهێنەر هەڵناگرێت؛ تەنیا (VLANـی ڕەسەن).
R1(config)#interface gigabitEthernet 0/0/0
R1(config-if)#no ip address
R1(config-if)#exit
R1(config)#interface gigabitEthernet 0/0/0.10
R1(config-subif)#encapsulation dot1Q 10
R1(config-subif)#ip address 192.168.10.1 255.255.255.0
R1(config-subif)#exit
R1(config)#interface gigabitEthernet 0/0/0.30
R1(config-subif)#encapsulation dot1Q 30
R1(config-subif)#ip address 192.168.30.1 255.255.255.0
R1(config-subif)#exit
R1(config)#interface gigabitEthernet 0/0/0.999
R1(config-subif)#encapsulation dot1Q 999 native
R1(config-subif)#exit
R1(config)#ip dhcp excluded-address 192.168.30.1 192.168.30.9
R1(config)#ip dhcp pool GUEST
R1(dhcp-config)#network 192.168.30.0 255.255.255.0
R1(dhcp-config)#default-router 192.168.30.1
R1(dhcp-config)#end
R1#copy running-config startup-config
Explain the codeڕوونکردنەوەی کۆدەکە
- Lineدێڕی 2
The physical interface keeps
no shutdownbut loses its address.فیزیکییەکە
no shutdownدەهێڵێتەوە بەڵام ناونیشانەکەی لادەبرێت.- Lineدێڕی 12-13
The native VLAN's subinterface needs no address; it only has to match the switch.
پێویستی بە ناونیشان نییە؛ تەنیا دەبێت لەگەڵ یەک بگرێتەوە.
Before it goes live: hardeningپێش کەوتنە کار: بەهێزکردنی ئاسایش
Packet Tracer shows the ideas; a real router needs a few more settings. The reasons are explained in Securing a home Wi-Fi; this is the list to tick off:
Packet Tracer بیرۆکەکان پیشان دەدات؛ ڕاستەقینە چەند ڕێکخستنێکی تری پێویستە. هۆکارەکان لە پاراستنی وایفایی ماڵەوەـدا ڕوون کراونەتەوە؛ ئەمە لیستەکەیە بۆ نیشانەکردن:
- Change the admin password first; turn remote management off.
- WPA3-Personal, or WPA2/WPA3 transition for old devices, with a long passphrase; never WEP or TKIP.
- Turn WPS off: its PIN can be guessed.
- Update the firmware and turn on automatic updates.
- Put visitors and smart gadgets on the guest network.
- Keep one SSID for 2.4, 5 and 6 GHz and let the router steer devices; give a band its own name only when a device needs it. 6 GHz accepts only WPA3.
- Save, and keep a backup of the configuration.
- سەرەتا بەڕێوەبەر بگۆڕە؛ بەڕێوەبردن لە دوورەوە بکوژێنەوە.
- WPA3-Personal، یان WPA2/WPA3 transition بۆ ئامێرە کۆنەکان، بە passphraseـێکی درێژ؛ هەرگیز WEP یان TKIP نا.
- بکوژێنەوە: PINـەکەی مەزەندە دەکرێت.
- نوێ بکەرەوە و نوێکردنەوەی خۆکار چالاک بکە.
- میوانان و ئامێرە زیرەکەکان بخە سەر .
- یەک بۆ 2.4، 5 و 6 GHz بهێڵەوە و با ئامێرەکان ئاڕاستە بکات؛ تەنیا کاتێک ئامێرێک پێویستی بوو ناوێکی جیا بدە بە . 6 GHz تەنیا WPA3 وەردەگرێت.
- پاشەکەوت بکە و بهێڵەوە.
Enterprise Wi-Fi: controllers and lightweight APsوایفایی دامەزراوەکان: کۆنترۆڵکەر و APـی سووک
A university with 300 access points cannot configure them one by one. It uses lightweight access points that keep almost no settings themselves and a wireless LAN controller (WLC) that manages them all. Each AP builds a CAPWAP tunnel to the WLC (RFC 5415, UDP ports 5246 and 5247) and downloads its SSIDs, security and radio settings. The WLC chooses channels and power, keeps roaming smooth and changes a password everywhere at once. As of 2026, Cisco's controllers are the Catalyst 9800 family running IOS XE; cloud-managed APs do the same job from a web dashboard. Packet Tracer has a WLC and lightweight APs (LAP-PT) for practising this design.
زانکۆیەک بە 300 ناتوانێت یەک یەک ڕێکیان بخات. بەکار دەهێنێت کە نزیکەی هیچ ڕێکخستنێکیان لای خۆیان نییە و (WLC) کە هەموویان بەڕێوە دەبات. هەر APـێک تونێلێکی CAPWAP بۆ WLC دروست دەکات (RFC 5415، UDP 5246 و 5247) و ، ئاسایش و ڕێکخستنی ڕادیۆکەی وەردەگرێت. WLC و هێزی ناردن هەڵدەبژێرێت، نەرم دەهێڵێتەوە و لە هەموو شوێنێک بە یەکجار دەگۆڕێت. تا 2026، کۆنترۆڵکەرەکانی Cisco خێزانی Catalyst 9800ن کە IOS XE بەکار دەهێنن؛ APـی بە هەور بەڕێوەبراو هەمان کار لە داشبۆردێکی دەکەن. Packet Tracer WLC و APـی سووکی (LAP-PT) هەیە بۆ ڕاهێنان لەسەر ئەم دیزاینە.
A device (or cloud service) that configures and manages many from one place: the SSIDs and their security, radio channels and power, and roaming between access points. The access points reach it over CAPWAP tunnels.
ئامێرێک (یان ڕاژەیەکی هەوری) کە زۆر لە یەک شوێنەوە ڕێک دەخات و بەڕێوەیان دەبات: و ئاسایشیان، و هێزی ناردن و لە نێوان . لە ڕێگەی تونێلی CAPWAPـەوە دەیگەنێ.
Common mistakesهەڵە باوەکان
Exercisesڕاهێنانەکان
Build Lab 1 again with SSID Lab-WiFi-7, WPA2 Personal, AES and a passphrase of your own, a new router admin password, one laptop, one smartphone and one wired PC. List your steps and how you prove that all three devices are on the network.
تاقیکردنەوەی 1 دووپاتە دروست بکە بە Lab-WiFi-7، WPA2 Personal، AES و passphraseـێکی خۆت، نوێی بەڕێوەبەری ، یەک ، یەک مۆبایل و یەک PCـی وایەردار. هەنگاوەکانت بنووسە و چۆن دەیسەلمێنیت کە هەر سێ ئامێرەکە لەسەر .
Show answerوەڵامەکە پیشان بدە
- Router GUI: Wireless → Basic Wireless Settings → SSID
Lab-WiFi-7→ Save; Wireless Security → WPA2 Personal, AES, passphrase → Save; Administration → Router Password → Save. - Laptop: Physical → power off → swap to WPC300N → power on → Desktop → PC Wireless → Connect with the key.
- Smartphone: Config → Wireless0 → SSID, WPA2-PSK, passphrase.
- Proof: each device's
ipconfigshows a 192.168.0.100+ address; pings to 192.168.0.1 and between the devices succeed; the router's DHCP Client Table lists all three.
- GUIـی : لە
Wireless → Basic Wireless Settingsبکە بەLab-WiFi-7و پاشەکەوتی بکە؛ لەWireless → Wireless SecurityWPA2 Personal، AES و passphrase دابنێ و پاشەکەوتی بکە؛ لەAdministration → ManagementRouter Password بگۆڕە و پاشەکەوتی بکە. - : لە Physical بیکوژێنەوە، کارتەکە بگۆڕە بۆ WPC300N و هەڵیبکەوە؛ پاشان
Desktop → PC Wirelessو Connect بە . - مۆبایل: لە
Config → Wireless0، WPA2-PSK و passphrase دابنێ. - سەلماندن:
ipconfigـی هەر ئامێرێک ناونیشانێکی 192.168.0.100 بەرەو سەرەوە پیشان دەدات؛ بۆ 192.168.0.1 و لە نێوان ئامێرەکاندا سەردەکەوێت؛ DHCP Client Tableـی هەر سێکیان دەنووسێت.
A student's laptop shows an empty list in PC Wireless, although the router is next to it. Give four possible causes.
قوتابییەک لیستێکی بەتاڵ لە PC Wireless پیشان دەدات، هەرچەندە لە تەنیشتیەتی. چوار هۆکاری ئەگەری بنووسە.
Show answerوەڵامەکە پیشان بدە
- The wired card is still installed (or no wireless card at all).
- The laptop is switched off after the module change.
- The card's band does not match the router's radio (5 GHz card, 2.4 GHz router).
- The router's radio is off or its SSID broadcast is disabled; or the laptop is outside the router's range.
- کارتە وایەردارەکە هێشتا دانراوە (یان هیچ کارتێکی نییە).
- دوای گۆڕینی مۆدیوڵ هێشتا کوژاوەیە.
- کارتەکە لەگەڵ ڕادیۆی یەک ناگرێتەوە (کارتی 5 GHz، 2.4 GHz).
- ڕادیۆی کوژاوەتەوە یان ناردنی ناچالاکە؛ یان لە دەرەوەی .
The café next to the office wants a guest network for up to 120 customers on VLAN 40, beside staff on VLAN 10 (192.168.10.0/24). Choose a subnet, the gateway, the excluded addresses and the R1 subinterface, and say what stops guests from reaching staff devices.
چایخانەکەی تەنیشت نووسینگەکە دەوێت بۆ تا 120 کڕیار لەسەر VLAN 40، لە تەنیشت کارمەندان لەسەر VLAN 10 (192.168.10.0/24). ، ، ناونیشانە دەرکراوەکان و R1 هەڵبژێرە و بڵێ چی میوانان لە گەیشتن بە ئامێرەکانی کارمەندان ڕادەگرێت.
Show answerوەڵامەکە پیشان بدە
Subnet 192.168.40.0/24 (254 usable hosts, enough for 120); gateway 192.168.40.1 on interface gigabitEthernet 0/0/0.40 with encapsulation dot1Q 40; ip dhcp excluded-address 192.168.40.1 192.168.40.9 and a pool with default-router 192.168.40.1; VLAN 40 added to the trunk's allowed list. An ACL on G0/0/0.40 that denies 192.168.10.0/24 and permits the rest keeps guests away from staff.
192.168.40.0/24 (254 بەکارهاتوو، بەس بۆ 120)؛ 192.168.40.1 لەسەر interface gigabitEthernet 0/0/0.40 بە encapsulation dot1Q 40؛ ip dhcp excluded-address 192.168.40.1 192.168.40.9 و پووڵێک بە default-router 192.168.40.1؛ VLAN 40 زیاد دەکرێتە . لەسەر G0/0/0.40 کە 192.168.10.0/24 ڕەت دەکاتەوە و ئەوانی تر ڕێگە دەدات میوانان لە کارمەندان دوور دەخاتەوە.
Your lab used WPA2 Personal with AES. You now install a real router for a family in Sulaymaniyah. Which security settings do you choose differently, and why?
تاقیکردنەوەکەت WPA2 Personal بە AES بەکار هێنا. ئێستا ڕاستەقینە بۆ خێزانێک لە سلێمانی دادەمەزرێنیت. کام ڕێکخستنی ئاسایش بە شێوەیەکی جیاواز هەڵدەبژێریت و بۆچی؟
Show answerوەڵامەکە پیشان بدە
WPA3-Personal (or WPA2/WPA3 transition if an old device must join), because WPA3's SAE log-in resists offline password guessing; WPS off; a new admin password; firmware updates on; a guest network for visitors and smart devices; one SSID for all bands.
WPA3-Personal (یان WPA2/WPA3 transition ئەگەر ئامێرێکی کۆن دەبێت ببەسترێت)، چونکە چوونەژوورەوەی SAEـی WPA3 بەرگەی مەزەندەکردنی دەرهێڵی دەگرێت؛ WPS کوژاوە؛ نوێی بەڕێوەبەر؛ نوێکردنەوەی چالاک؛ بۆ میوانان و ئامێرە زیرەکەکان؛ یەک بۆ هەموو .
Summaryکورتە
- A home wireless router is router, switch, access point and DHCP server in one: set the LAN address and DHCP (Setup), SSID and WPA2 Personal + AES + a long passphrase (Wireless), and a new admin password (Administration). Save every tab.
- A Packet Tracer laptop needs a wireless card (WPC300N, power off to swap); it joins with PC Wireless or Config → Wireless0, then gets its address by DHCP.
- In an office the router is gateway and DHCP server, the switch connects, the access point only bridges radio to cable (Config → Port 1).
- A guest network = its own SSID, VLAN, subnet and DHCP pool, kept apart with an ACL; the trunk's native VLAN is an unused VLAN.
- Packet Tracer stops at WPA2; real networks use WPA3, WPS off, updated firmware and a changed admin password. Large sites manage lightweight APs from a WLC over CAPWAP.
- ماڵەوە ، ، و لە یەکدا: ناونیشانی LAN و (Setup)، و WPA2 Personal + AES + passphraseـێکی درێژ (Wireless) و نوێی بەڕێوەبەر (Administration) دابنێ. هەموو تابێک پاشەکەوت بکە.
- Packet Tracer کارتی پێویستە (WPC300N، بۆ گۆڕین بیکوژێنەوە)؛ بە PC Wireless یان
Config → Wireless0دەبەسترێت، پاشان ناونیشانەکەی بە وەردەگرێت. - لە نووسینگەدا و ، دەبەستێت و تەنیا ڕادیۆ بە کێبڵەوە دەبەستێت (
Config → Port 1). - = ، ، و پووڵی خۆی، بە جیا دەکرێتەوە؛ بەکارنەهێنراوە.
- Packet Tracer لە WPA2دا دەوەستێت؛ ڕاستەقینە WPA3، WPSـی کوژاوە، نوێکراوە و گۆڕدراوی بەڕێوەبەر بەکار دەهێنن. شوێنە گەورەکان لە WLCـێکەوە بە CAPWAP بەڕێوە دەبەن.
Next chapter: Reading the Routing Table.
بەشی داهاتوو: خوێندنەوەی خشتەی ڕێدۆزی.
Lesson complete!وانەکە تەواو بوو!
Well done. Review the key terms, then go on to the next lesson.دەستخۆش. سەیرێکی زاراوە سەرەکییەکان بکەرەوە، پاشان بڕۆ بۆ وانەی داهاتوو.
Key termsزاراوە سەرەکییەکان
Reading the Routing Table: Route Sources, Metrics and ADخوێندنەوەی خشتەی ڕێدۆزی: سەرچاوەکانی ڕێگە، پێوانە و مەودای بەڕێوەبەری
Related lecturesوانە پەیوەندیدارەکان
- Inter-VLAN Routing with a Router: Router-on-a-Stickڕێدۆزیی نێوان VLANـەکان بە ڕێدۆز: ڕێدۆزی تاکقۆڵ
- Trunks and 802.1Q Tagsترەنکەکان و تاگەکانی 802.1Q
- DHCP on a Cisco Router and DHCP RelayDHCP لەسەر ڕێدۆزێکی Cisco و گوازەرەوەی DHCP
- Access Control Lists: Filtering TrafficACLـەکان: فلتەرکردنی هاتوچۆ
- Modems and Routersمۆدێمەکان و ڕێدۆزەکان
- DHCP: Automatic Addresses, DORA and LeasesDHCP: ناونیشانی خۆکار، DORA و کرێکانی DHCP
- Switch Port Securityئاسایشی دەرچەی سویچ
References and further readingسەرچاوەکان و خوێندنەوەی زیاتر
- Cisco Packet Tracer help: WRT300N GUI — tabs Setup, Wireless (SSID, Standard Channel; security modes Disabled, WEP, WPA/WPA2 Personal and Enterprise), Administration (Management, Factory Defaults, Firmware Upgrade), Status
- Cisco Packet Tracer help: Configuring WRT300N — Config tab, WPA2-PSK passphrase 8–63 ASCII characters, AES or TKIP
- Cisco Packet Tracer help: Home Router GUI — the same security modes (no WPA3)
- Cisco Packet Tracer help: Devices and Modules — End Devices (WPC300N 2.4 GHz and PT-LAPTOP-NM-1W-A 5 GHz laptop modules)
- Wi-Fi Alliance: Wi-Fi security — WPA3-Personal, WPA3-Enterprise, Wi-Fi Enhanced Open; WPA3 mandatory for Wi-Fi CERTIFIED devices
- RFC 5415: Control And Provisioning of Wireless Access Points (CAPWAP) Protocol Specification
This lecture is a first edition. The Kurdish text and terminology are waiting for review by Kurdish IT teachers.ئەم وانەیە چاپی یەکەمە. دەقە کوردییەکە و زاراوەکانی چاوەڕێی پێداچوونەوەی مامۆستایانی کوردی بواری IT ن.