Chapterبەش 8 · Lectureوانە 8.1
Packet Tracer: Your First NetworkPacket Tracer: یەکەم ڕایەڵەکەت
Cisco Packet Tracer step by step: what it is and how to get it free in 2026, a tour of the window, Realtime and Simulation modes, building PC–switch–PC, choosing cables and reading link lights, giving the PCs addresses, testing with ping and Add Simple PDU, watching ARP and ICMP in Simulation mode, a router’s Config tab as a bridge to the CLI, and the CêIT 3D network lab as an in-browser alternative.
Cisco Packet Tracer هەنگاو بە هەنگاو: چییە و چۆن لە 2026ـدا بە بێبەرانبەر وەریدەگریت، گەڕانێک بە ناو پەنجەرەکەدا، باری Realtime و Simulation، دروستکردنی ––، هەڵبژاردنی کێبڵ و خوێندنەوەی نیشانەکانی بەستەر، دانانی ناونیشان بۆ ، تاقیکردنەوە بە و Add Simple PDU، بینینی و لە باری Simulation، بەشی Configـی وەک پردێک بۆ CLI و تاقیگەی سێ ڕەهەندیی CêIT وەک جێگرەوەیەک لە .
What you will learnچی فێر دەبیت
- Say what Packet Tracer is and get the current version legally and for free.
- Name the parts of the Packet Tracer window and switch between Realtime and Simulation modes.
- Build a PC–switch–PC network with the right cables and read its link lights.
- Give PCs static IP addresses and test them with ping and Add Simple PDU.
- Follow ARP and ICMP step by step in Simulation mode and open a packet’s layers.
- بڵێیت Packet Tracer چییە و وەشانی ئێستای بە یاسایی و بێبەرانبەر وەربگریت.
- بەشەکانی پەنجەرەی Packet Tracer ناو ببەیت و لە نێوان باری Realtime و Simulation بگوازیتەوە.
- –– بە کێبڵی دروست دروست بکەیت و نیشانەکانی بەستەری بخوێنیتەوە.
- جێگیر بدەیتە و بە و Add Simple PDU تاقییان بکەیتەوە.
- و هەنگاو بە هەنگاو لە باری Simulation ببینیت و چینەکانی بکەیتەوە.
Packet Tracer: a network on your screenPacket Tracer: ڕایەڵەیەک لەسەر شاشەکەت
Cisco Packet Tracer is a network simulator: a free program from the Cisco Networking Academy in which you build a network from virtual routers, switches, PCs and servers, join them with cables, set them up and then watch how data moves between them. You need no real equipment and no money, and a mistake breaks nothing. Teachers also use it to write graded activities, and students can even work on one network together over the Internet.
Cisco Packet Tracer : بێبەرانبەری Cisco Networking Academy کە تێیدا لە ئامێری هاوشێوەسازکراو — ، ، و — دروست دەکەیت، بە کێبڵ پێکەوەیان دەبەستیتەوە، ڕێکیان دەخەیت و پاشان دەبینیت چۆن لە نێوانیاندا دەڕوات. پێویستت بە ئامێری ڕاستەقینە و پارە نییە و هەڵەیەک هیچ شتێک تێک نادات. مامۆستایانیش چالاکیی نمرەدار بە Packet Tracer دەنووسن و قوتابیان دەتوانن بە پێکەوە لەسەر یەک کار بکەن.
The name says what it does. A packet is a small unit of data that a network carries. Tracer comes from trace: following and recording the path something takes. So Packet Tracer lets you follow each packet, step by step, along its way from one device to another.
ناوەکەی خۆی دەڵێت چی دەکات. یەکەیەکی بچووکی کە دەیگوازێتەوە. Tracer لە وشەی traceـەوە هاتووە: شوێنکەوتن و تۆمارکردنی ئەو ڕێگەیەی شتێک پێیدا دەڕوات. کەواتە Packet Tracer ڕێگەت پێ دەدات هەر هەنگاو بە هەنگاو لە ڕێگاکەیدا لە ئامێرێکەوە بۆ ئامێرێکی تر ببینیت.
Packet Tracer: a network on your screenPacket Tracer: ڕایەڵەیەک لەسەر شاشەکەت
What it can show youچی پیشان دەدات
Packet Tracer runs a network in two ways: in Realtime mode, as it would really run, or in Simulation mode, where time stops so you can watch each message. It models the protocols of several layers, so you can see them at work:
Packet Tracer بە دوو شێوە کار پێ دەکات: لە باری Realtime، وەک ئەوەی لە ڕاستیدا کار دەکات، یان لە باری Simulation، کە کات دەوەستێت بۆ ئەوەی هەر پەیامێک ببینیت. چەند چینێک دروست دەکاتەوە، بۆیە دەتوانیت ببینیت چۆن کار دەکەن:
- Layer 2: Ethernet and PPP frames.
- Between layers 2 and 3: ARP, which finds the MAC address that belongs to an IP address. Its messages travel straight inside Ethernet frames, not inside IP packets.
- Layer 3: IP and ICMP (the messages of ping).
- Layer 4: TCP and UDP.
- Routing protocols such as RIP and OSPF: you can trace their updates too.
- چینی 2: و PPP.
- لە نێوان چینی 2 و 3: ، کە ئەو دەدۆزێتەوە کە هی . پەیامەکانی ڕاستەوخۆ لە ناو دەڕۆن، نەک لە ناو .
- چینی 3: و (پەیامەکانی ).
- چینی 4: و .
- وەک RIP و OSPF: دەتوانیت بەدواداچوون بۆ نوێکردنەوەکانیشیان بکەیت.
Each layer is explained in its own lesson: ARP, ICMP and ping, TCP and UDP.
هەر چینێک لە وانەی خۆیدا ڕوون کراوەتەوە: ARP، ICMP و پینگ، TCP و UDP.
Getting Packet Tracer (free)وەرگرتنی Packet Tracer (بێبەرانبەر)
Packet Tracer is free for everyone, but you download it only from the Cisco Networking Academy: make a free account on netacad.com, enrol in the free course Getting Started with Cisco Packet Tracer (about two hours), and the course gives you the official download link for the latest version. Avoid copies on other websites: they can be old or carry malware.
Packet Tracer بۆ هەمووان بێبەرانبەرە، بەڵام تەنیا لە Cisco Networking Academyـەوە داباری دەکەیت: لە netacad.com بێبەرانبەر دروست بکە، لە کۆرسی بێبەرانبەری Getting Started with Cisco Packet Tracer (نزیکەی دوو کاتژمێر) ناو بنووسە و کۆرسەکە بەستەری فەرمیی دوایین وەشانت دەداتێ. لە کۆپییەکانی تر دوور بکەوەرەوە: لەوانەیە کۆن بن یان تێدا بێت.
As of November 2026 the current version is 9.0.1 (a maintenance release of July 2026); version numbers change, and the course always links the newest one. It runs on Windows 10 and 11, macOS 12 or newer, and Linux. You need the Internet to download it and to sign in; “Keep me logged in” keeps you signed in for up to three months, so use it only on your own computer, never in a lab or an Internet café. How to open a router’s command line in Packet Tracer is shown in The console in Packet Tracer.
تا نۆڤەمبەری 2026 وەشانی ئێستا 9.0.1ـە (وەشانێکی چاککردنەوەی تەممووزی 2026)؛ ژمارەی وەشان دەگۆڕێت و کۆرسەکە هەمیشە بەستەری نوێترینیان دەدات. لەسەر Windows 10 و 11، macOS 12 یان نوێتر و Linux کار دەکات. بۆ و چوونەژوورەوە پێویستت بە هەیە؛ «Keep me logged in» تا سێ مانگ لە ژوورەوە دەتهێڵێتەوە، بۆیە تەنیا لەسەر خۆت بەکاری بهێنە، هەرگیز لە تاقیگە یان کافێ. چۆنیەتیی کردنەوەی لە Packet Tracer لە Console لە Packet Tracerدا پیشان دراوە.
A tour of the windowگەڕانێک بە ناو پەنجەرەکەدا
When Packet Tracer opens, most of the window is the white workspace, where you build. Around it are bars and boxes with fixed jobs. Learn their names now; every lab uses them.
کاتێک Packet Tracer دەکرێتەوە، زۆربەی پەنجەرەکە سپییە کە تێیدا دروست دەکەیت. لە دەوریدا شریت و چوارچێوەی ئیشی دیاریکراو هەن. ئێستا ناوەکانیان فێر بە؛ هەموو تاقیگەیەک بەکاریان دەهێنێت.
You will use the bottom-left box most: first pick a device type (for example Network Devices → Switches or End Devices), then the model next to it, and drag it onto the workspace. The Connections type, with the lightning-bolt icon, holds the cables.
زۆرتر چوارچێوەی خوارەوەی چەپ بەکار دەهێنیت: یەکەم جۆری ئامێر هەڵبژێرە (بۆ نموونە Network Devices ← Switches یان End Devices)، پاشان مۆدێلـەکەی لە تەنیشتیەوە و بیهێنە سەر . جۆری Connections، بە ئایکۆنی بروسکە، کێبڵەکانی تێدایە.
A tour of the windowگەڕانێک بە ناو پەنجەرەکەدا
Logical and Physical viewsدیمەنی Logical و Physical
The two tabs above the workspace show the same network in two ways. Logical (the default) shows how devices are connected — who is joined to whom — which is the logical topology. Physical shows where things are: a city, a building, a wiring closet and the racks in it, with real distances. A cable that is too long for its type fails in the physical view, just as in real life.
دوو تابەکەی سەرووی هەمان بە دوو شێوە پیشان دەدەن. Logical (بنەڕەت) پیشان دەدات ئامێرەکان چۆن پێکەوە بەستراون — کێ بە کێوە بەستراوە — کە تۆپۆلۆجیی لۆجیکیـە. Physical پیشان دەدات شتەکان لە کوێن: شارێک، بینایەک، ژووری کێبڵ و ڕەفەکانی ناوی، بە دووریی ڕاستەقینەوە. کێبڵێک کە بۆ جۆرەکەی زۆر درێژ بێت لە دیمەنی Physicalـدا کار ناکات، وەک ژیانی ڕاستەقینە.
In this lesson you stay in the Logical view. When you rest the cursor on a device without clicking (hover), a small box shows its ports, their links and their addresses — a quick check that needs no window.
لەم وانەیەدا لە دیمەنی Logicalـدا دەمێنیتەوە. کاتێک بێ لەسەر ئامێرێک ڕادەگریت ()، چوارچێوەیەکی بچووک ، بەستەرەکان و ناونیشانەکانی پیشان دەدات — پشکنینێکی خێرا کە پێویستی بە کردنەوەی پەنجەرە نییە.
Two modes: Realtime and Simulationدوو بار: Realtime و Simulation
The tabs at the bottom right switch between two modes. In Realtime mode the network runs as in real life: a ping is answered at once and you see only the result. In Simulation mode time stops between events. The Simulation Panel opens with an Event List: each row is one step of one packet — when it happened, the last device, the device it is at now and its type (ARP, ICMP…). With Capture/Forward you move one event at a time, with Auto Capture/Play the events run slowly, and Back returns to an earlier step. Edit Filters chooses which protocols appear.
تابەکانی خوارەوەی ڕاست لە نێوان دوو باردا دەتگوازنەوە. لە باری Realtime وەک ژیانی ڕاستەقینە کار دەکات: دەستبەجێ وەڵام دەدرێتەوە و تەنیا ئەنجامەکە دەبینیت. لە باری Simulation کات لە نێوان ڕووداوەکاندا دەوەستێت. Simulation Panel بە Event List (لیستی ڕووداوەکان) دەکرێتەوە: هەر ڕیزێک هەنگاوێکی — کەی ڕوویدا، دوایین ئامێر، ئەو ئامێرەی ئێستا لەسەریەتی و جۆرەکەی (، …). بە Capture/Forward ڕووداوەکان یەک بە یەک دەبینیت، بە Auto Capture/Play بە هێواشی دەڕۆن و Back دەتگەڕێنێتەوە بۆ هەنگاوێکی پێشوو. Edit Filters هەڵدەبژێرێت کام دەربکەون.
Realtime is watching the match live: the goal happens before you see how. Simulation is the slow-motion replay, where the commentator stops at every pass.
Realtime وەک سەیرکردنی یارییەکە بە ڕاستەوخۆیە: گۆڵەکە دەکرێت پێش ئەوەی ببینیت چۆن. Simulation دووپاتەپیشاندانی هێواشە، کە شرۆڤەکارەکە لە هەر پاسێکدا ڕادەوەستێت.
Where the analogy stops workingسنووری ئەم نموونەیە
A replay only shows what already happened; in Simulation mode the network really waits for you, and you can even send new packets.
دووپاتەپیشاندان تەنیا ئەوە پیشان دەدات کە ڕوویداوە؛ لە باری Simulation بە ڕاستی چاوەڕێت دەکات و دەتوانیت نوێش بنێریت.
Build it: two PCs and a switchدروستی بکە: دوو کۆمپیوتەر و سویچێک
Your first network is the smallest useful LAN: two PCs joined by a switch. You will give the PCs addresses in one network, 192.168.1.0/24, and test it with ping.
یەکەم بچووکترین بەسوودە: دوو کە پێکیانەوە دەبەستێت. لە یەک ، 192.168.1.0/24، دەدەیتە و بە تاقیی دەکەیتەوە.
In the network component box choose End Devices, then the generic PC. Drag and drop it onto the workspace. Do it again: you now have PC0 and PC1.
لە چوارچێوەی پێکهاتەکاندا End Devices هەڵبژێرە، پاشان PCـی گشتی. بە بیخە سەر . دووپاتەی بکەرەوە: ئێستا PC0 و PC1ت هەیە.
Choose Network Devices → Switches and drag a 2960 switch between them: it is Switch0 (model 2960-24TT, 24 FastEthernet ports and 2 Gigabit ports).
Network Devices ← Switches هەڵبژێرە و 2960 بخە نێوانیان: ئەوە Switch0ـە (مۆدێلی 2960-24TT، 24 FastEthernet و 2 Gigabit).
Click a device to open its window; click the label under it to rename it. Clear names (PC-Aram, PC-Lab2) help in bigger labs.
لەسەر ئامێرێک بکە بۆ کردنەوەی پەنجەرەکەی؛ لەسەر ناوەکەی ژێری بکە بۆ گۆڕینی. ناوی ڕوون (PC-Aram، PC-Lab2) لە تاقیگە گەورەکاندا یارمەتیت دەدات.
Choosing the cableهەڵبژاردنی کێبڵ
Open Connections (the lightning bolt). Click a cable type, click the first device and choose its port, then click the second device and choose its port. For a PC and a switch — two different kinds of device — take Copper Straight-Through (a solid line): PC0 Fa0 → Switch0 Fa0/1, PC1 Fa0 → Switch0 Fa0/2. Two devices of the same kind (PC–PC, switch–switch) take Copper Cross-Over (a dashed line) by the classic rule, and the Console cable joins a PC’s RS-232 port to the console port of a router or switch for its command line.
Connections (بروسکەکە) بکەرەوە. لە جۆری کێبڵێک بکە، لە ئامێری یەکەم بکە و هەڵبژێرە، پاشان لە ئامێری دووەم بکە و هەڵبژێرە. بۆ و — دوو ئامێری جیاواز — Copper Straight-Through وەربگرە (هێڵی پڕ): PC0 Fa0 ← Switch0 Fa0/1، PC1 Fa0 ← Switch0 Fa0/2. دوو ئامێری هاوجۆر (–، –) بە پێی یاسای کلاسیک Copper Cross-Over وەردەگرن (هێڵی پچڕپچڕ) و RS-232ـی بە یان دەبەستێت بۆ .
Then wait until every light is green. A new switch port shows amber for up to about 30 seconds while the switch checks the link for loops; Fast Forward Time (next to the clock) skips the wait. Automatically Choose Connection Type picks a working cable for you — handy, but learn the rule anyway: exams ask for it, and today real ports with Auto-MDI-X accept either cable. Which cable goes where is explained in Which cable goes where?.
پاشان چاوەڕێ بکە تا هەموو نیشانەکان سەوز دەبن. نوێی تا نزیکەی 30 چرکە نارنجی دەبێت لە کاتێکدا بەستەرەکە بۆ ئەڵقە دەپشکنێت؛ Fast Forward Time (لە تەنیشت کاتژمێرەکە) چاوەڕوانییەکە دەبڕێت. Automatically Choose Connection Type کێبڵێکی کارکەرت بۆ هەڵدەبژێرێت — بەسوودە، بەڵام هەر یاساکە فێر بە: تاقیکردنەوەکان دەیپرسن و ئەمڕۆ ڕاستەقینە بە Auto-MDI-X هەردوو کێبڵەکە وەردەگرن. کام کێبڵ بۆ کوێ دەچێت لە کام کێبڵ بۆ کوێ؟دا ڕوون کراوەتەوە.
Giving the PCs addressesدانانی ناونیشان بۆ کۆمپیوتەرەکان
Click PC0, open the Desktop tab and then IP Configuration. Keep Static, type the IP Address 192.168.1.1, then click the Subnet Mask box: Packet Tracer fills in 255.255.255.0 by itself (its guess for a 192.168.x.x address). Close the window — there is no Save button; the values are kept. Do the same on PC1 with 192.168.1.2.
لەسەر PC0 بکە، بەشی Desktop بکەرەوە، پاشان IP Configuration. Static وەک خۆی بهێڵەرەوە، IP Addressـی 192.168.1.1 بنووسە، پاشان لە خانەی Subnet Mask بکە: Packet Tracer خۆی 255.255.255.0 دەنووسێت (پێشبینییەکەی بۆ ناونیشانی 192.168.x.x). پەنجەرەکە دابخە — دوگمەی Save نییە؛ بەهاکان دەمێننەوە. هەمان کار لەسەر PC1 بە 192.168.1.2 بکە.
The Default Gateway and DNS Server can stay 0.0.0.0, because both PCs are in the same network and you use no names yet; the next lab fills them in. The same settings are also under Config → FastEthernet0. Now rest the cursor on PC0: the box shows 192.168.1.1/24 — the mask written as a prefix.
Default Gateway و DNS Server دەتوانن 0.0.0.0 بمێننەوە، چونکە هەردوو لە هەمان و هێشتا ناو بەکار ناهێنیت؛ تاقیگەی داهاتوو پڕیان دەکاتەوە. هەمان ڕێکخستن لە Config ← FastEthernet0ـیشدا هەیە. ئێستا لەسەر PC0 ڕابگرە: چوارچێوەکە 192.168.1.1/24 پیشان دەدات — ماسکەکە بە شێوەی درێژیی پێشگر نووسراوە.
Testing: ping from the Command Promptتاقیکردنەوە: پینگ لە Command Prompt
On PC0 open Desktop → Command Prompt. It looks like the Windows one and understands the same network commands, such as ping, ipconfig, arp -a and tracert. Type ping 192.168.1.2 and press Enter:
لەسەر PC0 Desktop ← Command Prompt بکەرەوە. وەک هی Windows دەردەکەوێت و هەمان تێدەگات، وەک ping، ipconfig، arp -a و tracert. ping 192.168.1.2 بنووسە و Enter دابگرە:
C:\>ping 192.168.1.2Pinging 192.168.1.2 with 32 bytes of data:
Reply from 192.168.1.2: bytes=32 time<1ms TTL=128
Reply from 192.168.1.2: bytes=32 time<1ms TTL=128
Reply from 192.168.1.2: bytes=32 time<1ms TTL=128
Reply from 192.168.1.2: bytes=32 time<1ms TTL=128
Ping statistics for 192.168.1.2:
Packets: Sent = 4, Received = 4, Lost = 0 (0% loss),
Approximate round trip times in milli-seconds:
Minimum = 0ms, Maximum = 0ms, Average = 0msFour replies and 0% loss: the two PCs reach each other. The times can differ a little.
چوار وەڵام و ونبوونی 0%: هەردوو دەگەنە یەکتر. کاتەکان دەکرێت کەمێک جیاواز بن.
ping لە Command Prompt، یان زەرفی Add Simple PDU.CêITThe quicker way is the Add Simple PDU envelope in the common tools: click it, then PC0, then PC1. The bottom-right window shows Successful or Failed. How to read every number of a reply is in Reading the result of a ping.
ڕێگا خێراترەکە زەرفی Add Simple PDUـە لە ئامرازە باوەکاندا: لەسەری بکە، پاشان PC0، پاشان PC1. پەنجەرەی خوارەوەی ڕاست Successful یان Failed پیشان دەدات. چۆنیەتیی خوێندنەوەی هەموو ژمارەیەکی وەڵام لە خوێندنەوەی ئەنجامی پینگێکدایە.
Watch ARP and ICMP in Simulation modeبینینی ARP و ICMP لە باری Simulation
Click the Simulation tab. In Edit Filters keep only ARP and ICMP, so other messages do not crowd the list.
لە تابی Simulation بکە. لە Edit Filters تەنیا ARP و ICMP بهێڵەرەوە، بۆ ئەوەی پەیامەکانی تر لیستەکە قەرەباڵغ نەکەن.
Use Add Simple PDU from PC0 to PC1, then press Capture/Forward again and again.
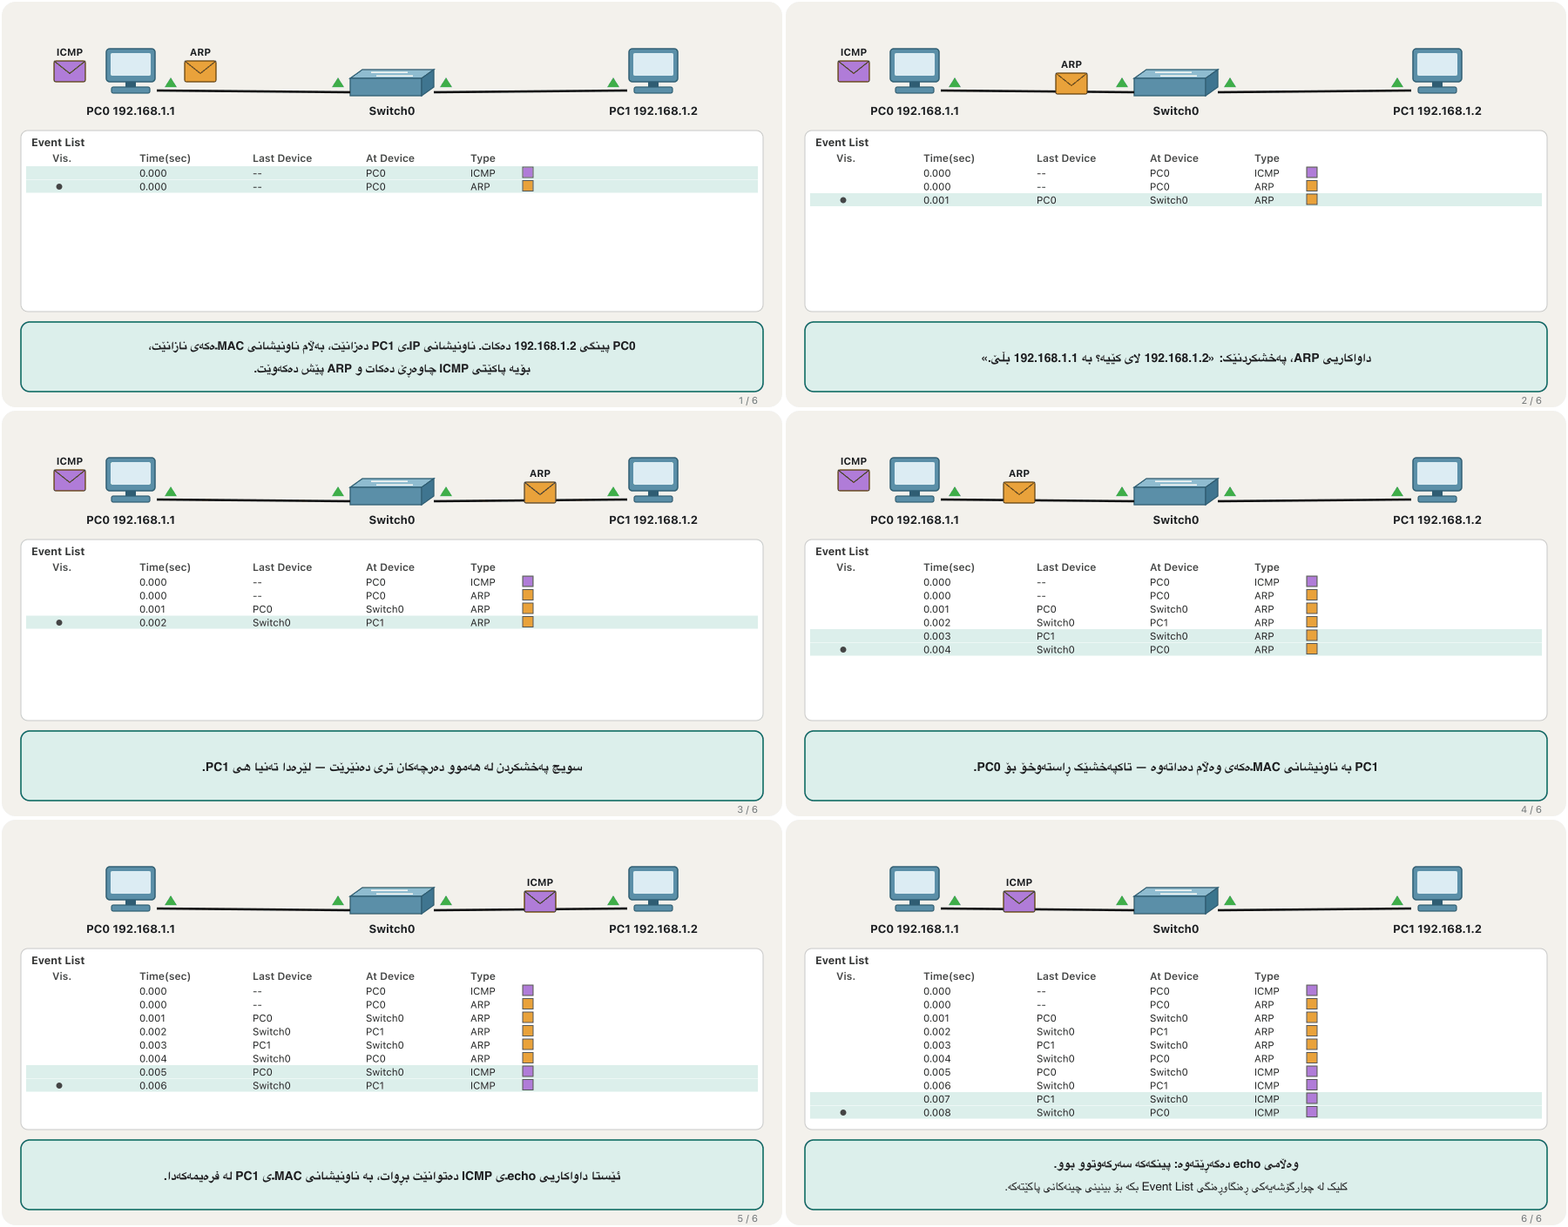
Add Simple PDU لە PC0ـەوە بۆ PC1 بەکاربهێنە، پاشان چەند جارێک Capture/Forward دابگرە.
Watch the envelopes move on the cables and the Event List fill, one row per step.
سەیری زەرفەکان بکە کە لەسەر کێبڵەکان دەجووڵێن و Event List ڕیز بە ڕیز پڕ دەبێتەوە.
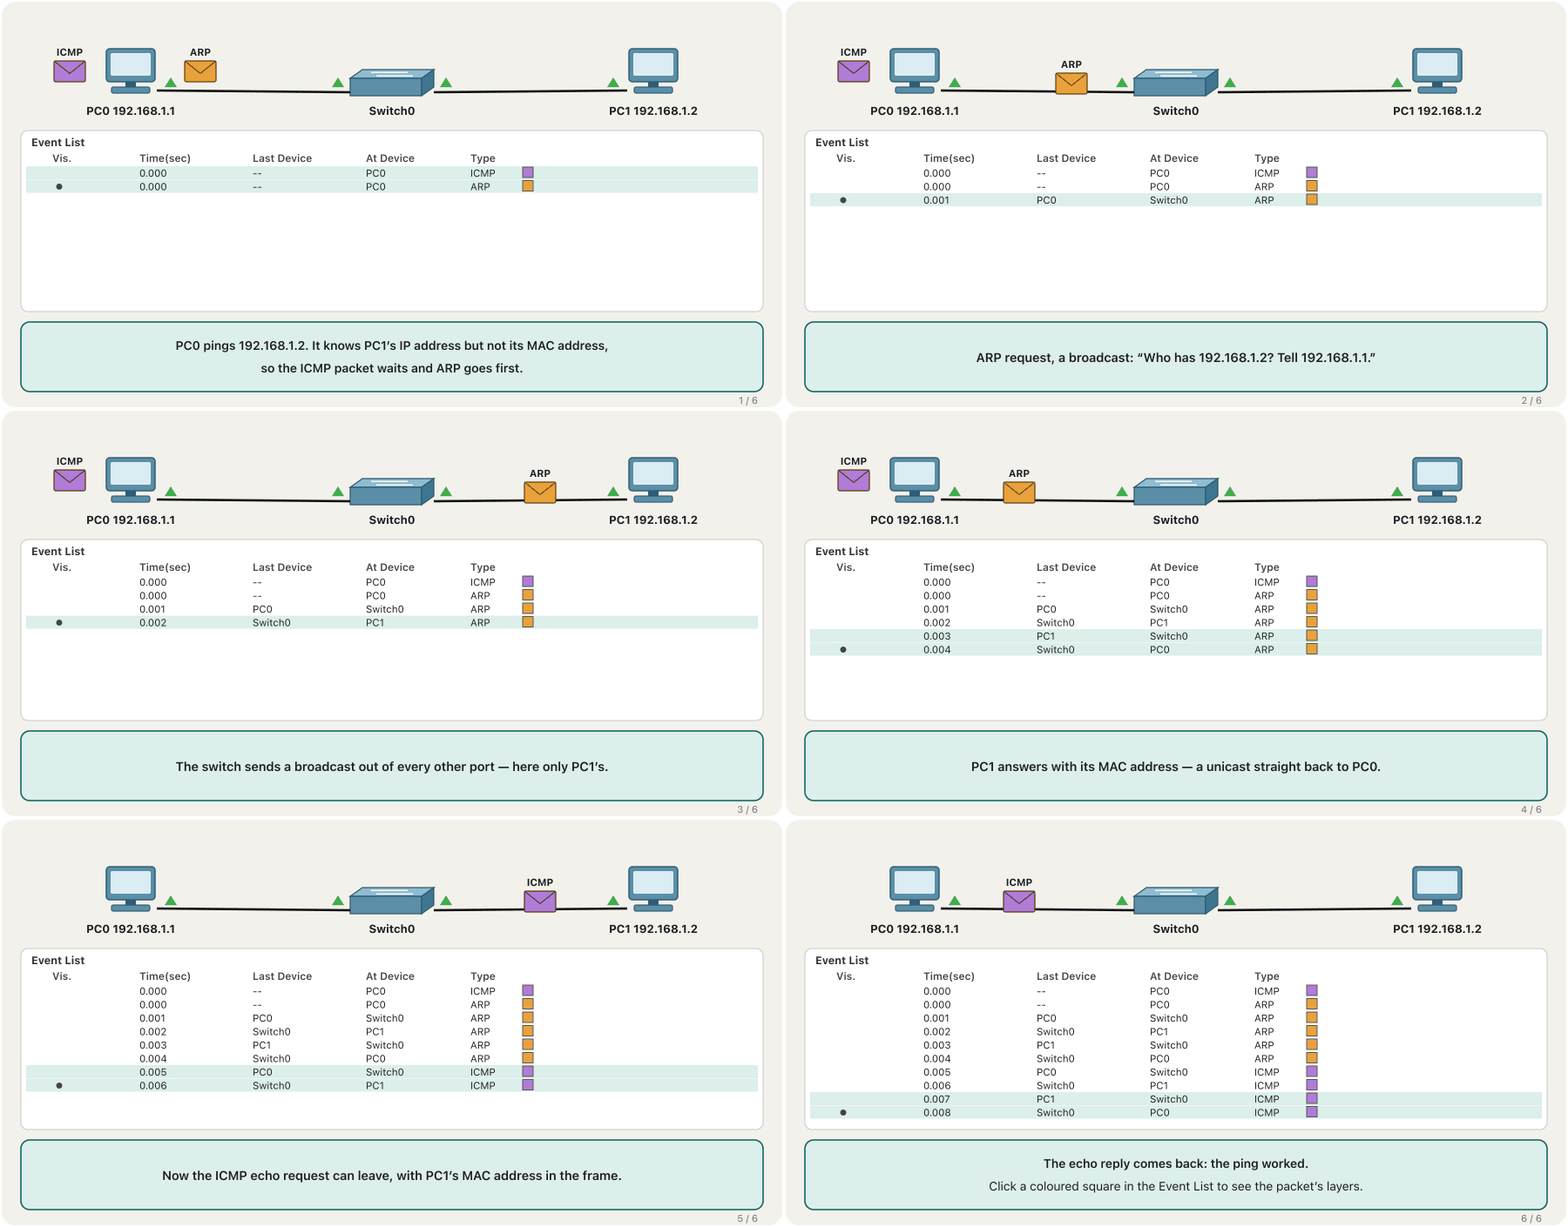
PC0 knew PC1’s IP address, but a frame needs PC1’s MAC address, so the ping waits while ARP asks everyone and PC1 answers. Then the ICMP echo request and reply go through. Ping a second time: no ARP now, because PC0 has saved the answer in its ARP cache. Sometimes the very first ping in Packet Tracer fails while ARP is still working; just ping again (why). The full story of ARP is in The request and the reply.
PC0 ـی PC1ـی دەزانی، بەڵام پێویستی بە ـی PC1 هەیە، بۆیە چاوەڕێ دەکات تا لە هەمووان دەپرسێت و PC1 وەڵام دەداتەوە. پاشان داواکاری و وەڵامی echoـی تێدەپەڕن. جارێکی تر بکە: ئیتر نییە، چونکە PC0 وەڵامەکەی لە هەڵگرتووە. هەندێک جار یەکەم لە Packet Tracer سەرناکەوێت لە کاتێکدا هێشتا کار دەکات؛ تەنیا دووپاتە بکەرەوە (بۆچی). هەموو چیرۆکی لە داواکاری و وەڵامدایە.
Watch ARP and ICMP in Simulation modeبینینی ARP و ICMP لە باری Simulation
Open a packet: the PDU Information windowکردنەوەی پاکێتێک: پەنجەرەی PDU Information
In the Event List, click the coloured square of a row (or the envelope on the cable). The PDU Information window opens. The OSI Model tab lists the layers the packet goes through In and Out of this device, with a short sentence for each — for example, at layer 2 the switch reads the destination MAC address. The Inbound and Outbound PDU Details tabs show the real header fields: Ethernet addresses, the IP header with its TTL, the ICMP type.
لە Event List لە چوارگۆشە ڕەنگاوڕەنگەکەی ڕیزێک بکە (یان لە زەرفەکەی سەر کێبڵەکە). پەنجەرەی PDU Information دەکرێتەوە. بەشی OSI Model ئەو چینانە لیست دەکات کە لە کاتی هاتنە ژوورەوە (In) و دەرچوون (Out) لەم ئامێرەدا پێیاندا تێدەپەڕێت، بۆ هەریەکەیان ڕستەیەکی کورت — بۆ نموونە لە چینی 2 مەبەست دەخوێنێتەوە. بەشەکانی Inbound و Outbound PDU Details خانە ڕاستەقینەکانی پیشان دەدەن: ناونیشانەکانی ، سەردێڕی بە TTLـەکەیەوە، جۆری .
This is encapsulation made visible: the same data, wrapped in a new header at every layer.
ئەمە پێچانەوەـە کە بینراو کراوە: هەمان ، لە هەر چینێکدا لە سەردێڕێکی نوێدا پێچراوەتەوە.
A router’s Config tab: a bridge to the command lineبەشی Configـی ڕێدۆز: پردێک بۆ نێوبەستەی هێڵی فەرمان
Routers and switches have a Config tab as well as a CLI tab. In Config you fill in a form: a name under Global Settings, and for each interface its Port Status and its IPv4 address and mask. One thing surprises everyone: a new router’s interfaces start switched off, so its links stay red until you tick On. Under the form, Equivalent IOS Commands shows the Cisco IOS commands that do the same job — the commands you will type yourself in the CLI.
و جگە لە بەشی CLI بەشی Configـیشیان هەیە. لە Configـدا فۆڕمێک پڕ دەکەیتەوە: ناوێک لە Global Settings و بۆ هەر Port Status و IPv4 و ماسکەکەی. شتێک هەمووان سەرسام دەکات: نوێ لە سەرەتادا کوژاونەتەوە، بۆیە بەستەرەکانی سوور دەمێننەوە تا On دیاری دەکەیت. لە ژێر فۆڕمەکەدا Equivalent IOS Commands ئەو فەرمانانەی پیشان دەدات کە هەمان کار دەکەن — ئەو فەرمانانەی خۆت لە CLI دەیاننووسیت.
This course uses only the GUI. The command line — enable, exit, disable, logout, completing words with Tab, help with ?, show commands, the command history and clock set — is the first lesson of the Routing and Switching course: Cisco IOS and the command line, and The console in Packet Tracer shows the CLI tab and the console cable.
ئەم کۆرسە تەنیا بەکار دەهێنێت. — enable، exit، disable، logout، تەواوکردنی وشە بە Tab، یارمەتی بە ?، فەرمانەکانی show، مێژووی فەرمانەکان و clock set — یەکەم وانەی کۆرسی Routing and Switchingـە: Cisco IOS و نێوبەستەی هێڵی فەرمان، هەروەها Console لە Packet Tracer بەشی CLI و پیشان دەدات.
No Packet Tracer? Try the CêIT network labPacket Tracerـت نییە؟ تاقیگەی ڕایەڵەی CêIT تاقی بکەرەوە
If you cannot install Packet Tracer — on a phone, a tablet or a school computer — open the CêIT network lab in your browser. It is a small 3D table where you add PCs, laptops, servers, printers, switches, hubs and routers, connect them with cables, give them addresses (or press Automatic addresses) and send a ping. Every step is written out: the ARP question “Who has …?”, the switch learning a MAC address, a router lowering the TTL.
ئەگەر ناتوانیت Packet Tracer دابمەزرێنیت — لەسەر مۆبایل، تابلێت یان قوتابخانە — تاقیگەی ڕایەڵەی CêIT لە بکەرەوە. مێزێکی سێ ڕەهەندیی بچووکە کە ، ، ، ، ، و تێدا زیاد دەکەیت، بە کێبڵ پێکەوەیان دەبەستیت، ناونیشانیان دەدەیتێ (یان Automatic addresses دادەگریت) و دەنێریت. هەموو هەنگاوێک دەنووسرێت: پرسیاری «Who has …?»، فێربوونی لەلایەن ، کەمکردنەوەی TTL لەلایەن .
Load the example One network: 3 PCs, a printer and a switch — the same idea as your Packet Tracer network. Ping the printer from a PC, then click the switch to see its MAC address table fill.
نموونەی One network: 3 PCs, a printer and a switch بار بکە — هەمان بیرۆکەی Packet Tracerـەکەت. لە بکە، پاشان لە بکە بۆ بینینی پڕبوونەوەی .
Click a PC to see its ARP table, then ping again: this time there is no “Who has …?”.
لە بکە بۆ بینینی خشتەی ـەکەی، پاشان دووپاتە بکە: ئەم جارە «Who has …?» نییە.
Load Two networks joined by a router, open the router’s routing table and ping across it. Delete a PC’s default gateway and try again.
Two networks joined by a router بار بکە، بکەرەوە و بە ناویدا بکە. بسڕەوە و دووپاتە تاقی بکەرەوە.
The lab has no DHCP, DNS or web servers and no command line: for those, the next lessons use Packet Tracer.
تاقیگەکە ، یان وێب و تێدا نییە: بۆ ئەوانە، وانەکانی داهاتوو Packet Tracer بەکار دەهێنن.
Common mistakesهەڵە باوەکان
Exercisesڕاهێنانەکان
Build a network of four PCs on one 2960 switch. Give them 192.168.1.1 to 192.168.1.4 with mask 255.255.255.0. From PC1 ping 192.168.1.2, then 192.168.1.4. What do you expect to see?
لە چوار لەسەر یەک 2960 دروست بکە. 192.168.1.1 تا 192.168.1.4 بە ماسکی 255.255.255.0 بیانەرێ. لە PC1ـەوە 192.168.1.2 بکە، پاشان 192.168.1.4. چاوەڕێی بینینی چی دەکەیت؟
Show answerوەڵامەکە پیشان بدە
Four straight-through cables, all lights green after the amber phase. Each ping shows four replies (Received = 4, Lost = 0 (0% loss)). If the very first one fails while ARP works, ping again.
چوار ، هەموو نیشانەکان دوای قۆناغی نارنجی سەوز دەبن. هەر چوار وەڵام پیشان دەدات (Received = 4, Lost = 0 (0% loss)). ئەگەر یەکەمیان لە کاتی کارکردنی سەرنەکەوت، دووپاتە بکەرەوە.
A PC (192.168.1.1), a 2960 switch (with the management address 192.168.1.3) and a laptop (192.168.1.2) are joined with Copper Straight-Through cables. The PC’s link is green, but the laptop’s link shows red triangles at both ends. Give two possible causes, and say what the switch’s address is for.
(192.168.1.1)، 2960 (بە ناونیشانی بەڕێوەبردنی 192.168.1.3) و (192.168.1.2) بە Copper Straight-Through پێکەوە بەستراون. بەستەری سەوزە، بەڵام بەستەری لە هەردوو سەر سێگۆشەی سووری پیشان دەدات. دوو هۆی ئەگەری بڵێ و بڵێ ناونیشانی بۆ چییە.
Show answerوەڵامەکە پیشان بدە
- The cable is in the wrong port, or the link was made a moment ago and is still coming up: check the ports by hovering over both ends.
- The port was switched off (Port Status not ticked), or the cable type is wrong.
- The switch’s address is only for managing it — pinging it, or reaching its command line from the LAN. It is set in the switch’s CLI (Routing and Switching course); the switch forwards frames without it.
- کێبڵەکە لە هەڵەدایە، یان بەستەرەکە ئێستا دروست کراوە و هێشتا خەریکی هەستانە: بە لەسەر هەردوو سەر بپشکنە.
- کوژاوەتەوە (Port Status دیاری نەکراوە)، یان جۆری کێبڵەکە هەڵەیە.
- ناونیشانی تەنیا بۆ بەڕێوەبردنییەتی — ، یان گەیشتن بە لە . لە CLIـی ڕێک دەخرێت (کۆرسی Routing and Switching)؛ بێ ئەویش دەنێرێت.
In Simulation mode, with only ARP and ICMP shown, PC0 pings PC1 for the first time through Switch0. Which protocol appears first, how many devices receive the ARP request, and what changes when you ping a second time?
لە باری Simulation، کە تەنیا و پیشان دەدرێن، PC0 بۆ یەکەم جار بە Switch0دا PC1 دەکات. کام یەکەم جار دەردەکەوێت، چەند ئامێر داواکاریی وەردەگرن و کاتێک جاری دووەم دەکەیت چی دەگۆڕێت؟
Show answerوەڵامەکە پیشان بدە
ARP comes first. The switch floods the broadcast out of every port except the one it came in on, so every other device in the LAN receives it (here only PC1). On the second ping PC0 already has PC1’s MAC address in its ARP cache, so only ICMP rows appear.
یەکەم دێت. لە هەموو دەنێرێت جگە لەوەی پێیدا هاتووە، بۆیە هەموو ئامێرەکانی تری وەری دەگرن (لێرەدا تەنیا PC1). لە دووەمدا PC0 پێشتر PC1ـی لە هەیە، بۆیە تەنیا ڕیزەکانی دەردەکەون.
For each task, say whether the CêIT network lab is enough or you need Packet Tracer: (a) see a switch learn MAC addresses; (b) give PCs addresses from a DHCP server; (c) watch a router lower the TTL; (d) type Cisco IOS commands.
بۆ هەر ئەرکێک بڵێ تاقیگەی CêIT بەسە یان پێویستت بە Packet Tracer هەیە: (a) بینینی فێربوونی لەلایەن ؛ (b) دانی ناونیشان بە لە ؛ (c) بینینی کەمکردنەوەی TTL لەلایەن ؛ (d) نووسینی فەرمانەکانی .
Show answerوەڵامەکە پیشان بدە
(a) and (c): the CêIT lab is enough. (b) and (d): Packet Tracer, because the CêIT lab has no DHCP server and no command line.
(a) و (c): تاقیگەی CêIT بەسە. (b) و (d): Packet Tracer، چونکە تاقیگەی CêIT و تێدا نییە.
Summaryپوختە
- Packet Tracer is Cisco’s free network simulator (version 9.0.1 in 2026): a free netacad.com account, the free Getting Started course, then the download.
- The window: menu and tool bars, Logical/Physical tabs, the workspace, the Realtime/Simulation bar, the network component box and the user created packet window.
- Realtime shows results; Simulation stops time and lists every event of every packet.
- PC–switch: Copper Straight-Through; same kind: Cross-Over; console: Console. Wait for green lights.
- Addresses: Desktop → IP Configuration → Static; test with
pingin Desktop → Command Prompt or with Add Simple PDU. - In Simulation mode the first ping shows ARP before ICMP; the PDU window shows every layer’s header.
- A router’s Config tab is a GUI with the Equivalent IOS Commands; the CLI belongs to Routing and Switching. No Packet Tracer? Use the CêIT network lab.
- Packet Tracer بێبەرانبەری Ciscoـیە (وەشانی 9.0.1 لە 2026ـدا): بێبەرانبەر لە netacad.com، کۆرسی بێبەرانبەری Getting Started، پاشان .
- پەنجەرەکە: و ، تابی Logical/Physical، ، شریتی Realtime/Simulation، چوارچێوەی پێکهاتەکانی و پەنجەرەی دروستکراوەکانی بەکارهێنەر.
- Realtime ئەنجام پیشان دەدات؛ Simulation کات ڕادەگرێت و هەموو ڕووداوێکی هەر لیست دەکات.
- –: Copper Straight-Through؛ هاوجۆر: Cross-Over؛ console: Console. چاوەڕێی نیشانەی سەوز بکە.
- ناونیشان: Desktop → IP Configuration → Static؛ بە
pingلە Desktop ← Command Prompt یان بە Add Simple PDU تاقیی بکەرەوە. - لە باری Simulation یەکەم پێش پیشان دەدات؛ پەنجەرەی PDU سەردێڕی هەموو چینێک پیشان دەدات.
- بەشی Configـی بە Equivalent IOS Commandsـەوە؛ CLI هی Routing and Switchingـە. Packet Tracerـت نییە؟ تاقیگەی ڕایەڵەی CêIT بەکاربهێنە.
Next: one server, four services — DHCP, web, DNS and FTP in Packet Tracer.
دواتر: یەک ، چوار خزمەتگوزاری — DHCP، وێب، DNS و FTP لە Packet Tracer.
Lesson complete!وانەکە تەواو بوو!
Well done. Review the key terms, then go on to the next lesson.دەستخۆش. سەیرێکی زاراوە سەرەکییەکان بکەرەوە، پاشان بڕۆ بۆ وانەی داهاتوو.
Key termsزاراوە سەرەکییەکان
Packet Tracer Lab: DHCP, Web, DNS and FTP Serversتاقیگەی Packet Tracer: ڕاژەکارەکانی DHCP، وێب، DNS و FTP
Related lecturesوانە پەیوەندیدارەکان
- Packet Tracer Lab: DHCP, Web, DNS and FTP Serversتاقیگەی Packet Tracer: ڕاژەکارەکانی DHCP، وێب، DNS و FTP
- Windows Network Commandsفەرمانەکانی ڕایەڵە لە Windows
- ARP: From IP Address to MAC AddressARP: لە ناونیشانی IP بۆ ناونیشانی MAC
- ICMP, Ping and TracerouteICMP، پینگ و بەدواداچوونی ڕێگە
- Cisco IOS and the Command LineCisco IOS و نێوبەستەی هێڵی فەرمان
- Physical and Logical Topologiesتۆپۆلۆجیی فیزیکی و تۆپۆلۆجیی لۆجیکی
- Subnet Masks: Binary, Dotted Decimal and Prefixماسکی ژێرڕایەڵە: دووانی، شێوەی دەییخاڵدار و پێشگر
- Encapsulation, PDUs and Addresses at Each Layerپێچانەوە، یەکەکانی دراوەی پرۆتۆکۆڵ و ناونیشانەکان لە هەر چینێکدا
References and further readingسەرچاوەکان و خوێندنەوەی زیاتر
- Cisco Networking Academy: Download Cisco Packet Tracer for free (account, Getting Started course, Windows 10/11, macOS 12+, Linux, FAQ)
- Cisco Networking Academy: Time to Download Cisco Packet Tracer 9.0.1 (25 July 2026)
- Cisco Networking Academy: What is Cisco Packet Tracer?
- Cisco Packet Tracer Help: Interface Overview
- Cisco Packet Tracer Help: Simulation Mode (Event List, Play Controls, filters)
- Cisco Packet Tracer Help: Connections / Links (cable types and link lights)
- Cisco Packet Tracer Help: My First Packet Tracer Lab
- RFC 826: An Ethernet Address Resolution Protocol
This lecture is a first edition. The Kurdish text and terminology are waiting for review by Kurdish IT teachers.ئەم وانەیە چاپی یەکەمە. دەقە کوردییەکە و زاراوەکانی چاوەڕێی پێداچوونەوەی مامۆستایانی کوردی بواری IT ن.