Lab: Connecting Two PCs, Sharing Folders and Remote Desktopتاقیگە: بەستنەوەی دوو کۆمپیوتەر، هاوبەشکردنی فۆڵدەرەکان و Remote Desktop
A hands-on Windows 11 lab: join two PCs with one cable, test them with ping, give them unique names, one workgroup and addresses (static or APIPA), open the firewall the right way with a Private profile, share a folder with the right permissions, open it by \\name\share or as a mapped drive, see the SMB protocol underneath, and control one PC from the other with Remote Desktop — safely, through a VPN from outside. For a server lab: two VMs on a host-only network, workgroup or domain, and a server disk over iSCSI.
What you will build in this labلەم تاقیگەیەدا چی دروست دەکەیت
The smallest network is two computers joined together. There is no server: each PC is a peer that can offer its folders and use the other one’s (Peer-to-peer: every peer is equal). In this lab you join two Windows 11 PCs, share a folder from one to the other, and then control one PC from the other with Remote Desktop. Aram works on ARAM-PC; Shilan’s computer, SHILAN-PC, shares the folder and accepts Remote Desktop.
بچووکترین دوو کە پێکەوە بەستراون. هیچ نییە: هەر کە دەتوانێت خۆی پێشکەش بکات و هی ئەوی تر بەکار بهێنێت (تاک: هەموو تاکەکان یەکسانن). لەم تاقیگەیەدا دوو Windows 11 بەیەکەوە دەبەستیت، لە یەکێکیانەوە بۆ ئەوی تر هاوبەش دەکەیت، پاشان بە Remote Desktop لە ئەوی تر کۆنترۆڵ دەکەیت. ئارام لەسەر ARAM-PC کار دەکات؛ شیلان، SHILAN-PC، هاوبەش دەکات و Remote Desktop وەردەگرێت.
Two Windows 11 PCs joined by one Ethernet cable. Left: ARAM-PC, any edition, computer name ARAM-PC, workgroup WORKGROUP, IPv4 address 192.168.10.1/24; it opens the share and connects with Remote Desktop. Right: SHILAN-PC, Windows 11 Pro, workgroup WORKGROUP, 192.168.10.2/24; it shares C:\Lab and accepts Remote Desktop. Notes: a straight-through cable works thanks to Auto-MDI-X, or both PCs can sit on one switch or Wi-Fi; there is no DHCP server, so give static addresses or Windows uses APIPA 169.254.x.x.دوو کۆمپیوتەری Windows 11 کە بە یەک کێبڵی Ethernet بەستراون. چەپ: ARAM-PC، هەر جۆرێک، ناوی میوانگر ARAM-PC، گرووپی کار WORKGROUP، ناونیشانی IP 192.168.10.1/24؛ فۆڵدەرە هاوبەشەکە دەکاتەوە و بە Remote Desktop پەیوەندی دەکات. ڕاست: SHILAN-PC، Windows 11 Pro، گرووپی کار WORKGROUP، 192.168.10.2/24؛ C:\Lab هاوبەش دەکات و Remote Desktop وەردەگرێت. تێبینی: کێبڵی ڕاستەوخۆ بەهۆی Auto-MDI-Xـەوە کار دەکات، یان دەکرێت هەردووکیان لەسەر یەک سویچ یان وایفای بن؛ هیچ ڕاژەکارێکی DHCP نییە، بۆیە ناونیشانەکانی IPـی جێگیر بدە یان Windows APIPA (169.254.x.x) بەکار دەهێنێت.
The whole lab on one page: two peers, one cable, one shared folder, one Remote Desktop connection.هەموو تاقیگەکە لە یەک لاپەڕەدا: دوو ، یەک کێبڵ، یەک و یەک پەیوەندیی Remote Desktop.CêIT
Step 1: connect the two PCsهەنگاوی 1: دوو کۆمپیوتەرەکە بەیەکەوە ببەستە
Plug one Ethernet cable into both computers. An ordinary straight-through patch cable works: almost every Ethernet port today has Auto-MDI-X, which finds the send and receive pairs by itself (Why crossover cables are rare now). You need a crossover cable only for very old 10/100 ports without Auto-MDI-X. You can also plug both PCs into one switch, or join both to the same Wi-Fi network.
Then check that the network card works. The port’s link light should come on. In Windows, Settings › Network & internet should show Ethernet. If the adapter is missing, or has a yellow warning in Device Manager › Network adapters, Windows needs its driver (Device Manager).
Three panels. 1: two PCs joined by one cable — a straight-through cable works because Auto-MDI-X swaps the pairs; crossover only for very old ports. 2: both PCs cabled to one switch with two straight-through cables. 3: two laptops on the same Wi-Fi router or access point. Below: then check layer 1 — the link light is on and Windows shows the network as connected; with no light, try another cable or port first.سێ بەش. 1: دوو کۆمپیوتەر بە یەک کێبڵ — کێبڵی ڕاستەوخۆ کار دەکات چونکە Auto-MDI-X جووتەکان دەگۆڕێتەوە؛ کێبڵی خاچی تەنیا بۆ دەرچەی زۆر کۆن. 2: هەردوو کۆمپیوتەرەکە بە دوو کێبڵی ڕاستەوخۆ بە یەک سویچەوە. 3: دوو لاپتۆپ لەسەر هەمان ڕێدۆز یان خاڵی دەستڕاگەیشتنی وایفای. لە خوارەوە: پاشان چینی فیزیکی بپشکنە — گڵۆپی بەستن داگیرساوە و Windows ڕایەڵەکە بە پەیوەستکراو نیشان دەدات؛ ئەگەر ڕووناکی نەبوو، سەرەتا کێبڵ یان دەرچەیەکی تر تاقی بکەرەوە.
Any of the three works for this lab; the direct cable needs no other device.هەر یەکێک لەم سێیە بۆ ئەم تاقیگەیە کار دەکات؛ بەستنی ڕاستەوخۆ بە یەک کێبڵ هیچ ئامێرێکی تری پێویست نییە.CêIT
Step 1: connect the two PCsهەنگاوی 1: دوو کۆمپیوتەرەکە بەیەکەوە ببەستە
No second PC? Two virtual machinesکۆمپیوتەری دووەمت نییە؟ دوو ئامێری گریمانەیی
You can build the whole lab on one computer with two virtual machines. Put both on a host-only network: the two VMs and your own computer can reach each other, but nothing outside them. In VirtualBox open each VM's Settings › Network, set Attached to: Host-only Adapter and pick the same host-only network for both. In Hyper-V, connect both VMs to a Private virtual switch (VMs only) or an Internal one (VMs and your computer).
One laptop, the host, holds two virtual machines: VM 1 ARAM-PC with 10.1.1.1 and VM 2 SHILAN-PC with 10.1.1.2. A host-only network inside the laptop joins them to each other and to the host; a crossed-out arrow shows that nothing reaches the school network or the Internet. On the right, the VirtualBox setting Settings › Network › Adapter 1: Attached to Host-only Adapter, the same network for both VMs. Note: in Hyper-V use a Private (VMs only) or an Internal (VMs and host) virtual switch.لاپتۆپێک، کۆمپیوتەرە سەرەکییەکە، دوو ئامێری گریمانەیی تێدایە: ئامێری 1 ARAM-PC بە 10.1.1.1 و ئامێری 2 SHILAN-PC بە 10.1.1.2. ڕایەڵەیەکی host-only لە ناو لاپتۆپەکەدا ئەوان بە یەکتر و بە کۆمپیوتەرە سەرەکییەکەوە دەبەستێتەوە؛ تیرێکی خاچکراو پیشان دەدات کە هیچ شتێک ناگاتە ڕایەڵەی قوتابخانە یان ئینتەرنێت. لە ڕاست، ڕێکخستنی VirtualBox: Settings › Network › Adapter 1: Attached to Host-only Adapter، هەمان ڕایەڵە بۆ هەردوو ئامێرەکە. تێبینی: لە Hyper-V سویچێکی گریمانەیی Private (تەنیا ئامێرە گریمانەییەکان) یان Internal (ئامێرە گریمانەییەکان و کۆمپیوتەرە سەرەکییەکە) بەکار بهێنە.
Two VMs on a host-only network: a closed lab inside one computer.دوو لەسەر host-only: تاقیگەیەکی داخراو لە ناو یەک .CêIT
Then do Steps 2–8 inside the VMs. A VirtualBox host-only network usually has its own small DHCP server that lends 192.168.56.x addresses; or type static addresses such as 10.1.1.1 and 10.1.1.2, mask 255.255.255.0. Because nothing leaks out, a host-only network is also a safe place for a Windows Server lab, like the iSCSI lab below.
Step 2: test your own TCP/IP firstهەنگاوی 2: سەرەتا TCP/IPـی خۆت تاقی بکەرەوە
Open Command Prompt (Start, type cmd, press Enter) and ping the loopback address, 127.0.0.1. This packet never leaves the computer: it turns back inside the TCP/IP software. Replies prove that TCP/IP works on this PC. They prove nothing about the network card or the cable — that is the next test.
Command Prompt بکەرەوە (Start، cmd بنووسە، Enter دابگرە) و بکە، 127.0.0.1. ئەم هەرگیز لە دەرناچێت: لە ناو TCP/IPـدا دەگەڕێتەوە. وەڵامەکان دەیسەلمێنن کە TCP/IP لەسەر ئەم کار دەکات. هیچ شتێک لەبارەی یان کێبڵەکە ناسەلمێنن — ئەوە تاقیکردنەوەی دواترە.
Windows 11 Command Prompt: the loopback testCommand Promptـی Windows 11: تاقیکردنەوەی خۆگەڕانەوەBATType in a terminalلە تێرمیناڵدا بینووسە
ping 127.0.0.1
Outputدەرئەنجام
Pinging 127.0.0.1 with 32 bytes of data:
Reply from 127.0.0.1: bytes=32 time<1ms TTL=128
Reply from 127.0.0.1: bytes=32 time<1ms TTL=128
Reply from 127.0.0.1: bytes=32 time<1ms TTL=128
Reply from 127.0.0.1: bytes=32 time<1ms TTL=128

Ping statistics for 127.0.0.1:
    Packets: Sent = 4, Received = 4, Lost = 0 (0% loss),
Approximate round trip times in milli-seconds:
    Minimum = 0ms, Maximum = 0ms, Average = 0ms
ping -t keeps pinging until you press Ctrl+C, then prints the statistics. It is handy while you wiggle a cable or change a setting: you see the replies stop and start. If even the loopback test fails, TCP/IP itself is broken: use Settings › Network & internet › Advanced network settings › Network reset, or reinstall the adapter’s driver. More ping forms are in Ping an address, a name or yourself.
Two panels. Left, “ping 127.0.0.1”: inside ARAM-PC the packet goes from the ping program down to the TCP/IP software and turns back before the network card; a tick says TCP/IP works, a cross says it tells nothing about the card or cable. Right, “ping 192.168.10.2”: an Echo Request crosses the cable to SHILAN-PC and a reply comes back; a reply proves the cards, the cable, both addresses and the other PC’s firewall all work. Bottom: start with the loopback test and move outwards one step at a time; ping -t keeps going until Ctrl+C.دوو بەش. چەپ، «ping 127.0.0.1»: لە ناو ARAM-PCـدا پاکێتەکە لە بەرنامەی ping دەچێتە خوارەوە بۆ نەرمەواڵەی TCP/IP و پێش کارتی ڕایەڵە دەگەڕێتەوە؛ نیشانەی ڕاست دەڵێت TCP/IP کار دەکات، خاچێک دەڵێت هیچ لەبارەی کارت و کێبڵ ناڵێت. ڕاست، «ping 192.168.10.2»: Echo Request بە کێبڵەکەدا دەچێت بۆ SHILAN-PC و وەڵامێک دەگەڕێتەوە؛ وەڵامێک دەیسەلمێنێت کارتەکان، کێبڵەکە، هەردوو ناونیشان و ئاگرەدیواری کۆمپیوتەرەکەی تر کار دەکەن. خوارەوە: بە تاقیکردنەوەی خۆگەڕانەوە دەست پێ بکە و هەنگاو بە هەنگاو بەرەو دەرەوە بڕۆ؛ ping -t بەردەوام دەبێت تا Ctrl+C.
Each ping tests a different part: first yourself, then the other PC.هەر بەشێکی جیاواز تاقی دەکاتەوە: سەرەتا خۆت، پاشان تر.CêIT
Step 3: a unique name and the same workgroupهەنگاوی 3: ناوێکی جیاواز و هەمان گرووپی کار
Every computer on a network has a computer name (its hostname). It must be unique: if two PCs have the same name, Windows reports a name conflict and the wrong PC may answer. Use simple names such as ARAM-PC and SHILAN-PC (up to 15 letters, digits and hyphens). Change it in Settings › System › About › Rename this PC, then restart.
هەر لەسەر هەیە. دەبێت جیاواز بێت: ئەگەر دوو هەمان ناویان هەبێت، Windows ڕاپۆرتی پێکدادانی ناو دەدات و لەوانەیە هەڵە وەڵام بداتەوە. ناوی سادە بەکار بهێنە وەک ARAM-PC و SHILAN-PC (تا 15 پیت، ژمارە و «-»). لە Settings › System › About › Rename this PC بیگۆڕە، پاشان بکە.
A workgroup is a simple peer-to-peer group with no central server: each PC keeps its own user accounts. Give both PCs the same workgroup — the default name is WORKGROUP. You find it under Settings › System › About › Domain or workgroup, which opens the classic System Properties window (you can also type sysdm.cpl): Change… › Workgroup. Windows 11 can open a share by name or address even across workgroups, but one workgroup keeps the lab simple.
Left, a Settings window at System › About: the device name SHILAN-PC with a “Rename this PC” button (1), and under Related links “Domain or workgroup” (2). An arrow leads to the Computer Name/Domain Changes dialog: Computer name SHILAN-PC; Member of — Workgroup: WORKGROUP (2); OK and Cancel. Notes: every PC needs its own name, up to 15 letters, digits or hyphens; keep the same workgroup, default WORKGROUP; restart after a change.چەپ، پەنجەرەی Settings لە System › About: ناوی ئامێر SHILAN-PC لەگەڵ دوگمەی «Rename this PC» (1) و لە ژێر Related links «Domain or workgroup» (2). تیرێک دەچێت بۆ پەنجەرەی Computer Name/Domain Changes: Computer name SHILAN-PC؛ Member of — Workgroup: WORKGROUP (2)؛ OK و Cancel. تێبینی: هەر کۆمپیوتەرێک ناوی خۆی پێویستە، تا 15 پیت، ژمارە یان «-»؛ هەمان گرووپی کار بهێڵەوە، بنەڕەت WORKGROUP؛ پاش گۆڕین دەستپێکردنەوە بکە.
Schematic drawn after Microsoft’s Windows 11 settings; your window may look slightly different.وێنەیەکی سادەکراوە بەپێی ڕێکخستنەکانی Windows 11ـی Microsoft؛ لەوانەیە تۆ کەمێک جیاواز بێت.CêIT
Step 3: a unique name and the same workgroupهەنگاوی 3: ناوێکی جیاواز و هەمان گرووپی کار
Workgroup or domain? Why Windows Home cannot joinگرووپی کار یان دۆمەین؟ بۆچی Windows Home نابێتە ئەندامی دۆمەین
In a workgroup every PC keeps its own user accounts — that is why Aram needs an account on SHILAN-PC. That is fine for two or three PCs, not for a school with 300. Schools and companies use a domain instead: one Windows Server, the domain controller, keeps every user account and computer in Active Directory. A user signs in on any member PC with one account, and IT manages all the PCs from one place.
Two panels. Left, Workgroup: three PCs, each with its own small list of user accounts; the same person needs an account on every PC. Right, Domain: a Windows Server domain controller with Active Directory holds one list of all accounts and computers; three member PCs running Pro, Enterprise and Education sign in through it, while a Windows 11 Home PC stands outside with a cross: it cannot join.دوو بەش. چەپ، گرووپی کار: سێ کۆمپیوتەر، هەریەکەیان لیستێکی بچووکی هەژمارەکانی بەکارهێنەری خۆی هەیە؛ هەمان کەس لەسەر هەر کۆمپیوتەرێک هەژمارێکی پێویستە. ڕاست، دۆمەین: domain controllerـێکی Windows Server بە Active Directory یەک لیستی هەموو هەژمار و کۆمپیوتەرەکان هەڵدەگرێت؛ سێ کۆمپیوتەری ئەندام بە Pro، Enterprise و Education لە ڕێیەوە دەچنە ژوورەوە، لە کاتێکدا کۆمپیوتەرێکی Windows 11 Home بە نیشانەی خاچەوە لە دەرەوە وەستاوە: ناتوانێت ببێتە ئەندام.
Workgroup: accounts on every PC. Domain: one directory on a server — Home cannot join.: هەژمار لەسەر هەر . دۆمەین: یەک ڕێبەر لەسەر — Home ناتوانێت ببێتە ئەندام.CêIT
Only Pro, Enterprise and Education editions can join a domain. In Windows 11 Home the Domain choice in System Properties is greyed out, so a Home PC can only stay in a workgroup; nor can it join Microsoft Entra ID, the cloud version of the same idea. So the client PCs of a Windows Server lab must run Pro or higher — just as a Remote Desktop host must.
تەنیا جۆرەکانی Pro، Enterprise و Education دەتوانن ببنە ئەندامی دۆمەین. لە Windows 11 Homeـدا هەڵبژاردەی Domain لە System Properties ناچالاکە، بۆیە Home تەنیا دەتوانێت لە بمێنێتەوە؛ هەروەها ناتوانێت ببێتە ئەندامی Microsoft Entra ID، کە وەشانی هەوریی هەمان بیرۆکەیە. بۆیە لە تاقیگەیەکی Windows Serverـدا دەبێت Pro یان سەرووتریان لەسەر بێت — هەر وەک خانەخوێی Remote Desktop.
Step 4: give each PC an IP addressهەنگاوی 4: ناونیشانێکی IP بدە بە هەر کۆمپیوتەرێک
By default Windows asks a DHCP server for an address (DHCP). On a two-PC cable there is none. While it waits, Windows shows the network as “Identifying…” with no usable address. After about a minute each PC gives itself an APIPA address from 169.254.0.0/16, mask 255.255.0.0, and no gateway (No answer: APIPA and 169.254). Both PCs land in 169.254.0.0/16, so they can still talk — but the addresses may change.
Windows بە بنەڕەت داوای ناونیشان لە دەکات (DHCP). لەسەر کێبڵێکی دوو هیچ نییە. لە کاتی چاوەڕوانیدا، Windows بە «Identifying…» نیشان دەدات و هیچ ناونیشانێکی بەکارهاتووی نییە. پاش نزیکەی خولەکێک هەر خۆی ناونیشانێکی لە 169.254.0.0/16 وەردەگرێت، بە ماسکی 255.255.0.0 و بێ (وەڵام نییە: APIPA و 169.254). هەردوو دەکەونە ناو 169.254.0.0/16، بۆیە هێشتا دەتوانن قسە بکەن — بەڵام ناونیشانەکان لەوانەیە بگۆڕێن.
For a lab, static addresses are easier. In Settings › Network & internet › Ethernet › IP assignment › Edit, choose Manual, turn on IPv4 and type 192.168.10.1 on ARAM-PC and 192.168.10.2 on SHILAN-PC, mask 255.255.255.0. Leave gateway and DNS empty: there is no router. The classic window still works too: ncpa.cpl › right-click Ethernet › Properties › Internet Protocol Version 4 (TCP/IPv4) › Properties.
بۆ تاقیگە، ئاسانترن. لە Settings › Network & internet › Ethernet › IP assignment › Edit، Manual هەڵبژێرە، IPv4 دابگیرسێنە و لەسەر ARAM-PC 192.168.10.1 و لەسەر SHILAN-PC 192.168.10.2 بنووسە، ماسک 255.255.255.0. و بەتاڵ بهێڵەوە: هیچ نییە. کۆنەکەش هێشتا کار دەکات: ncpa.cpl › کرتەی ڕاست لەسەر Ethernet › Properties › Internet Protocol Version 4 (TCP/IPv4) › Properties.
Left, “Automatic (DHCP) — the default”: Windows asks for a DHCP server, nobody answers on this cable, and after about a minute it picks an APIPA address by itself: IPv4 address 169.254.37.160, subnet mask 255.255.0.0; both PCs land in 169.254.0.0/16 so they can still talk, but with no gateway or Internet and the address can change. Right, the Windows 11 “Edit IP settings” dialog set to Manual: IPv4 on, IP address 192.168.10.2, subnet mask 255.255.255.0, gateway and preferred DNS empty, Save. Notes: the Settings path, and that static addresses are easier for a lab.چەپ، «خۆکار (DHCP) — بنەڕەت»: Windows داوای ڕاژەکارێکی DHCP دەکات، لەسەر ئەم کێبڵە کەس وەڵام ناداتەوە و پاش نزیکەی خولەکێک خۆی ناونیشانێکی APIPA هەڵدەبژێرێت: IPv4 169.254.37.160، ماسکی ژێرڕایەڵە 255.255.0.0؛ هەردووکیان دەکەونە 169.254.0.0/16 بۆیە دەتوانن قسە بکەن، بەڵام بێ دەروازەی بنەڕەتی و ئینتەرنێت و ناونیشانەکە دەکرێت بگۆڕێت. ڕاست، پەنجەرەی «Edit IP settings»ـی Windows 11 لەسەر Manual: IPv4 داگیرساو، IP address 192.168.10.2، Subnet mask 255.255.255.0، Gateway و Preferred DNS بەتاڵ، Save. تێبینی: ڕێگای Settings و ئەوەی ناونیشانەکانی IPـی جێگیر بۆ تاقیگە ئاسانترن.
Automatic falls back to APIPA; manual gives you addresses you choose.خۆکار دەگەڕێتەوە سەر ؛ دەستی ئەو ناونیشانانەت دەداتێ کە خۆت هەڵیاندەبژێریت.CêIT
Step 4: give each PC an IP addressهەنگاوی 4: ناونیشانێکی IP بدە بە هەر کۆمپیوتەرێک
Find the address: ipconfig and Settingsناونیشانەکە بدۆزەوە: ipconfig و Settings
Before you test, find out each PC’s address. In Command Prompt type ipconfig. An APIPA address appears as Autoconfiguration IPv4 Address, and Default Gateway stays empty. A Wi-Fi adapter that is not used shows “Media disconnected”. More about ipconfig is in ipconfig /all.
SHILAN-PC on the two-PC cable, before static addressesSHILAN-PC لەسەر کێبڵە دوو کۆمپیوتەرییەکە، پێش ناونیشانەکانی IPـی جێگیرBATType in a terminalلە تێرمیناڵدا بینووسە
ipconfig
Outputدەرئەنجام
Windows IP Configuration


Ethernet adapter Ethernet:

   Connection-specific DNS Suffix  . :
   Link-local IPv6 Address . . . . . : fe80::4d2a:91c3:7b10:5e2f%12
   Autoconfiguration IPv4 Address. . : 169.254.37.160
   Subnet Mask . . . . . . . . . . . : 255.255.0.0
   Default Gateway . . . . . . . . . :

Wireless LAN adapter Wi-Fi:

   Media State . . . . . . . . . . . : Media disconnected
   Connection-specific DNS Suffix  . :
The same facts are in Settings › Network & internet › Ethernet: the network name, the profile, the IPv4 address and the Physical address (MAC). “No internet” there is normal on this little network — there is no gateway — just as older Windows said “Limited or no connectivity”.
هەمان زانیاری لە Settings › Network & internet › Ethernetـدایە: ناوی ، پرۆفایلەکە، ناونیشانی IPv4 و Physical address (MAC). «No internet» لەوێ لەم بچووکەدا ئاساییە — هیچ نییە — هەروەک Windowsـی کۆن دەیگوت «Limited or no connectivity».
A Windows 11 Settings page, Network & internet › Ethernet: “Unidentified network — No internet” (1); Network profile type with “Public network (Recommended)” and “Private network”, Private selected (2); IP assignment Automatic (DHCP), IPv4 address 169.254.37.160 (3), IPv4 DNS servers empty, Physical address (MAC) 00-00-5E-00-53-B2. Notes: 1 “No internet” is normal here because there is no gateway; 2 choose Private on a network you trust — Public hides the PC and blocks sharing; 3 169.254.x.x is APIPA, ipconfig shows the same.لاپەڕەیەکی Settingsـی Windows 11، Network & internet › Ethernet: «Unidentified network — No internet» (1)؛ Network profile type بە «Public network (Recommended)» و «Private network»، Private هەڵبژێردراوە (2)؛ IP assignment Automatic (DHCP)، ناونیشانی IPv4 169.254.37.160 (3)، ڕاژەکارەکانی DNS بەتاڵ، Physical address (MAC) 00-00-5E-00-53-B2. تێبینی: 1 «No internet» لێرە ئاساییە چونکە دەروازەی بنەڕەتی نییە؛ 2 لەسەر ڕایەڵەیەک کە متمانەت پێیەتی Private هەڵبژێرە — Public کۆمپیوتەرەکە دەشارێتەوە و هاوبەشکردن ڕادەگرێت؛ 3 169.254.x.x APIPAـیە و ipconfig هەمان شت پیشان دەدات.
Settings shows the address, the MAC address and the network profile on one page.Settings ناونیشان، و پرۆفایلی لە یەک لاپەڕەدا پیشان دەدات.CêIT
Step 4: give each PC an IP addressهەنگاوی 4: ناونیشانێکی IP بدە بە هەر کۆمپیوتەرێک
Same network, same mask: check the pairهەمان ڕایەڵە، هەمان ماسک: دوو ناونیشانەکە بپشکنە
With no router between them, two PCs can talk only if they are in the same network. Check the pair like this: the subnet mask must be the same; an AND of each address with the mask must give the same network address, and so the same broadcast address; and the host parts must differ. How the AND works is shown in AND: how a computer finds the network ID.
10.1.1.1 and 10.1.1.2, mask 255.255.255.0: both give network 10.1.1.0 and broadcast 10.1.1.255 — they can talk.
192.168.10.1 and 192.168.20.2, mask 255.255.255.0: networks 192.168.10.0 and 192.168.20.0 — they need a router.
10.1.1.1 و 10.1.1.2، ماسک 255.255.255.0: هەردووکیان 10.1.1.0 و 10.1.1.255 دەدەن — دەتوانن قسە بکەن.
192.168.10.1 و 192.168.20.2، ماسک 255.255.255.0: 192.168.10.0 و 192.168.20.0 — پێویستیان بە هەیە.
Two rows. Top, a pair that works: 10.1.1.1 AND 255.255.255.0 = 10.1.1.0, and 10.1.1.2 AND 255.255.255.0 = 10.1.1.0; same network 10.1.1.0, same broadcast 10.1.1.255, different host parts .1 and .2 — a tick: they can talk over one cable. Bottom, a pair that fails: 192.168.10.1 gives 192.168.10.0 and 192.168.20.2 gives 192.168.20.0 — different networks, a cross: a router is needed.دوو ڕیز. سەرەوە، جووتێک کە کار دەکات: 10.1.1.1 AND 255.255.255.0 = 10.1.1.0 و 10.1.1.2 AND 255.255.255.0 = 10.1.1.0؛ هەمان ناسەڕایەڵە 10.1.1.0، هەمان ناسەپەخش 10.1.1.255، بەشی میوانگری جیاواز .1 و .2 — نیشانەی ڕاست: بە یەک کێبڵ دەتوانن قسە بکەن. خوارەوە، جووتێک کە کار ناکات: 192.168.10.1 دەبێتە 192.168.10.0 و 192.168.20.2 دەبێتە 192.168.20.0 — ڕایەڵەی جیاواز، نیشانەی خاچ: ڕێدۆزێک پێویستە.
Same mask, same network address, same broadcast address: then two PCs can talk without a router.هەمان ماسک، هەمان ، هەمان : ئەو کاتە دوو بێ دەتوانن قسە بکەن.CêIT
Exam questions often give a network, such as 192.168.1.0/24, and ask for two host addresses. Any two different addresses from 192.168.1.1 to 192.168.1.254 are right; .0 is the network address and .255 the broadcast address, so never give those to a PC.
پرسیارەکانی تاقیکردنەوە زۆرجار دەدەن (وەک 192.168.1.0/24) و دوو ناونیشانی دەخوازن. هەر دوو ناونیشانێکی جیاواز لە 192.168.1.1 تا 192.168.1.254 ڕاستن؛ .0 و .255 ، بۆیە هەرگیز ئەوانە مەدە بە .
Step 5: ping the other PCهەنگاوی 5: پینگیکۆمپیوتەرەکەی تر بکە
Now check that the two computers can exchange data. On ARAM-PC, ping SHILAN-PC’s address. Replies mean the connection works. “Request timed out” means something blocks the way.
Success: the two PCs can talkسەرکەوتن: دوو کۆمپیوتەرەکە دەتوانن قسە بکەنBATType in a terminalلە تێرمیناڵدا بینووسە
ping 192.168.10.2
Outputدەرئەنجام
Pinging 192.168.10.2 with 32 bytes of data:
Reply from 192.168.10.2: bytes=32 time<1ms TTL=128
Reply from 192.168.10.2: bytes=32 time<1ms TTL=128
Reply from 192.168.10.2: bytes=32 time=1ms TTL=128
Reply from 192.168.10.2: bytes=32 time<1ms TTL=128

Ping statistics for 192.168.10.2:
    Packets: Sent = 4, Received = 4, Lost = 0 (0% loss),
Approximate round trip times in milli-seconds:
    Minimum = 0ms, Maximum = 1ms, Average = 0ms
Failure: no reply came backشکست: هیچ وەڵامێک نەگەڕایەوەBATType in a terminalلە تێرمیناڵدا بینووسە
ping 192.168.10.2
Outputدەرئەنجام
Pinging 192.168.10.2 with 32 bytes of data:
Request timed out.
Request timed out.
Request timed out.
Request timed out.

Ping statistics for 192.168.10.2:
    Packets: Sent = 4, Received = 0, Lost = 4 (100% loss),
Step 5: ping the other PCهەنگاوی 5: پینگیکۆمپیوتەرەکەی تر بکە
Why the first ping often fails: the firewallبۆچی یەکەم پینگ زۆرجار سەرناکەوێت: ئاگرەدیوار
On two new PCs, the usual reason for “Request timed out” is not the cable but Windows Defender Firewall. On a Public network it silently drops incoming Echo Requests. When you turn on file and printer sharing for the Private profile (Step 6), Windows also turns on its built-in rule File and Printer Sharing (Echo Request - ICMPv4-In), and the PC starts answering. Silence is not proof that a PC is off (Firewalls and ping).
لەسەر دوو نوێ، هۆی ئاسایی «Request timed out» کێبڵەکە نییە، بەڵکو Windows Defender Firewallـە. لەسەر Public بە بێدەنگی Echo Requestـە هاتووەکان فڕێ دەدات. کاتێک هاوبەشکردنی و بۆ پرۆفایلی Private دادەگیرسێنیت (هەنگاوی 6)، Windows یاسا ئامادەکەی خۆیشی دادەگیرسێنێت، File and Printer Sharing (Echo Request - ICMPv4-In). ئیتر دەست دەکات بە وەڵامدانەوە. بێدەنگی بەڵگە نییە کە کوژاوەتەوە (ئاگرەدیوارەکان و پینگ).
Two panels. Left, profile Public (the default): ARAM-PC sends an Echo Request, a red firewall wall in front of SHILAN-PC drops it, and ping prints “Request timed out.” and “Lost = 4 (100% loss)”. Right, profile Private with file and printer sharing on: the firewall rule File and Printer Sharing (Echo Request - ICMPv4-In) is on, the request passes and an Echo Reply comes back: “Reply from 192.168.10.2: bytes=32 time<1ms TTL=128”. Bottom: fix the profile and the sharing settings, never switch the whole firewall off; “Request timed out” can also mean a wrong address or a bad cable.دوو بەش. چەپ، پرۆفایلی Public (بنەڕەت): ARAM-PC Echo Request دەنێرێت، دیوارێکی ئاگرەدیوار لە بەردەم SHILAN-PC فڕێی دەدات و ping دەنووسێت «Request timed out.» و «Lost = 4 (100% loss)». ڕاست، پرۆفایلی Private بە هاوبەشکردنی فایل و چاپەری داگیرساو: یاسای File and Printer Sharing (Echo Request - ICMPv4-In) داگیرساوە، داواکارییەکە تێدەپەڕێت و Echo Reply دەگەڕێتەوە: «Reply from 192.168.10.2: bytes=32 time<1ms TTL=128». خوارەوە: پرۆفایل و ڕێکخستنەکانی هاوبەشکردن چاک بکە، هەرگیز هەموو ئاگرەدیوارەکە مەکوژێنەوە؛ «Request timed out» دەکرێت واتای ناونیشانی هەڵە یان کێبڵی خراپیش بێت.
Same cable, same addresses: only the firewall rule differs.هەمان کێبڵ، هەمان ناونیشان: تەنیا یاسای جیاوازە.CêIT
Allow only ping: one firewall ruleتەنیا ڕێگە بە پینگ بدە: یەک یاسای ئاگرەدیوار
Sometimes a PC should answer ping but share nothing. Then keep the firewall on and turn on just one rule:
هەندێک جار دەبێت وەڵامی بداتەوە، بەڵام هیچ شتێک هاوبەش نەکات. ئەو کاتە داگیرساو بهێڵەوە و تەنیا یەک یاسا دابگیرسێنە:
Open the rulesیاساکان بکەرەوە
Open Windows Defender Firewall › Advanced settings (or type wf.msc) and select Inbound Rules.
Windows Defender Firewall › Advanced settings بکەرەوە (یان wf.msc بنووسە) و Inbound Rules هەڵبژێرە.
Enable Echo RequestEcho Request دابگیرسێنە
Find File and Printer Sharing (Echo Request - ICMPv4-In) whose Profile includes Private, right-click it and select Enable Rule.
Optional: in its Properties › Scope, under Remote IP address, choose These IP addresses and add 192.168.10.1. Now only ARAM-PC gets replies.
ئارەزوومەندانە: لە Properties › Scopeـی یاساکەدا، لە ژێر Remote IP address، These IP addresses هەڵبژێرە و 192.168.10.1 زیاد بکە. ئێستا تەنیا ARAM-PC وەڵام وەردەگرێت.
Left, the Windows Defender Firewall with Advanced Security window at Inbound Rules: the row File and Printer Sharing (Echo Request - ICMPv4-In), Profile Private, Enabled Yes, is highlighted (1) and its right-click menu shows Enable Rule. Right, the rule's Properties at the Scope tab: Remote IP address — These IP addresses: 192.168.10.1 (2). Bottom, a red-bordered note: not New Rule › Program › All programs › Allow the connection — that opens every program on the PC.چەپ، پەنجەرەی Windows Defender Firewall with Advanced Security لە Inbound Rules: ڕیزی File and Printer Sharing (Echo Request - ICMPv4-In)، Profile Private، Enabled Yes دیار کراوە (1) و لیستی کرتەی ڕاستەکەی Enable Rule پیشان دەدات. ڕاست، Propertiesـی یاساکە لە تابی Scope: Remote IP address — These IP addresses: 192.168.10.1 (2). خوارەوە، تێبینییەک بە چوارچێوەی سوور: نەک New Rule › Program › All programs › Allow the connection — ئەوە هەموو بەرنامەکانی کۆمپیوتەرەکە دەکاتەوە.
One narrow rule: Echo Request in, on the Private profile, from 192.168.10.1 only.یەک یاسای تەسک: Echo Requestـی هاتوو، لەسەر پرۆفایلی Private، تەنیا لە 192.168.10.1ـەوە.CêIT
Step 6: a Private profile, discovery and file sharingهەنگاوی 6: پرۆفایلی Private، discovery و هاوبەشکردنی فایل
Windows gives every network a profile. Public is the safe default for cafés and hotels: the PC hides and shares nothing. Private is for a network you trust: the PC can be found and can share. On both lab PCs open Settings › Network & internet › Ethernet (or Wi-Fi), select the network, and set Network profile type to Private network.
Windows پرۆفایلێک دەدات بە هەر . Public بنەڕەتی سەلامەتە بۆ کافێ و ئوتێل: خۆی دەشارێتەوە و هیچ شتێک هاوبەش ناکات. Private بۆ کە متمانەت پێیەتی: دەدۆزرێتەوە و دەتوانێت هاوبەش بکات. لەسەر هەردوو تاقیگەکە Settings › Network & internet › Ethernet (یان Wi-Fi) بکەرەوە، هەڵبژێرە و Network profile type بکە بە Private network.
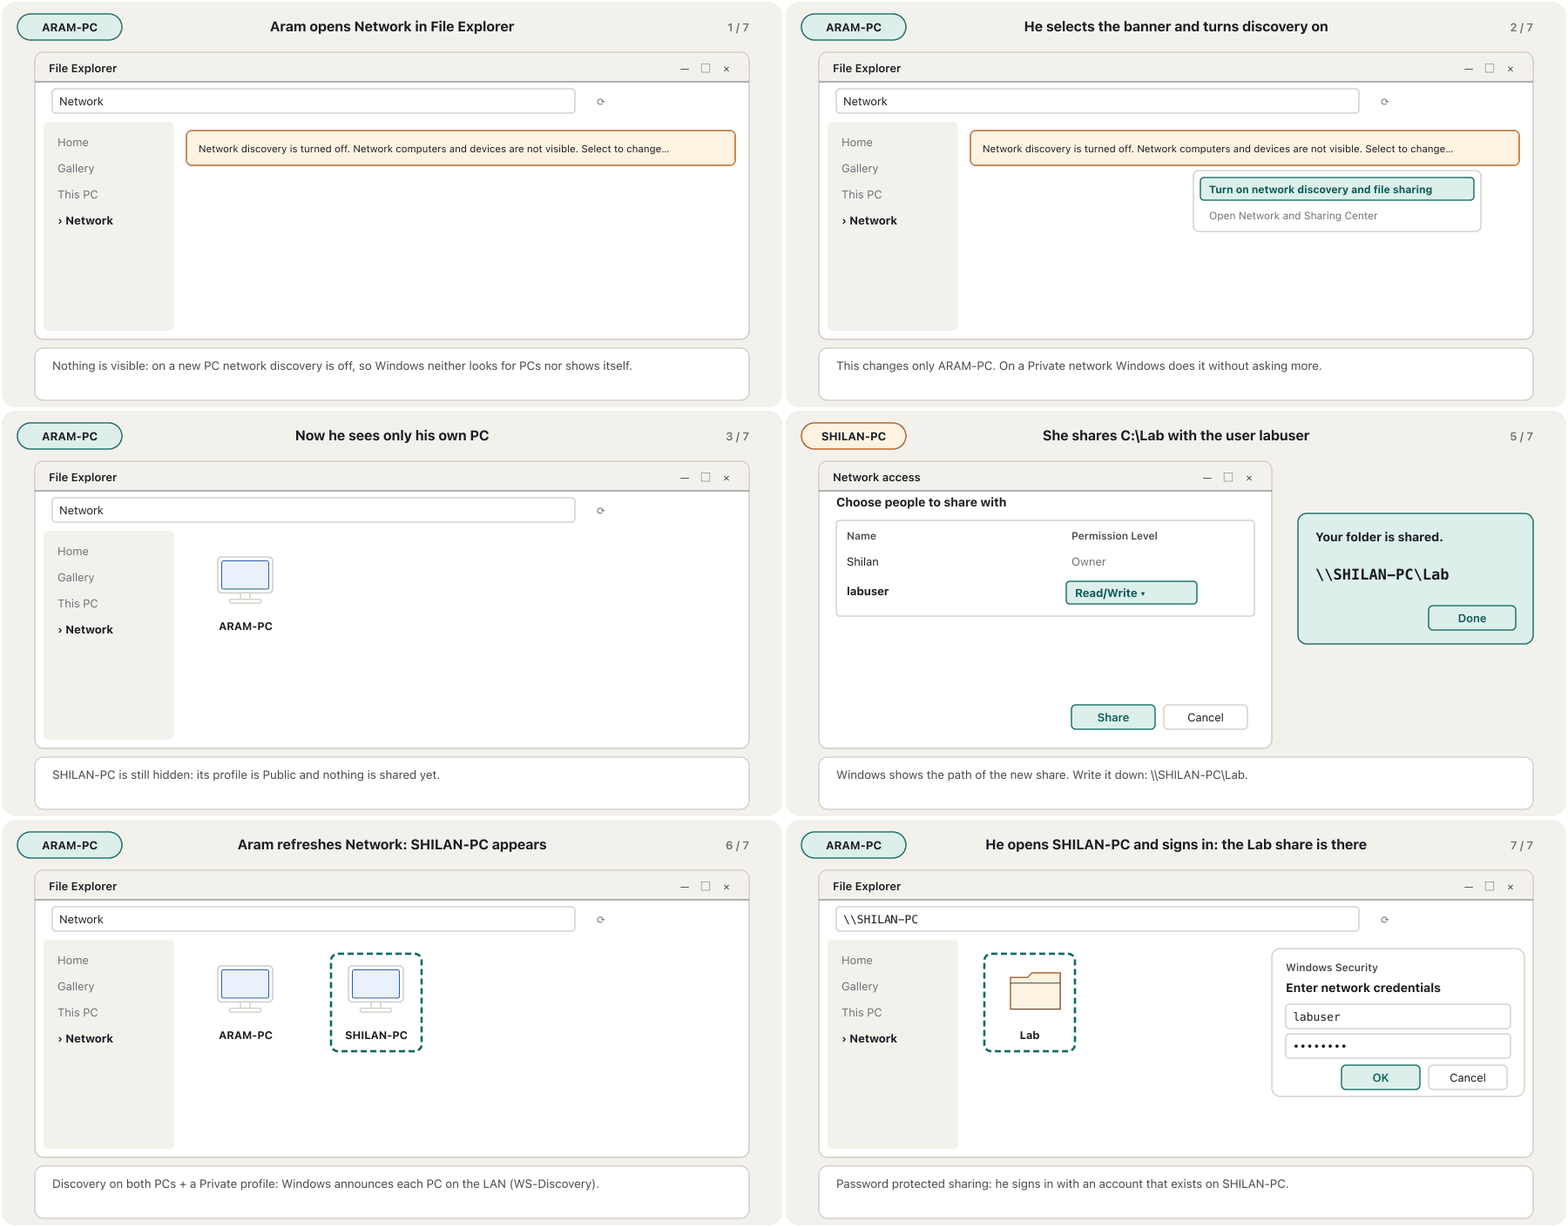
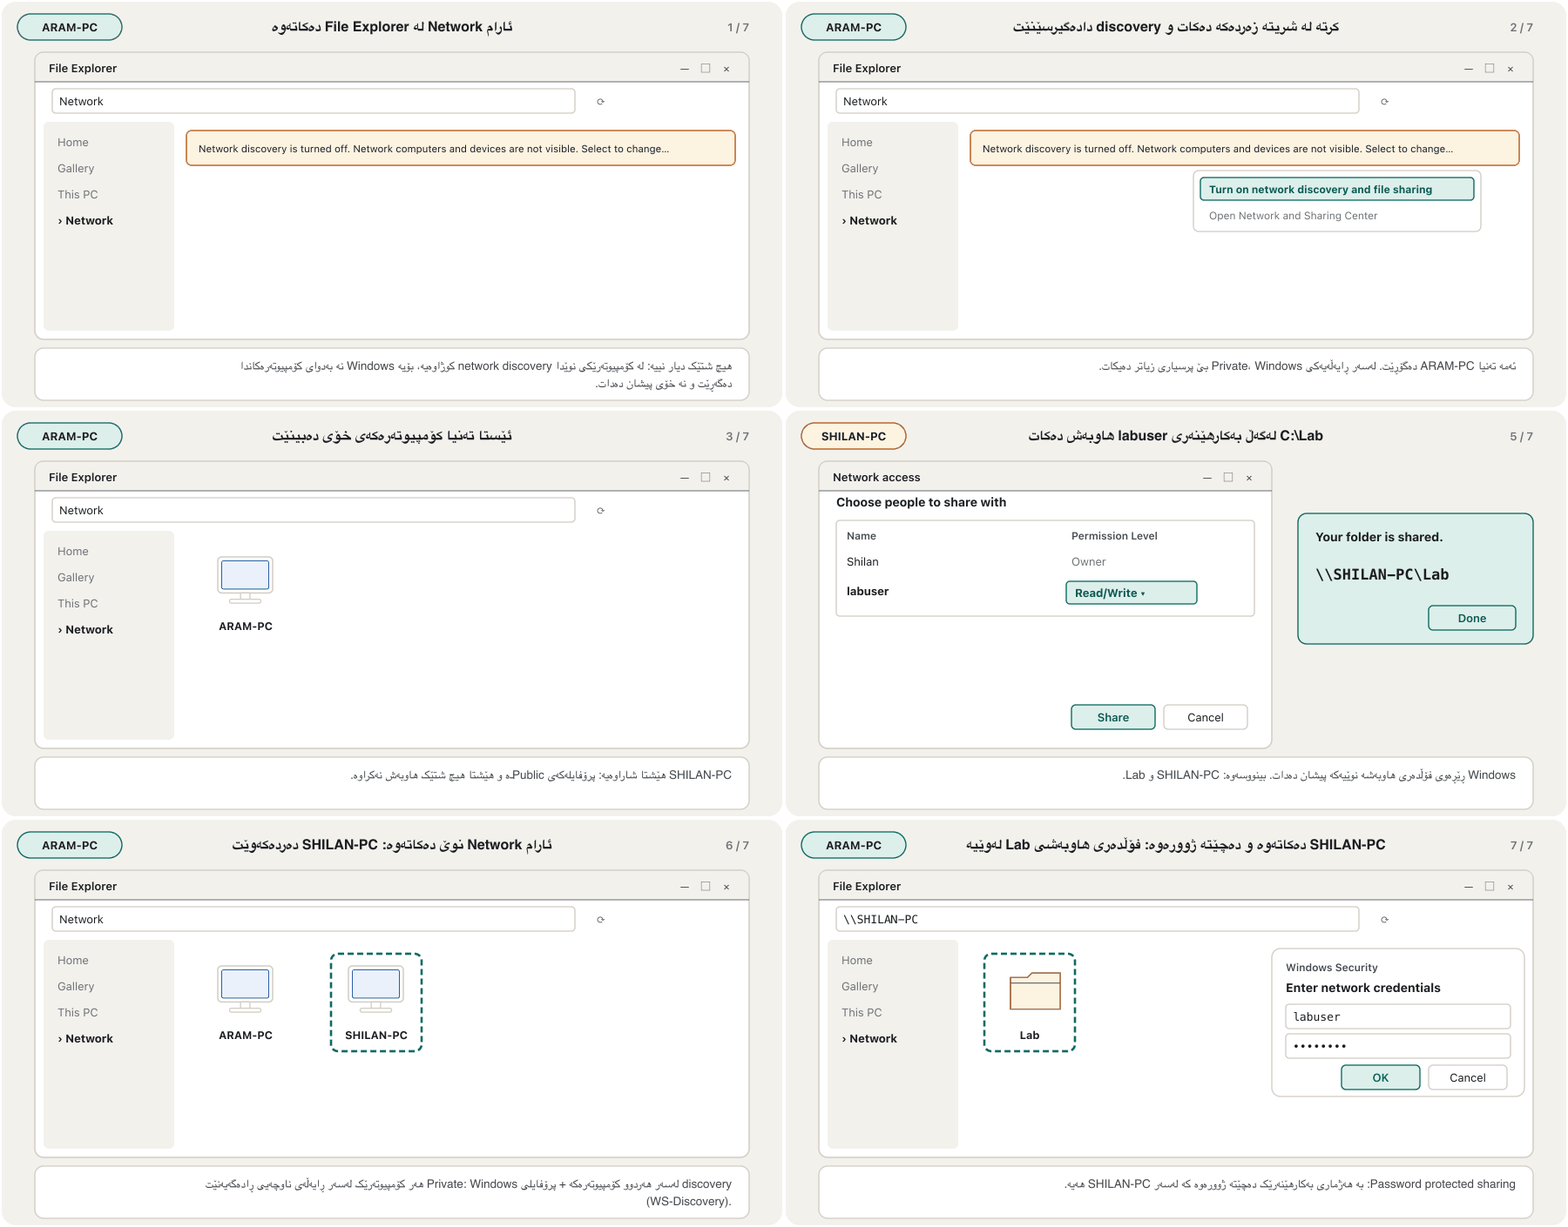
Then open Settings › Network & internet › Advanced network settings › Advanced sharing settings. Under Private networks turn on Network discovery and File and printer sharing. Under All networks leave Password protected sharing on. (In File Explorer › Network, the yellow “Network discovery is turned off” bar offers the same switch.)
A Windows 11 Settings window, Advanced sharing settings. Private networks (current profile): Network discovery On and File and printer sharing On, highlighted (1). Public networks: both Off (!). All networks: Public folder sharing Off; Password protected sharing On, highlighted (2). Notes: 1 on the Private profile turn on discovery and sharing so others can see this PC and its shares; 2 keep password protected sharing on, visitors must sign in with an account of this PC; ! public networks stay off, in a café nobody should see your folders.پەنجەرەی Settingsـی Windows 11، Advanced sharing settings. Private networks (پرۆفایلی ئێستا): Network discovery On و File and printer sharing On، دیاریکراو (1). Public networks: هەردووکیان Off (!). All networks: Public folder sharing Off؛ Password protected sharing On، دیاریکراو (2). تێبینی: 1 لە پرۆفایلی Private، discovery و هاوبەشکردن دابگیرسێنە تا ئەوانی تر ئەم کۆمپیوتەرە و فۆڵدەرە هاوبەشەکانی ببینن؛ 2 Password protected sharing داگیرساو بهێڵەوە، سەردانکەر دەبێت بە هەژمارێکی بەکارهێنەری ئەم کۆمپیوتەرە بچێتە ژوورەوە؛ ! Public networks کوژاوە دەمێنێتەوە، لە کافێدا کەس نابێت فۆڵدەرەکانت ببینێت.
Three switches decide whether the PC can be seen, can share, and asks for a password.سێ کلیل بڕیار دەدەن کە ئایا دەبینرێت، دەتوانێت هاوبەش بکات و داوای دەکات.CêIT
Step 7: share a folderهەنگاوی 7: فۆڵدەرێک هاوبەش بکە
On SHILAN-PC, create the folder C:\Lab (a folder outside your user folder gets a short path). Password protected sharing means Aram signs in with an account of SHILAN-PC, so first create a standard local account for him, for example labuser (Settings › Accounts › Other users). Then share the folder:
Share and note the pathهاوبەشی بکە و ڕێڕەوەکە بنووسەوە
Select Share. Windows says “Your folder is shared” and shows the path: \\SHILAN-PC\Lab. Select Done.
کرتە لە Share بکە. Windows دەڵێت «Your folder is shared» و نیشان دەدات: \\SHILAN-PC\Lab. کرتە لە Done بکە.
The folder Lab with its right-click menu: Open, Show more options (1), Give access to (2), Properties; the submenu item “Specific people…”. An arrow leads to the Network access window: “Choose people to share with”, labuser chosen and Add; a list with Shilan (Owner) and labuser with Permission Level Read/Write highlighted (3); the levels Read, Read/Write and Remove; Share and Cancel. A green box: “Your folder is shared.” \\SHILAN-PC\Lab (4).فۆڵدەری Lab لەگەڵ لیستی کرتەی ڕاست: Open، Show more options (1)، Give access to (2)، Properties؛ و بژاردەی «Specific people…». تیرێک دەچێت بۆ پەنجەرەی Network access: «Choose people to share with»، labuser هەڵبژێردراوە و Add؛ لیستێک بە Shilan (Owner) و labuser بە Permission Level Read/Write کە دیاریکراوە (3)؛ ئاستەکانی Read، Read/Write و Remove؛ Share و Cancel. سندوقێکی سەوز: «Your folder is shared.» \\SHILAN-PC\Lab (4).
“Give access to” shares the folder and sets its permissions in one go.«Give access to» هاوبەش دەکات و بە یەکجار دادەنێت.CêIT
Step 7: share a folderهەنگاوی 7: فۆڵدەرێک هاوبەش بکە
The other road: Advanced Sharingڕێگاکەی تر: Advanced Sharing
Windows has a second, older road with more options. Right-click the folder › Properties › the Sharing tab (not General) › Advanced Sharing… Tick Share this folder and check the share name. Windows 11 lets at most 20 users in at once. Permissions sets who may do what; Caching decides whether other PCs may keep offline copies.
Left, the Advanced Sharing dialog: Share this folder ticked (1); share name Lab; limit the number of simultaneous users to 20 (2); Comments; Permissions button (3) and Caching button (4); OK, Cancel, Apply. An arrow to the Permissions for Lab dialog: user labuser (Everyone removed); for labuser, Allow is ticked for Change and Read, Full Control is not (5). Notes: Windows 11 allows at most 20 users at once; caching means offline copies; remove Everyone and add the user; Change means read and write, Read means look only; Full Control also lets the user change the permissions, never give it to Everyone.چەپ، پەنجەرەی Advanced Sharing: Share this folder دیاریکراوە (1)؛ ناوی هاوبەش Lab؛ سنووری بەکارهێنەرەکانی هاوکات 20 (2)؛ Comments؛ دوگمەی Permissions (3) و دوگمەی Caching (4)؛ OK، Cancel، Apply. تیرێک بۆ پەنجەرەی Permissions for Lab: بەکارهێنەری labuser، Everyone لابراوە؛ بۆ labuser، Allow بۆ Change و Read دیاریکراوە، Full Control نا (5). تێبینی: Windows 11 لە یەک کاتدا تا 20 بەکارهێنەر ڕێگە دەدات؛ Caching واتە کۆپیی ئۆفلاین؛ Everyone لاببە و بەکارهێنەرەکە زیاد بکە؛ Change واتە خوێندن و نووسین، Read واتە تەنیا سەیرکردن؛ Full Control ڕێگە دەدات مۆڵەتەکانیش بگۆڕێت، هەرگیز مەیدە بە Everyone.
Advanced Sharing: Read and Change for one user — never Full Control for Everyone.Advanced Sharing: Read و Change بۆ یەک — هەرگیز Full Control بۆ Everyone نا.CêIT
Read, Change or Full Control?Read، Change یان Full Control؟
Share permissions grow in three steps. Each one includes the one before it, and a Deny always beats an Allow. Give each user the least privilege that does the job (least privilege).
Three boxes growing like steps. Read (Give access to: Read): open, copy, run — most users. Change (Give access to: Read/Write): plus create, edit, delete — people who must write. Full Control: plus change the permissions themselves — only the owner or an admin. Bottom: each level includes the one before it; Deny beats Allow.سێ سندوق کە وەک پلیکانە گەورە دەبن. Read (Give access to: Read): کردنەوە، کۆپیکردن، کارپێکردن — زۆربەی بەکارهێنەرەکان. Change (Give access to: Read/Write): + دروستکردن، دەستکاریکردن، سڕینەوە — ئەوانەی دەبێت بنووسن. Full Control: + گۆڕینی خودی مۆڵەتەکان — تەنیا خاوەن یان بەڕێوەبەر. خوارەوە: هەر ئاستێک ئاستی پێشووی تێدایە؛ Deny بەسەر Allowـدا زاڵە.
“Read/Write” in Give access to is “Change” in Advanced Sharing.«Read/Write» لە Give access to هەمان «Change»ـە لە Advanced Sharing.CêIT
Step 8: open the share from the other PCهەنگاوی 8: فۆڵدەرە هاوبەشەکە لە کۆمپیوتەرەکەی ترەوە بکەرەوە
On ARAM-PC open File Explorer › Network. Once discovery is on and SHILAN-PC uses a Private profile, it appears in the list. Or skip browsing: type \\SHILAN-PC\Lab (or \\192.168.10.2\Lab) in the address bar or in Win+R. Windows asks for credentials: sign in as labuser.
From “nothing visible” to an open share: the settings on both PCs, in order.لە «هیچ شتێک دیار نییە»وە بۆ کراوە: ڕێکخستنەکانی هەردوو بە ڕیز.CêIT
Step 8: open the share from the other PCهەنگاوی 8: فۆڵدەرە هاوبەشەکە لە کۆمپیوتەرەکەی ترەوە بکەرەوە
Listing computers and shares: net viewلیستکردنی کۆمپیوتەرەکان و هاوبەشەکان: net view
Older Windows listed the PCs of a workgroup with net view or “View workgroup computers”. That list came from the Computer Browser service, which needs the old SMBv1 protocol. SMBv1 is not installed in Windows 11, so plain net view usually ends with “System error 6118” (net view and net use). File Explorer › Network now uses WS-Discovery instead. net view with one PC’s name still lists that PC’s shares (after you have signed in to it):
One PC’s sharesهاوبەشەکانی یەک کۆمپیوتەرBATType in a terminalلە تێرمیناڵدا بینووسە
net view \\SHILAN-PC
Outputدەرئەنجام
Shared resources at \\SHILAN-PC


Share name  Type  Used as  Comment

-------------------------------------------------------------------------------
Lab         Disk
The command completed successfully.
Map the share to a drive letterبەستنەوەی فۆڵدەرە هاوبەشەکە بە پیتێکی درایڤ
If Aram uses the share every day, he can give it a drive letter. In File Explorer open This PC › See more (⋯) › Map network drive, choose Z:, type \\SHILAN-PC\Lab, tick Reconnect at sign-in, and select Finish. The share now opens like a local disk. The command net use does the same in Command Prompt (net view and net use):
ئەگەر ئارام هەموو ڕۆژێک بەکار بهێنێت، دەتوانێت بداتێ. لە File Explorer This PC › See more (⋯) › Map network drive بکەرەوە، Z: هەڵبژێرە، \\SHILAN-PC\Lab بنووسە، Reconnect at sign-in دیاری بکە و کرتە لە Finish بکە. ئێستا وەک دیسکێکی ناوخۆیی دەکرێتەوە. net use هەمان کار لە Command Prompt دەکات (net view و net use):
Map, list and remove a network driveبەستنەوە، لیستکردن و لابردنی درایڤێکی ڕایەڵەBATType in a terminalلە تێرمیناڵدا بینووسە
net use Z: \\SHILAN-PC\Lab * /user:SHILAN-PC\labuser /persistent:yesnet usenet use Z: /delete
Outputدەرئەنجام
C:\>net use Z: \\SHILAN-PC\Lab * /user:SHILAN-PC\labuser /persistent:yes
Type the password for \\SHILAN-PC\Lab:
The command completed successfully.

C:\>net use
New connections will be remembered.


Status       Local     Remote                    Network

-------------------------------------------------------------------------------
OK           Z:        \\SHILAN-PC\Lab           Microsoft Windows Network
The command completed successfully.

C:\>net use Z: /delete
Z: was deleted successfully.
Explain the codeڕوونکردنەوەی کۆدەکە
Lineدێڕی1
* asks for the password instead of typing it on the command line; /persistent:yes reconnects at every sign-in.
Left, the Map Network Drive dialog: Drive Z:, Folder \\SHILAN-PC\Lab, “Reconnect at sign-in” and “Connect using different credentials” ticked, Finish. Right, This PC: under Devices and drives “Local Disk (C:)”, and under Network locations “Lab (\\SHILAN-PC) (Z:)”, which opens like a local disk. Note: This PC › See more › Map network drive, or the command net use Z: in Command Prompt.چەپ، پەنجەرەی Map Network Drive: درایڤی Z:، Folder \\SHILAN-PC\Lab، «Reconnect at sign-in» و «Connect using different credentials» دیاریکراون، Finish. ڕاست، This PC: لە ژێر Devices and drives «Local Disk (C:)» و لە ژێر Network locations «Lab (\\SHILAN-PC) (Z:)» کە وەک دیسکێکی ناوخۆیی دەکرێتەوە. تێبینی: This PC › See more › Map network drive، یان فەرمانی net use لە Command Prompt.
A mapped drive is a shortcut with a letter: the files still live on SHILAN-PC.درایڤی بەستراو کورتەڕێیەکە بە پیتێک: هێشتا لەسەر SHILAN-PCـن.CêIT
What carries the files: SMBچی فایلەکان هەڵدەگرێت: SMB
Windows file and printer sharing speaks SMB (Server Message Block), an application-layer protocol on TCP port 445 (the well-known ports table). File Explorer on ARAM-PC is the SMB client; the Server service on SHILAN-PC answers. Other ways to move files — FTP, SFTP — are compared in Which tool for which job?
هاوبەشکردنی و Windows بە (Server Message Block) قسە دەکات، لەسەر TCP 445 (خشتەی پۆرتەکان ناسراوەکان). File Explorer لەسەر ARAM-PC ؛ خزمەتگوزاریی Server لەسەر SHILAN-PC وەڵام دەداتەوە. ڕێگاکانی تری گواستنەوەی — FTP، SFTP — لە کام ئامراز بۆ کام کار؟ بەراورد کراون.
Two stacks side by side. ARAM-PC (client): File Explorer › SMB client; TCP port 49821; IP 192.168.10.1; Ethernet MAC 00-00-5E-00-53-A1. SHILAN-PC (server): Server service › C:\Lab; TCP port 445; IP 192.168.10.2; Ethernet MAC 00-00-5E-00-53-B2. Between them, the layer names: application layer SMB 3.1.1, transport layer TCP port 445, network layer IP addresses, data link and physical — the cable that joins the two stacks. Note: SMB is the Windows protocol for shared folders and printers; by default Windows 11 speaks SMB 2 and 3 only, the old SMBv1 is not installed.دوو کۆگا لە تەنیشت یەک. ARAM-PC (ڕاژەخواز): File Explorer › SMB client؛ پۆرتی TCP 49821؛ IP 192.168.10.1؛ MACـی Ethernet 00-00-5E-00-53-A1. SHILAN-PC (ڕاژەکار): Server service › C:\Lab؛ پۆرتی TCP 445؛ IP 192.168.10.2؛ MAC 00-00-5E-00-53-B2. لە نێوانیاندا ناوی چینەکان: چینی ئەپ SMB 3.1.1، چینی گواستنەوە پۆرتی TCP 445، چینی ڕایەڵە ناونیشانەکانی IP، چینی بەستەری دراوە و چینی فیزیکی — ئەو کێبڵەی دوو کۆگاکە دەبەستێتەوە. تێبینی: SMB پرۆتۆکۆڵی Windowsـە بۆ فۆڵدەرە هاوبەشەکان و چاپەرەکان؛ Windows 11 بە بنەڕەت تەنیا SMB 2 و 3 بەکار دەهێنێت، SMBv1ـی کۆن جێگیر نەکراوە.
Opening \\SHILAN-PC\Lab is an SMB conversation on TCP port 445, carried by IP and Ethernet.کردنەوەی \\SHILAN-PC\Lab گفتوگۆیەکی لەسەر TCP 445، کە IP و هەڵیدەگرن.CêIT
The old SMBv1 is deprecated: the WannaCry ransomware spread through a flaw in it in 2017 (WannaCry). Since Windows 10 version 1709 it is not installed by default, and a clean installation of Windows 11 contains neither its client nor its server. If an old device works only with SMBv1, update or replace the device — do not turn SMBv1 back on.
A whole disk from a server: iSCSIدیسکێکی تەواو لە ڕاژەکارێکەوە: iSCSI
A mapped drive is a shared folder: the files stay on the other computer, which keeps its own file system and sends whole files over SMB — to many users at once. iSCSI (Internet Small Computer Systems Interface) works one level lower. The server lends a whole disk — really a virtual-disk file on its own drive — and the disk commands travel inside TCP, on port 3260. The client sees a new, empty local disk, formats it with its own file system and gives it a letter such as E:.
لە ڕاستیدا : لەسەر تر دەمێننەوە، کە خۆی ڕادەگرێت و تەواو بە دەنێرێت — بۆ چەندین بەکارهێنەر پێکەوە. iSCSI (Internet Small Computer Systems Interface) یەک ئاست نزمتر کار دەکات. دیسکێکی تەواو بەقەرز دەدات — لە ڕاستیدا دیسکی گریمانەییە لەسەر درایڤی خۆی — و دیسکەکە لە ناو ، لەسەر 3260، دەگوازرێنەوە. دیسکێکی ناوخۆیی نوێ و بەتاڵ دەبینێت، بە خۆی دەکات و وەک E: دەداتێ.
Two panels. Left, a mapped network drive (SMB, TCP 445): the server keeps its own NTFS file system and the shared folder Lab, and sends whole files such as report.docx; many PCs can use the share at once; on the client it appears as Z: \\SERVER1\Lab. Right, an iSCSI disk (TCP 3260): the server holds only a virtual-disk file, lab.vhdx; the client asks for numbered blocks such as block 10482, formats the disk with its own NTFS and sees it as E:, a local disk; one computer at a time.دوو بەش. چەپ، درایڤێکی ڕایەڵە (SMB، TCP 445): ڕاژەکارەکە سیستەمی فایلی NTFSـی خۆی و فۆڵدەری هاوبەشی Lab ڕادەگرێت و فایلی تەواو، وەک report.docx، دەنێرێت؛ چەندین کۆمپیوتەر دەتوانن پێکەوە بەکاری بهێنن؛ لەسەر ڕاژەخوازەکە وەک Z: \\SERVER1\Lab دەردەکەوێت. ڕاست، دیسکێکی iSCSI (TCP 3260): ڕاژەکارەکە تەنیا فایلێکی دیسکی گریمانەیی هەڵدەگرێت، lab.vhdx؛ ڕاژەخوازەکە داوای بلۆکی ژمارەدار دەکات، وەک block 10482، دیسکەکە بە NTFSـی خۆی فۆرماتی دەکات و وەک E:، دیسکێکی ناوخۆیی، دەیبینێت؛ لە یەک کاتدا تەنیا یەک کۆمپیوتەر.
SMB shares files; iSCSI lends a whole disk, and the client keeps the file system. هاوبەش دەکات؛ iSCSI دیسکێکی تەواو بەقەرز دەدات و ڕادەگرێت.CêIT
This is block-level storage, the idea behind a SAN, over an ordinary network. Because the client keeps the file system, an iSCSI disk belongs to one computer at a time: if two PCs write to it, neither knows what the other changed, and the file system is soon corrupted. To share files between people, share a folder.
In Disk Management right-click C: › Shrink Volume, then make a new volume D: in the free space for the virtual disks. (In a VM, adding a second virtual hard disk is simpler.)
Server Manager › Manage › Add Roles and Features › File and Storage Services › File and iSCSI Services › tick iSCSI Target Server.
Server Manager › Manage › Add Roles and Features › File and Storage Services › File and iSCSI Services › iSCSI Target Server دیاری بکە.
Create the diskدیسکەکە دروست بکە
File and Storage Services › iSCSI › Tasks › New iSCSI Virtual Disk…: choose D:, a name and a size (20 GB), make a new iSCSI target, and under Access Servers add ARAM-PC by its IP address.
File and Storage Services › iSCSI › Tasks › New iSCSI Virtual Disk… بکەرەوە؛ D:، ناوێک و قەبارەیەک (20 GB) هەڵبژێرە، iSCSI targetـێکی نوێ دروست بکە و لە ژێر Access Servers، ARAM-PC بە زیاد بکە.
Connect (ARAM-PC)پەیوەندی بکە (ARAM-PC)
Open iSCSI Initiator (type iscsicpl and let its service start), type 192.168.10.10 under Target and select Quick Connect.
In Disk Management the new disk appears. Bring it Online if needed, Initialize it (GPT), then New Simple Volume with the letter E: and NTFS. E: now opens like a local disk.
لە Disk Management دیسکە نوێیەکە دەردەکەوێت. ئەگەر پێویست بوو بیکە بە Online، Initializeـی بکە (GPT)، پاشان New Simple Volume بە E: و NTFS. ئێستا E: وەک دیسکێکی ناوخۆیی دەکرێتەوە.
SERVER1 (Windows Server 2025, 192.168.10.10) on the left with three numbered steps: 1 Disk Management — shrink C:, new volume D:; 2 Add Roles and Features — iSCSI Target Server; 3 New iSCSI Virtual Disk — D:\iSCSIVirtualDisks\lab.vhdx, 20 GB, a new target, access server 192.168.10.1. A link labelled iSCSI, TCP 3260 joins it to ARAM-PC (192.168.10.1) on the right with two steps: 4 iSCSI Initiator — Target 192.168.10.10, Quick Connect; 5 Disk Management — Online, Initialize (GPT), New Simple Volume E: (NTFS). Below ARAM-PC, This PC shows Local Disk (C:) and New Volume (E:).SERVER1 (Windows Server 2025، 192.168.10.10) لە چەپ بە سێ هەنگاوی ژمارەدار: 1 Disk Management — بچووککردنەوەی C:، ڤۆلیومی نوێی D:؛ 2 Add Roles and Features — iSCSI Target Server؛ 3 New iSCSI Virtual Disk — D:\iSCSIVirtualDisks\lab.vhdx، 20 GB، targetـێکی نوێ، access server 192.168.10.1. بەستەرێک بە نووسینی iSCSI، TCP 3260 ئەو بە ARAM-PC (192.168.10.1)ـەوە لە ڕاست دەبەستێتەوە بە دوو هەنگاو: 4 iSCSI Initiator — Target 192.168.10.10، Quick Connect؛ 5 Disk Management — Online، Initialize (GPT)، New Simple Volume E: (NTFS). لە ژێر ARAM-PC، This PC «Local Disk (C:)» و «New Volume (E:)» پیشان دەدات.
Three steps on the server, two on the client: E: is a disk that lives on SERVER1.سێ هەنگاو لەسەر ، دوو لەسەر : E: دیسکێکە کە لەسەر SERVER1 دەژی.CêIT
Remote Desktop: use a PC from somewhere elseRemote Desktop: کۆمپیوتەرێک لە شوێنێکی ترەوە بەکار بهێنە
Remote Desktop lets you connect to your office PC from another machine — say, a laptop at home — and use it as if you were sitting in front of it. Its protocol, RDP, carries the office PC’s screen to you and your keyboard and mouse to it. In this lab the office PC (the host) is SHILAN-PC, which stays in the building; the home PC (the client) is ARAM-PC, the machine you use when working remotely. The protocol itself is introduced in RDP and VNC.
A laptop on the left (home PC, client: any Windows edition, a Mac or a phone) shows a window with SHILAN-PC’s desktop. A desktop PC on the right (office PC, host: SHILAN-PC, Windows 11 Pro). A green arrow from the office PC to the laptop: pictures of the screen. A dark arrow from the laptop to the office PC: keyboard and mouse. Label: RDP, TCP and UDP port 3389. Notes: programs and files stay on the office PC; only screen pictures travel to the client and only keystrokes and mouse moves travel back; analogy — a long keyboard, mouse and screen cable made of network packets.لاپتۆپێک لە چەپ (کۆمپیوتەری ماڵەوە، ڕاژەخواز: هەر جۆرێکی Windows، Mac یان مۆبایل) پەنجەرەیەک پیشان دەدات کە ڕوومێزی SHILAN-PCـی تێدایە. کۆمپیوتەرێکی مێزی لە ڕاست (کۆمپیوتەری نووسینگە، خانەخوێ: SHILAN-PC، Windows 11 Pro). تیرێکی سەوز لە کۆمپیوتەری نووسینگەوە بۆ لاپتۆپەکە: وێنەی شاشە. تیرێکی تاریک لە لاپتۆپەکەوە بۆ کۆمپیوتەری نووسینگە: کیبۆرد و ماوس. نووسین: RDP، پۆرتی TCP و UDP 3389. تێبینی: بەرنامەکان و فایلەکان لەسەر کۆمپیوتەری نووسینگە دەمێننەوە؛ تەنیا وێنەی شاشە دەچێت بۆ ڕاژەخوازەکە و تەنیا دوگمەکان و جووڵەی ماوس دەگەڕێنەوە؛ لێکچواندن: کێبڵێکی درێژی کیبۆرد، ماوس و شاشە کە لە پاکێتەکان دروست کراوە.
With Remote Desktop the programs run on the remote PC; only pictures and keystrokes travel.لەگەڵ Remote Desktop لەسەر دوور کار دەکەن؛ تەنیا وێنە و دەگوازرێنەوە.CêIT
The PC you connect to must run Windows 11 Pro, Enterprise or Education. Windows 11 Home cannot be a host; it can only connect to other PCs. Check the edition in Settings › System › About › Windows specifications.
Keep Require devices to use Network Level Authentication to connect ticked.
Require devices to use Network Level Authentication to connect دیاریکراو بهێڵەوە.
Under Remote Desktop users add labuser (administrators may connect already). Note the PC name.
لە ژێر Remote Desktop users، labuser زیاد بکە (بەڕێوەبەرەکان پێشتر دەتوانن). PC name بنووسەوە.
A Windows 11 Settings page, System › Remote Desktop: the Remote Desktop switch On (1); “Require devices to use Network Level Authentication to connect” ticked (2); Remote Desktop port 3389; Remote Desktop users (3); PC name SHILAN-PC (4). Beside it the “Enable Remote Desktop?” box with Confirm and Cancel. Notes: turn on and confirm, it needs an administrator; keep NLA on so you sign in before a session starts; administrators may connect, add other users here; write down the PC name or its IP address.لاپەڕەیەکی Settingsـی Windows 11، System › Remote Desktop: کلیلی Remote Desktop On (1)؛ «Require devices to use Network Level Authentication to connect» دیاریکراوە (2)؛ Remote Desktop port 3389؛ Remote Desktop users (3)؛ PC name SHILAN-PC (4). لە تەنیشتیەوە سندوقی «Enable Remote Desktop?» بە Confirm و Cancel. تێبینی: دایگیرسێنە و پشتڕاستی بکەرەوە، بەڕێوەبەری پێویستە؛ NLA داگیرساو بهێڵەوە تا پێش دەستپێکردنی دانیشتن بچیتە ژوورەوە؛ بەڕێوەبەرەکان دەتوانن، بەکارهێنەرەکانی تر لێرە زیاد بکە؛ ناوی کۆمپیوتەرەکە یان ناونیشانی IPـیەکەی بنووسەوە.
Schematic drawn after Microsoft’s Windows 11 settings.وێنەیەکی سادەکراوە بەپێی ڕێکخستنەکانی Windows 11ـی Microsoft.CêIT
Network Level Authentication (NLA) makes users sign in before a remote session is created, so strangers never even reach the Windows sign-in screen. The older road still exists: press the Windows key, type “advanced system”, open View advanced system settings › Remote tab, select Allow remote connections to this computer and keep the NLA box ticked. Turning Remote Desktop on also opens its rule in the firewall.
Select Show Options. In Computer type SHILAN-PC or 192.168.10.2; in User name type SHILAN-PC\labuser.
کرتە لە Show Options بکە. لە Computer، SHILAN-PC یان 192.168.10.2 بنووسە؛ لە User name، SHILAN-PC\labuser بنووسە.
Select Connect and type labuser’s password.
کرتە لە Connect بکە و labuser بنووسە.
Left, the Remote Desktop Connection window, options shown: Computer SHILAN-PC (1), User name SHILAN-PC\labuser (2), Connect. Right, the warning “The identity of the remote computer cannot be verified. Do you want to connect anyway?”: certificate name SHILAN-PC highlighted (3), “The certificate is not from a trusted certifying authority”, an empty box “Don’t ask me again for connections to this computer” (4), and View certificate, Yes, No. Notes: type the PC name or IP address; use an account that exists on SHILAN-PC and may use Remote Desktop; on your own LAN check the certificate name, then Yes; leave “Don’t ask me again” empty.چەپ، پەنجەرەی Remote Desktop Connection بە بژاردەکانەوە: Computer SHILAN-PC (1)، User name SHILAN-PC\labuser (2)، Connect. ڕاست، ئاگادارکردنەوەی «The identity of the remote computer cannot be verified. Do you want to connect anyway?»: ناوی بڕوانامەی دیجیتاڵی SHILAN-PC دیاریکراوە (3)، «The certificate is not from a trusted certifying authority»، سندوقێکی بەتاڵ «Don’t ask me again for connections to this computer» (4) و View certificate، Yes، No. تێبینی: ناوی کۆمپیوتەرەکە یان ناونیشانی IPـیەکەی بنووسە؛ هەژمارێکی بەکارهێنەر بەکار بهێنە کە لەسەر SHILAN-PC هەیە و ڕێگەی Remote Desktopـی پێدراوە؛ لەسەر ڕایەڵەی ناوچەیی خۆت ناوی بڕوانامە دیجیتاڵییەکە بپشکنە، پاشان Yes؛ «Don’t ask me again» بەتاڵ بهێڵەوە.
Connect by name or address, check the certificate name, and keep the warning switched on.بە ناو یان ناونیشان پەیوەندی بکە، ناوی بپشکنە و ئاگادارکردنەوەکە داگیرساو بهێڵەوە.CêIT
Not on Windows? On a Mac, iPhone, iPad or Android device, install Microsoft’s Windows App (it runs on Windows too), add SHILAN-PC as a PC and connect with the same name and user.
Windowsـت نییە؟ لەسەر Mac، iPhone، iPad یان ئامێری Android، Windows Appـی Microsoft دابمەزرێنە (لەسەر Windowsـیش کار دەکات)، SHILAN-PC وەک PC زیاد بکە و بە هەمان ناو و پەیوەندی بکە.
Connect from the other PCلە کۆمپیوتەرەکەی ترەوە پەیوەندی بکە
The certificate warning and the one-session ruleئاگادارکردنەوەی بڕوانامەی دیجیتاڵی و یاسای یەک دانیشتن
A new PC uses a self-signed certificate, so Remote Desktop Connection warns that it “cannot verify the identity of the remote computer”. In the lab, check that the certificate name is the PC you meant (View certificate) and select Yes. Do not tick “Don’t ask me again”: if one day a fake PC answers, that warning is what saves you. At work, IT installs trusted certificates so the warning does not appear (certificates).
Windows 11 allows one person at a time on the desktop. If someone else is signed in at SHILAN-PC, Windows asks whether to disconnect them; if it is labuser, the office screen simply locks. To finish, sign out from the remote Start menu; closing the window only disconnects, and your programs keep running.
Windows 11 لە یەک کاتدا تەنیا یەک کەس لەسەر ڕوومێزەکە دەهێڵێت. ئەگەر کەسێکی تر لەسەر SHILAN-PC لە ژوورەوە بێت، Windows دەپرسێت ئایا پەیوەندییەکەی بپچڕێنێت؛ ئەگەر خودی labuser بێت، تەنیا نووسینگە قفڵ دەبێت. بۆ تەواوکردن، لە لیستی Startـی دوورەوە sign out بکە؛ داخستنی تەنیا پەیوەندییەکە دەپچڕێنێت و بەردەوام کار دەکەن.
In the lab both PCs sit on one LAN. From home it is tempting to forward port 3389 on the office router to the office PC. Never do it. Bots scan the whole Internet for 3389 and guess passwords all day (brute-force attacks), and exposed Remote Desktop is a favourite way in for ransomware. CISA’s #StopRansomware guide says: do not expose remote desktop on the web.
Instead, connect to the office network with a VPN first — an encrypted tunnel with its own sign-in, ideally with multi-factor authentication (VPNs) — and then use Remote Desktop inside the office LAN. Large companies may use a Remote Desktop gateway instead. Also keep strong passwords, NLA on and Windows updated.
Two rows. Wrong: a home laptop reaches the office PC across the Internet through the office router, which forwards port 3389 — “:3389 open”; three bots scan the router; bots scan the whole Internet for 3389 and try passwords all day. Right: the home laptop builds an encrypted VPN tunnel (a padlock) across the Internet to the office VPN gateway, and only then RDP on port 3389 goes to the office PC inside the office network; the tunnel needs its own sign-in with MFA and 3389 is never open to the Internet. Bottom: strong passwords, NLA on, Windows updates installed.دوو ڕیز. هەڵە: لاپتۆپێکی ماڵەوە لە ڕێی ئینتەرنێت و ڕێدۆزی نووسینگەوە دەگاتە کۆمپیوتەری نووسینگە، کە پۆرتی 3389 پێشڕۆکردنی پۆرت دەکات — «:3389 open»؛ سێ ڕۆبۆت ڕێدۆزەکە دەپشکنن؛ ڕۆبۆتەکان هەموو ئینتەرنێت بۆ 3389 دەپشکنن و هەموو ڕۆژێک تێپەڕەوشەکان تاقی دەکەنەوە. ڕاست: لاپتۆپی ماڵەوە تونێلێکی VPN کە بە شفرەکردن پارێزراوە (قفڵێک) بە ناو ئینتەرنێتدا بۆ دەروازەی VPNـی نووسینگە دروست دەکات، تەنیا پاشان RDP لەسەر پۆرتی 3389 بۆ کۆمپیوتەری نووسینگە لە ناو ڕایەڵەی نووسینگەدا دەچێت؛ تونێلەکە چوونەژوورەوەی خۆی بە پشتڕاستکردنەوەی فرەهۆکاری پێویستە و 3389 هەرگیز بەڕووی ئینتەرنێتدا کراوە نییە. خوارەوە: تێپەڕەوشەکانی بەهێز، NLAـی داگیرساو، نوێکردنەوەکانی Windows.
Port 3389 belongs inside the office network; the VPN is the only door from outside. 3389 هی ناو نووسینگەیە؛ تاکە دەرگای دەرەوەیە.CêIT
Common mistakesهەڵە باوەکان
Exercisesڕاهێنانەکان
ExerciseڕاهێنانLab quiz: true or false?تاقیکردنەوەی تاقیگە: ڕاست یان هەڵە؟
Decide whether each step is right. The steps use Windows 11 names.
بۆ پشکنینی لە ترەوە، This PC › Local Disk (C:) بکەرەوە.
Command Prompt بکەرەوە بۆ کارپێکردنی ipconfig و ping.
Show answerوەڵامەکە پیشان بدە
Statementڕستە
Answerوەڵام
Connect both ends of an Ethernet cable to the two computers.هەردوو سەری کێبڵێکی بە دوو ببەستە.
True — Step 1.ڕاستە — هەنگاوی 1.
In the folder’s Properties, select the General tab, then Advanced Sharing.لە Propertiesـی ، تابی General هەڵبژێرە، پاشان Advanced Sharing.
False — Advanced Sharing is on the Sharing tab.هەڵەیە — Advanced Sharing لە تابی Sharingـدایە.
Right-click the folder › Show more options › Give access to › Specific people.کرتەی ڕاست لەسەر › Show more options › Give access to › Specific people.
True — Step 7.ڕاستە — هەنگاوی 7.
Find the IP address of the computer you will share from. ئەو لێیەوە هاوبەش دەکەیت بدۆزەوە.
True — with ipconfig or Settings › Network & internet › Ethernet.ڕاستە — بە ipconfig یان Settings › Network & internet › Ethernet.
Double-click the folder, then choose Give access to.دوو کرتە لەسەر بکە، پاشان Give access to هەڵبژێرە.
False — double-clicking opens the folder; you need a right-click.هەڵەیە — دوو کرتە دەکاتەوە؛ کرتەی ڕاست پێویستە.
Add a user and change the permission level from Read to Read/Write if they must change files. زیاد بکە و ئاستی لە Read بۆ Read/Write بگۆڕە ئەگەر دەبێت بگۆڕێت.
True — but prefer a named user to Everyone.ڕاستە — بەڵام ناودار لە Everyone باشترە.
In the adapter properties choose Internet Protocol Version 6 to type the IPv4 address.لە Propertiesـی کارتەکە Internet Protocol Version 6 هەڵبژێرە بۆ نووسینی ناونیشانی IPv4.
False — IPv4 settings are under Internet Protocol Version 4 (TCP/IPv4).هەڵەیە — ڕێکخستنەکانی IPv4 لە ژێر Internet Protocol Version 4 (TCP/IPv4)ـدان.
In ncpa.cpl, right-click the Ethernet connection, then select Properties.لە ncpa.cpl کرتەی ڕاست لەسەر پەیوەندیی Ethernet بکە، پاشان Properties هەڵبژێرە.
True — the classic road to the TCP/IPv4 settings.ڕاستە — ڕێگا کۆنەکە بۆ ڕێکخستنەکانی TCP/IPv4.
To check the share from the other PC, open This PC › Local Disk (C:).بۆ پشکنینی لە ترەوە، This PC › Local Disk (C:) بکەرەوە.
False — look under Network or type \\SHILAN-PC\Lab.هەڵەیە — لە ژێر Network سەیر بکە یان \\SHILAN-PC\Lab بنووسە.
Open Command Prompt to run ipconfig and ping.Command Prompt بکەرەوە بۆ کارپێکردنی ipconfig و ping.
True — Steps 2, 4 and 5.ڕاستە — هەنگاوەکانی 2، 4 و 5.
ExerciseڕاهێنانSharing between Windows versionsهاوبەشکردن لە نێوان وەشانەکانی Windows
A classmate asks how to share files between (a) two Windows 11 PCs, (b) a Windows 11 PC and an old Windows 7 PC, and (c) a Windows 11 PC and a Windows XP PC. What do you tell them?
هاوپۆلێک دەپرسێت چۆن هاوبەش بکات لە نێوان (a) دوو Windows 11، (b) Windows 11 و کۆنی Windows 7، (c) Windows 11 و Windows XP. چی پێ دەڵێیت؟
Show answerوەڵامەکە پیشان بدە
(a) The steps of this lesson: same LAN, Private profile, discovery and file sharing on, Give access to a named user, open \\PC-name\share.
(b) The idea is the same since Windows Vista (sharing wizard, profile, permissions), and Windows 7 speaks SMB 2.1, so it can work — but Windows 7 has had no security updates since 2020. Copy the files off and retire or upgrade it.
(c) Windows XP speaks only SMBv1, which Windows 11 does not have. Do not turn SMBv1 back on: move the files with a USB stick instead, and keep XP off the network.
(a) هەنگاوەکانی ئەم وانەیە: هەمان ، پرۆفایلی Private، discovery و هاوبەشکردنی داگیرساو، Give access to بۆ ناودار، کردنەوەی \\PC-name\share.
(b) بیرۆکەکە لە Windows Vistaـوە هەمان شتە (یاریدەدەری هاوبەشکردن، پرۆفایل، )، Windows 7 بە SMB 2.1 قسە دەکات، بۆیە دەکرێت کار بکات — بەڵام Windows 7 لە 2020ـەوە هیچ وەرنەگرتووە. کۆپی بکە و ئامێرەکە لابە یان نوێی بکەرەوە.
(c) Windows XP تەنیا SMBv1 دەزانێت، کە Windows 11 نییەتی. SMBv1 دووپاتە دامەگیرسێنەوە: لەبری ئەوە بە فلاشێکی USB بگوازەرەوە و XP لە دوور بخەرەوە.
ExerciseڕاهێنانTroubleshoot the shareکێشەی فۆڵدەرە هاوبەشەکە چارەسەر بکە
Aram can ping 192.168.10.2, but \\SHILAN-PC\Lab gives “Windows cannot access \\SHILAN-PC\Lab”. List three things to check, in order.
: ئایا labuser لەسەر SHILAN-PC هەیە و ڕاستە؟ ئایا Read یان Changeـی لەسەر هاوبەشەکە و لە تابی Security هەیە؟
ExerciseڕاهێنانWhy will Remote Desktop not connect?بۆچی Remote Desktop پەیوەندی ناکات؟
Remote Desktop Connection from ARAM-PC says it “can’t connect to the remote computer”. SHILAN-PC runs Windows 11 Home and answers ping. What is wrong, and what are two possible fixes?
Remote Desktop Connection لە ARAM-PCـەوە دەڵێت «can’t connect to the remote computer». SHILAN-PC Windows 11 Homeـی لەسەرە و وەڵامی دەداتەوە. چی هەڵەیە و دوو چارەسەری ئەگەری چین؟
Show answerوەڵامەکە پیشان بدە
Windows 11 Home cannot be a Remote Desktop host, so there is nothing listening on port 3389. Fix: upgrade SHILAN-PC to Windows 11 Pro and turn Remote Desktop on — or make ARAM-PC (if it runs Pro) the host and connect the other way.
Exam sample: you are given the network 192.168.1.0/24 for the two lab PCs. Write an IPv4 address and a subnet mask for each PC, and the network address and broadcast address they share.
نموونەی تاقیکردنەوە: 192.168.1.0/24ت پێ دراوە بۆ دوو تاقیگەکە. بۆ هەر ناونیشانێکی IPv4 و بنووسە، هەروەها ئەو و هاوبەشیانە.
Show answerوەڵامەکە پیشان بدە
For example ARAM-PC 192.168.1.1 and SHILAN-PC 192.168.1.2, both with mask 255.255.255.0 (/24).
Network address 192.168.1.0 and broadcast address 192.168.1.255 — the same for both.
Any two different addresses from .1 to .254 are correct; .0 and .255 are not host addresses.
This lecture is a first edition. The Kurdish text and terminology are waiting for review by Kurdish IT teachers.ئەم وانەیە چاپی یەکەمە. دەقە کوردییەکە و زاراوەکانی چاوەڕێی پێداچوونەوەی مامۆستایانی کوردی بواری IT ن.